Instruction Book Instructions for installation and use
8 kg 0.05 ÷ 0.
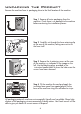
Unpacking the Product Remove the machine from its packaging close to the final location of the machine. Step 1. Remove all outer packaging from the machine. Check there is no damage to the machine before continuing the installation process. Step 2. Carefully cut through the hose-retaining clip at the rear of the machine, taking care not to cut the hose itself. Step 3. Remove the 4 retaining screws at the rear of the machine, as indicated in the image on the left.
Installation Before installing the machine, ensure that the mains plug and water supply valves are easily accessible from your chosen machine location. Make sure there is enough space for the machine. Select a space at least 600mm wide and 850mm high. Also leave enough space to open the door fully so you can load and unload it easily. Keep the area underneath and around the machine free of combustible materials such as lint, paper, rags, chemicals etc.
Water Supply This machine should only be connected to a cold-water supply. The cold-water pressure should be between 0.5 and 8 bar (0.05-0.8 Mpa). Do not connect the machine to a single outlet instantaneous water heater. Before connecting the fill hose, check that the water is running from the water supply tap to be used. Let the water flow from the tap until the water runs clear before connecting to the machine. The water supply tap should be accessible when the machine is installed.
Connecting the Cold Water Supply Only one hose is required to install this machine to a cold water supply. Cold fill is an energy efficient system. Only the water required to wash the laundry is heated. There is no loss of heat in the pipeline from the hot water tank or the boiler. If your previous machine installation was hot and cold fill ensure that the hot tap is firmly closed to prevent leakage.
Connecting the drainage pipe This machine must be connected in accordance with the water supply regulations. Water bylaws prohibit connection to a surface water drain. Decide which plumbing option suits you best then follow the instructions below: Option 1 - Waste pipe connection (waste trap) Fit the hooked end support to the outlet pipe and position it at least 800mm off the floor.
Levelling The Machine Your machine is heavy so care must be taken when moving it. We recommend that two people move the machine to avoid strain and possible injury. Take care not to damage flooring when moving the machine and do not drag or lift the machine by its door. When moving the machine to its final position, take care not to kink or damage the hose at the back of the machine. Once the machine is in place the feet should be adjusted to ensure that the machine is level.
Step 5. Switch off the machine at the end of the cycle by turning the Programme Selector to the OFF position. Step 6. Select the spin programme and press the Start Pause button to start the machine. If the machine takes longer than one minute to empty check the drain hose for kinks. Installation testing is now complete. Now you have successfully installed the machine we advise that you run the machine to ensure the drum is thoroughly clean after testing and storage.
Description of the Machine The Hoover washing machine details are indicated below: Control Panel Detergent Dispenser Door Handle Porthole Door Filter Adjustable Feet 15
The Control Panel Door Lock Indicator Programme Selector Spin Speed Selector Wash Time Selector Digital Display Sensitive Care Stain Blaster Temperature Start/Pause Selector Button Delay Start Easy Iron Turning the Machine On Turning the Programme Selector to your chosen programme will turn the machine on. The Programme Selector must be returned to the OFF position between each wash cycle in order to reset the controls.
Digital Display The easy-to-use Digital Display gives you total control of your wash cycle, whether it is adjusting the wash length using our Wash Time Selector, delaying the start of your wash, or adjusting the temperature and spin speed of your selected programme. The simplicity of the Digital Display understates the advanced technology, which clearly displays all the wash cycle information, putting you in control.
Spin Speed When a programme is selected the maximum spin speed allowed for that programme appears on the display. Pressing the Spin Speed button will reduce the speed by 100rpm each time the button is pressed. The minimum speed is 400rpm, or continuing to press the button will eliminate the final spin completely. Delay Start This indicator shows the number of hours time delay, once the delay start has been set.
Sensitive Care The Sensitive Care option washes your clothes in a deeper than normal water level to provide gentler washing for especially delicate fabrics, while detergent is removed thoroughly with five extra rinses. Perfect for people with delicate skin, this option can be selected on all Cotton and Synthetic cycles. This option does not need to be selected on the Delicate, Woollen or Silk programmes, as it is already an integrated part of the wash cycles.
Easy Iron This function is designed to reduce creasing of your clothes during your wash cycle, and is tailored to specific fabric types. This option is only available on Synthetics, Delicates, Woolmark and Silk programmes. Programme Easy Iron Function Action Required to Complete the Cycle Mixed & Synth’s The programme is completed by a short spin of very low speed. _ Delicate The machine stops in the final rinse stage and the option indicators blink.
Automatic Features KG Mode (Half Load) Available on the Cottons and Synthetics cycles, the intelligent sensor adjusts the water level and programme length throughout each phase of the cycle according to how much laundry you load into the machine. The KG Mode indicator will light up when the intelligent sensor is weighing the laundry. The washing machine is fitted with a self-adjusting water level system.
Programme Descriptions For handling the various types of fabric and their level of dirtiness in your laundry the washing machine has different programme groups according to type of wash, temperature, spin speed and duration (see Programme Guide). Once the programme is selected, the intelligent sensor will weigh the laundry using the KG Mode and adjust the critical elements of the wash cycle depending on the weight of the laundry to ensure perfect results (available on Cotton and Synthetic cycle).
Spin The Spin programme completes the spin at the maximum spin speed, this can be reduced by using the Spin Speed option button. Drain This programme drains out the water from the machine. Wool & Silk This programme allows a complete washing cycle for garments specified as “MachineWashable” Wool fabrics and laundry items made from silk or specified “Wash as Silk” on the fabric label.
Programme Programme Guide Guide Programme Programme Fabric Fabric Type Type Water Water Temp Temp Water Water Temp Temp Spin Spin Speed Speed Max Max Load Load Cottons, Cottons, Colourfast Colourfast and and linen linen 60 60 90 90 1600 1600 88 Cottons, Cottons, NonNonfast fast Coloureds, Coloureds, mixed mixed fabrics fabrics 40 40 60 60 1600 1600 88 Mixed Mixed fabrics fabrics and and synthetics synthetics 40 40 60 60 1000 1000 44 Delicate Delicate fabrics fabrics 40 40 40 40 400 4
Length of Programme 1) Detergent Short Med. Long 2 1:48 2:23 3:01 ✓ ✓ ✓ 2:14 2:49 3:27 ✓ ✓ - 1:22 1:52 2:02 ✓ ✓ - 1:08 - - ✓ ✓ - 0:24 - - - ✓ - 0:07 - - - - - 0:04 - - - - - 1:06 - - ✓ ✓ - 0:14 - - 0:30 - 0:44 ✓ ✓ ✓ ✓ ✓ ✓ - 0:59 - - ✓ ✓ - 1:39 2:04 2:30 ✓ ✓ - 1 1) For the programmes shown you can adjust the duration and intensity of the wash using the Wash Time button.
Refer to the programme guide (pag.24) ** STANDARD COTTON PROGRAMMES ACCORDING TO (EU) No 1015/2010 and No 1061/2010 COTTON PROGRAMME with a temperature of 60°C COTTON PROGRAMME with a temperature of 40°C These programmes are suitable to clean normally soiled cotton laundry and they are the most efficient programmes in terms of combined energy and water consumptions for washing cotton laundry.
● The level of dirtiness It is possible to reduce the amount of detergent used depending on how dirty the laundry is. Use less detergent for items that are not very dirty. ● Amount of laundry It is possible to reduce the amount of detergent when washing only a small amount of laundry. For smaller loads use less detergent. The dosages shown on the packaging of detergents for washing delicates often already refer to a reduced wash size. Always follow the dosage instructions on the detergent packaging.
Laundry Items to avoid We recommend that you do not wash underwired bras in the machine. Should the wires become detached they could cause damage to your clothes and the machine. If the wash care label states that the bra is machine washable then we advise placing it in a wash bag. Recommendations Always follow the wash care labelling on the garments. Fasten zips, tie strings and close press-studs to prevent tangling. Ensure that pockets are emptied of loose change and other small items.
Running a Wash Cycle This section summarises the main points when completing a wash cycle. For detailed explanations of features, options and details of the machine refer to the relevant section in the instruction manual. Preparing the laundry Select and sort the laundry according to the wash care labels found on each garment. Loading the laundry Open the door. Put the laundry in the washing machine.
the wash cycle, the KG Mode will weigh the clothes and update the wash time remaining on the display every five seconds until the weight has been determined. In some programs in the initial phase of the cycle there are planned spin sequences to ensure optimal wash results. Do not try to open the door when the door locked indicator is on, nor open the dispenser drawer during the wash programme.
Care and Maintenance The washing machine needs very little maintenance, but regular attention to a few small details will ensure the continued performance of your washing machine. Do not use abrasive cleaners, scouring pads, solvent-based cleaners or polishes; wiping the outside of the machine with a damp cloth will suffice. Cleaning the soap dispenser It is advisable to clean the compartments occasionally to remove detergents and additives. To do this you need to do the following: Step 1.
Step 4. Turn the filter anti-clockwise until it stops in the vertical position. Remove the filter and clean. Step 5. Replace the filter and turn in a clockwise direction until locked in position. Replace the stopper in the hose and close the filter cover. We recommend that the filter be cleaned frequently, at least once a month. Maintenance wash Using small quantities of detergent and low temperature wash programmes can cause the gradual build up of grease, dirt and scale.
Problem Solving Guide Defects you can remedy yourself Before calling Hoover Service for technical advice please run through the following checklist. A charge will be made if the machine is found to be working or has been installed incorrectly or used incorrectly. If the problem persists after completing the recommended checks, please call Hoover Service (tel: 08705 400 600); they may be able to assist you over the telephone.
Water on the floor around the washing machine... ● Is the fill hose tightened? If so, replace the rubber washers and re-tighten. Is the standpipe or the household drain blocked? If so, clear the blockage yourself or call a plumber. ● Is there clothing or dirt between the door gasket and the door glass? Ensure that the door glass and gasket are kept clean and free of laundry when loading the machine.
The door will not open… Has the programme finished? Is the END light illuminated? If not the programme is not complete. Has the door locked light gone out? If not wait a further two minutes and the light will go out and you will be able to open the door. ● Has the programme finished but the door remains locked? The display reads Error 2. Turn the machine to OFF to reset the machine and this will allow the door to open. ● ● If water remains in the drum refer to 'Water does not drain away…' above.
Power Failure If there is a power failure the wash cycle will be interrupted, and the wash programme and functions will be suspended. When the power is restored, the wash programme and functions will re-start from the same point and complete the programme. During a power failure the water can be drained and the load can be removed from the machine as follows: Step 1. Switch off the machine both via the programme dial and the mains power supply. Remove the plug from the mains power supply socket. Step 2.
After Sales Service Customer Service At Hoover, we aim to make appliances that are reliable and long lasting. However, should your appliance need to be serviced during its working life, no one is more qualified to maintain your appliance than our own Hoover Service engineers. To book a service call or to ask our customer service advisors for help on using your appliance, please call: 08444 995599 or contact us online www.hoover.co.
The guarantee excludes: Any faults which occur due to bad installation or misuse of the machine. Repair of, or interference with, the machine by any person not authorised by the manufacturer. ● Any parts which are fitted to the machine that are not original manufacturer’s parts. ● Non-domestic use of the machine. ● Operation at incorrect voltage. ● The result of using this machine for any purpose other than those described in the instruction book.
13.