Owner’s Manual Operating and Servicing Instructions Español - página E1 www.hoover.com IMPORTANT: READ CAREFULLY BEFORE ASSEMBLY AND USE. Questions or concerns? For assistance, please call Customer Service at 1-800-944-9200 Mon-Fri 8am-7pm EST. PLEASE DO NOT RETURN THIS PRODUCT TO THE STORE. THIS PRODUCT IS INTENDED FOR HOUSEHOLD USE ONLY. IF USED COMMERCIALLY WARRANTY IS VOID. ©2011 Techtronic Floor Care Technology Limited. All rights reserved.
Thank you for choosing a HOOVER® product. Please enter the complete model and Manufacturing Code in the spaces provided. 1-800-944-9200 Model MFG. CODE Hint: Attach your sales receipt to this owner’s manual. Verification of date of purchase may be required for warranty service of your HOOVER® product. Be sure to register your product online at Hoover.com or call 1-800-944-9200 to register by phone. Made in China Manufacturing code (Label located on bottom of cleaner) Contents Important Safeguards......
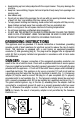
IMPORTANT SAFETY INSTRUCTIONS SAVE THESE INSTRUCTIONS When using an electrical appliance, basic precautions should always be followed, including the following: READ ALL INSTRUCTIONS BEFORE USING THIS APPLIANCE. WARNING: TO REDUCE THE RISK OF FIRE, ELECTRIC SHOCK OR INJURY: • To avoid internal component damage, use only Hoover® cleaning products intended for use with this Appliance. (See Cleaning Products section of this manual.) • Use only on surfaces moistened by the cleaning process or small spills.
• Avoid picking up hard, sharp objects with the carpet cleaner. They may damage the machine. • Keep hair, loose clothing, fingers, feet and all parts of body away from openings and moving parts. • Use indoors only. • Do not put any object into openings. Do not use with any opening blocked; keep free of dust, lint, hair, and anything that may reduce air flow. • To help prevent matting and resoiling, avoid contact with carpets until they are dry.
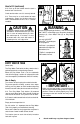
1. Cleaner ASSEMBLY Carton contents 1.1 Bare floor cleaner Carpet Upholstery Cleaner PreCleaner G C H D F I B E A F. Hose/Tool Caddy* G Hose H Stair/Upholstery Nozzle I. SpinScrub® Hand Tool* A. Cleaner B. Upper Handle C. Handle Bolts and Nuts (Three nuts may be in bag but only two or need for assembly. Bolts and nuts located in bag with hose) D. Hose/Cord Hook E. SpinScrub® Brush Assembly *Available on select models only.
Replace upper tank 1.6 Position bottom of tank onto cleaner. 1.6 1.7 1.8 1.10 1.11 1.7 Push top of tank and tank handle while supporting back of cleaner with other hand. 1.8 Push up on handle to latch it to cleaner. Check tank to make sure it is secure. Attach hose/cord hook 1.9 Snap hook onto cleaner. 1.9 Attach tool caddy (for storage on cleaner) (Available on select models only) C 1.10 Insert tabs. B 1.11 Slide caddy down. Notch (B) rests on hook (C).
2. HOW TO USE Cleaner Description 2.1 1 1. Hand Grip 2 3 2. SolutionTrigger: press to release 18 cleaning solution 4 3. ON/OFF Switch 4. Rinse Setting Switch 20 19 5 5. SpinScrub® Hand Tool* 6. Carry Handle 6 7. Clean Water Tank Handle 21 8. Clean Water Tank 7 9. Detergent Container 9 8 10. Dirty Water Tank Handle 11. Dirty Water Tank 10 12. Dirty Water Tank Latches 13. SpinScrub® Mode Selector 11 14. Solution Tube Connection Port 12 15.
SpinScrub® mode selector 2.6 Your SteamVac® cleaner has two agitator brush settings. SPILL PICK-UP - brushes OFF for picking up spills or cleaning carpets and hard floors when brushing is not desired. POWER SCRUB - brushes at maximum speed for cleaning carpets Slide setting selector to the desired setting before cleaning. The tanks: Clean Water Solution Tank 2.8 2.7 D (upper tank) C 2.
How to Fill (continued) 2.12 Push up on the handle once the tank is back to latch it to the unit. 2.12 2.13 Check tank to make sure it is securely latched. 2.13 There may be a small amount of water (indicated by arrows) on the base when the tank is removed from the unit. This is a normal condition. ! CAUTION ! Detergents contain Anionic and Nonionic Surfactants. Avoid contact with eyes and skin. In case of contact with eyes, flush with cold water for 15 minutes.
Automatic shut off When the Dirty Water Tank (lower tank) is full the automatic shut off mechanism will shut off the cleaner suction (suction will be noticeably reduced). 2.16 B 2.16 At that time, the yellow float disk will rise to the top of the Dirty Water Tank lid (B). The cleaner will no longer pick up dirty solution and the motor sound will become noticeably higher in pitch. When this happens, turn cleaner off and empty Dirty Water Tank before continuing use.
Cleaning Carpet 3.1/3.1a Read “Before You Begin Cleaning” instructions above. 3.2 AUTO RINSE WASH OFF Fill Clean Water Tank according to instructions for Figs. 2.9. Rinse ON Fill detergent container with Hoover® detergent according to instructions for Figs. 2.10 and 2.11. Select proper SpinScrub® mode (see pg. 8). Dry hands and plug cord into a properly grounded outlet. 3.2a Do not clean over floor electrical outlets. WASH 3.
Picking up spills Your HOOVER® SteamVac® cleaner may also be used to pick up small liquid spills on carpet or uholstery. cleaning solution can completely remove all spots, they can be treated by following the instructions provided by the manufacturer of the carpet, upholstery, or hard floor surface being cleaned. For best results, pick up spills immediately by placing the stair/upholstery nozzle just above the spill and suction up any residue on top of the carpet.
4. TOOLS Attach hose ! CAUTION 4.1 ! 4.2 A To reduce the risk of injury from moving parts, unplug cleaner. How to Attach 4.1 Open hose connection port (A). C B Insert short hose end, matching tabs on hose with same-sized slots in connection port. Push hose into port and lock in place. 4.2 Plug solution tube firmly into solution connection port (B). How to Remove 4.2 Squeeze latches (C) on top and bottom of hose. Remove hose from port. Close door. Remove solution tube from solution connection port.
How to Attach Tools ! CAUTION 4.6 G ! To reduce the risk of injury from moving parts, unplug cleaner. Place handle in upright position and remove hose from rack. H All tools attach to the hose in the same manner: 4.6 Connect tool to hose by sliding it onto connector until the tab (G) locks it securely. Using your thumb, push forward and up on the latch (H) to remove tool. After Using Tool 4.7 Drain suction hose by turning cleaner ON and holding nozzle up for several minutes. Do not press trigger.
Cleaning carpeted stairs 4.9 4.10 Read “Before You Begin Cleaning” instructions on page 10. A Attach hose and solution tube as instructed in Figs. 4.1 and 4.2. Place handle in upright position. Agitator brushes will not rotate while handle is in upright position. B Fill clean water tank according to instructions for Figs. 2.9 to 2.11. Position tool against the riser and slightly press it into carpet pile. Press the trigger and pull the tool slowly over the carpet (second wet stroke).
Cleaning upholstery 4.11 Read “Before You Begin Cleaning” instructions on page 10. 4.12 Be sure to check the cleaning code on your upholstery. Use your cleaner only on upholstery marked “W” or “W/S”. Attach hose and solution tube as instructed in Figs. 4.1 to 4.2. Place handle in upright position. Agitator brushes will not rotate while handle is in upright position. Make additional strokes without pressing the trigger to remove more moisture. Fill Clean Water Tank according to instructions for Figs.
5. MAINTENANCE Familiarize yourself with these home maintenance tasks as proper use and care of your cleaner will ensure continued cleaning effectiveness. Any other servicing should be done by an authorized service representative. nozzle: How to Clean ! CAUTION 5.2 5.1 If lint or other debris becomes lodged in nozzle, it can be removed for cleaning. ! B To reduce the risk of injury from moving parts, unplug cleaner before servicing. A Remove both tanks as described in Fig. 2.16.
valve: How to Unclog Remove Clean Water Tank. 5.5-5.6 Turn valve cap (A) counter clockwise and remove. 5.5 5.6 A 5.7 C A Soak valve cap in warm water for at least 15 minutes. Wipe cap dry. B 5.7 Align slots (B) on cap with tabs (C) in opening. Turn cap clockwise to tighten. Storage Lubrication Before storing: • Empty Clean Water Tank and let air dry. Replace on cleaner. • Empty Dirty Water Tank, rinse tank and lid thoroughly with clean water and let air dry.
6. TROUBLESHOOTING If a minor problem occurs, it usually can be solved quite easily when the cause is found by using the checklist below. Any other servicing should be done by an authorized service representative. ! WARNING ! To reduce risk of personal injury - unplug cleaner before servicing. PROBLEM POSSIBLE CAUSE POSSIBLE SOLUTION Cleaner won’t run. 1. Not firmly plugged in. Low suction. Clean water won’t dispense. 1. Plug unit in firmly. 2. No voltage in wall plug. 3.
7. Service To obtain approved Hoover® service and genuine Hoover® parts, locate the nearest Authorized Hoover® Warranty Service Dealer (Depot) by: • Checking the Yellow Pages under “Vacuum Cleaners” or “Household”. • Visit our website at hoover.com (U.S. Customers) or hoover.ca (Canadian customers). Follow the service center link to find the service outlet nearest you. • For an automated referral of authorized service outlet locations call 1-800-944-9200. Do not send your vacuum to Hoover®, Inc.
8. 7. CleaninG CLEANING produCts PRODUCTS WARNING: To reduce the risk of fire and electric shock due to internal component damage, use only Hoover® cleaning products and Hoover® hard surface attachments intended for use with the appliance as noted below.
9. WARRANTY Limited ONE Year Warranty (Domestic Use) WHAT THIS WARRANTY COVERS When used and maintained in normal household use and in accordance with the Owner’s Manual, your HOOVER® product is warranted against original defects in material and workmanship for a full one year from date of purchase (the “Warranty Period”). During the Warranty Period, Hoover® will provide labor and parts, at no cost to you, to correct any such defect in products purchased in the United States, U.S.
MANUAL DEL PROPIETARIO Instrucciones de Funcionamiento y Servicio www.hoover.com IMPORTANTE: LEA ATENTAMENTE ANTES DE ENSAMBLAR Y USAR. ¿Tiene alguna pregunta o inquietud? Para obtener asistencia, llame al Servicio de atención al cliente al 1-800 944 9200, de lunes a viernes, de 8 a.m. a 7 p.m., hora del ESTE. POR FAVOR, NO DEVUELVA ESTE PRODUCTO A LA TIENDA. ESTA ASPIRADORA PARA ALFOMBRAS ESTÁ DISEÑADA PARA USO DOMÉSTICO. EL USO COMERCIAL DE ESTE PRODUCTO ANULA LA GARANTÍA.
Gracias por haber elegido un producto HOOVER®. Anote los números completos de Código de fabricación en los espacios provistos. 1-800-944-9200 Modelo CÓDIGO DE FABRICACIÓN Consejo: Adjunte su recibo de compra a este Manual del propietario. Para obtener el servicio de garantía de su producto HOOVER® puede requerirse la verificación de la fecha de compra. Inscriba su producto en línea en Hoover.com, o llame al 1-800-944-9200 si prefiere hacerlo por teléfono.
¡SALVAGUARDIAS IMPORTANTES! ¡GUARDE ESTAS INSTRUCCIONES! Al usar un aparato eléctrico, observe siempre las precauciones básicas, incluyendo las siguientes: LEA TODAS LAS INSTRUCCIONES ANTES DE USAR ESTE APARATO ADVERTENCIA: PARA REDUCIR EL RIESGO DE INCENDIOS, CHOQUES ELÉCTRICOS O LESIONES: • Para evitar daños a los componentes internos, use únicamente productos de limpieza Hoover® diseñados para uso con este aparato. (Vea la sección Productos de limpieza de este manual).
• Para ayudar a reducir el tiempo de secado, asegúrese de que el área esté bien ventilada al usar detergentes y otros limpiadores con esta máquina. • Mantenga los detergentes y otros limpiadores fuera del alcance de los niños. • No use este aparato para aspirar líquidos inflamables o combustibles, como gasolina, ni lo use en áreas donde dichos líquidos pudieran estar presentes. • No aspire blanqueadores con cloro, limpiadores de drenaje, gasolina ni ningún otro material tóxico con este aparato.
1. ENSAMBLADO DE LA ASPIRADORA Contenido de la caja 1.1 Carpet Upholstery Cleaner Bare floor cleaner PreCleaner G C H D F I B E A F. Funda de manguera/accesorios* G. Manguera H. Boquilla para escaleras/tapizados I. SpinScrub® cepillos del accesorio* A. Aspiradora B. Mango superior C. Pernos y tuercas del mango (Puede haber tres tuercas en la bolsa, pero sólo se necesitan dos para el ensamblaje. Los pernos y las tuercas se encuentran en la bolsa con la manguera.) D. Gancho para manguera/cordón E.
Reemplace el tanque superior 1.6 Coloque la parte inferior del tanque sobre la limpiadora. 1.6 1.7 1.7 Empuje la parte superior del tanque y el mango del tanque mientras sujeta la parte posterior de la limpiadora con la otra mano. . 1.8 Empuje el mango hacia arriba una vez que el tanque esté colocado, para trabarlo a la limpiadora. Revise el tanque para asegurarse de que está bien trabado. Instale el gancho para la manguera/ cordón 1.9 Encaje el gancho en la limpiadora. 1.9 1.
2. FUNCIONAMIENTO Descripción de la aspiradora 1 Empuñadura del mango 2. Gatillo para la solución: presione para liberar la solución de limpieza 3. Interruptor para encender/apagar 4. Interruptor de posición Rinse (Enjuague) 5. Accesorio de mano SpinScrub®* 6. Mango de transporte 7. Mango del tanque de agua limpia 8. Tanque de agua limpia 9. Contenedor para detergente 10. Mango del tanque de recuperación 11. Tanque de recuperación: contiene la solución sucia 12. Trabas del tanque de recuperación 13.
Selector de modo SpinScrub® Su aspiradora Steam Vac™ tiene dos posiciones de cepillos del agitador. SPILL PICK-UP (ASPIRADO DE DERRAMES): Cepillos apagados para aspirar derrames o limpiar alfombras y suelos duros cuando no se requiere cepillado. POWER SCRUB (FREGADO POTENTE): Cepilla a velocidad máxima para limpiar alfombras. Deslice el selector de posiciones a la posición deseada antes de limpiar. 2.6 Los tanques: Tanque de agua limpia 2.7 2.8 E D (tanque superior) C 2.
Cómo llenar (continuado) 2.12 Empuje el mango hacia arriba una vez que el tanque esté colocado en la parte posterior de la unidad para trabarlo a ésta. 2.12 2.13 Revise el tanque para asegurarse de que esté bien trabado. 2.13 Es posible que haya una pequeña cantidad de agua (indicada con flechas) en la base cuando se retira el tanque de la unidad. Esto es normal. ! PRECAUCIÓN ! Los detergentes contienen surfactantes aniónicos y no iónicos. Evite el contacto con los ojos y la piel.
Apagado automático Cuando el tanque de recuperación (tanque inferior) está lleno, el mecanismo de apagado automático apaga la succión de la aspiradora (la succión se reduce de manera significativa). 2.16 B 2.16 En ese momento, el disco flotante amarillo se eleva a la parte superior de la tapa del tanque de recuperación (B). La aspiradora ya no aspira más solución sucia, y el sonido del motor se vuelve mucho más agudo.
Limpieza de alfombras 3.1/3.1a Lea las instrucciones “Antes de comenzar a limpiar”, que figuran arriba. 3.2 AUTO RINSE WASH OFF ON 3.2a Llene el tanque de agua limpia de acuerdo con las instrucciones que aparecen en la Fig. 2.9. Llene el contenedor para detergente con detergente Hoover® de acuerdo con las instrucciones de las Fig. 2.10 y 2.11. WASH WASH OFF Pise el pedal para soltar el mango y baje el mango a la posición de funcionamiento. 3.
Aspiración de derrames Su aparato SteamVac® de HOOVER® también puede usarse para recoger pequeños derrames de líquidos en moquetas y tapizados. Para obtener los mejores resultados, aspire los derrames inmediatamente colocando la boquilla para escaleras/tapizados justo por encima del derrame y succionando cualquier residuo que haya quedado sobre la alfombra.
4. accesorios Para conectar la manguera ! PRECAUCIÓN 4.1 ! 4.2 A Para reducir el riesgo de lesiones ocasionadas por piezas en movimiento, desenchufe la aspiradora. Cómo conectarlos C 4.1 Abra el orificio de conexión de la manguera (A). Introduzca el extremo corto de la manguera y haga coincidir las lengüetas de la manguera con las ranuras del mismo tamaño en el orificio de conexión. Empuje la manguera en el orificio y fíjela en su lugar. 4.
Cómo conectar los accesorios ! PRECAUCIÓN 4.6 G ! Para reducir el riesgo de lesiones ocasionadas por piezas en movimiento, desenchufe la aspiradora. Coloque el mango en posición vertical y retire la manguera del soporte. H Todos los accesorios deben conectarse a la manguera de la misma manera. Conecte el accesorio a la manguera deslizándolo sobre el conector hasta que la lengüeta (G) lo trabe con seguridad.
Limpieza de escaleras alfombradas Lea las instrucciones “Antes de comenzar a limpiar” que se encuentran en la página 10. 4.9 4.10 Conecte la manguera y el tubo de solución como se indica en las Fig. 4.1 y 4.2. A Coloque el mango en posición vertical. Los cepillos del agitador no giran mientras el mango se encuentra en posición vertical. Llene el tanque de agua limpia de acuerdo con las instrucciones que aparecen desde la Fig. 2.9 hasta la 2.11.
Limpieza de tapizados 4.11 Lea las instrucciones “Antes de comenzar a limpiar” que se encuentran en la página 13. 4.12 Asegúrese de consultar el código de limpieza en su tapizado. Use su aspiradora sólo en tapizados marcados con “W” o “W/S”. Conecte la manguera y el tubo de solución como se indica desde la Fig. 4.1 hasta la 4.2 Coloque el mango en posición vertical. Los cepillos del agitador no giran mientras el mango se encuentra en posición vertical.
5. MANTENIMIENTO Familiarícese con estas tareas de mantenimiento en el hogar, ya que el uso y cuidado apropiados de su aspiradora asegurarán una limpieza continuamente eficaz. Cualquier otra tarea de mantenimiento debe ser realizada por un representante de mantenimiento autorizado. boquilla: Cuándo limpiarlo ! PRECAUCIÓN 5.2 5.1 Si se depositan pelusas o cualquier otro residuo en la boquilla, puede retirarla y limpiarla.
válvula: Cómo desatascar Retire el tanque de agua limpia. 5.5 5.5-5.6 Gire la tapa de la válvula (A) en sentido antihorario y retírela. 5.6 A 5.7 C A Ponga en remojo la tapa de la válvula en agua tibia durante, al menos, 15 minutos. Seque la tapa con un paño. B 5.7 Alinee las ranuras (B) de la tapa con las lengüetas (C) de la abertura. Gire la tapa en sentido horario para ajustarla. Almacenamiento Lubricación Antes de guardarlo: • Vacíe el tanque de agua limpia y deje secar al aire.
6. Solución de problemas Si ocurre un problema menor, generalmente puede resolverse con bastante facilidad cuando se halla la causa, usando esta lista de verificación. Cualquier otra tarea de mantenimiento debe ser realizada por un representante de mantenimiento autorizado. ! ADVERTENCIA ! Para reducir el riesgo de lesiones ocasionadas por piezas en movimiento, desenchufe la aspiradora antes de realizar el mantenimiento. Problema Causa posible Causa posible La limpiadora no funciona. 1.
Recordatorios útiles ! PRECAUCIÓN 6.1 A 6.2 ! Desenchufe la aspiradora antes de hacer lo siguiente. • Use detergentes de marca HOOVER®, otros pueden producir demasiada espuma o causar fugas. B • Use pasadas adicionales en seco para que la al fombra se seque más rápidamente. • 6.1 Llene el tanque (A) SOLAMENTE con agua caliente (menos de 60˚C/ 140˚F)de grifo. No coloque ningún detergente en el tanque de agua. Llene el recipiente para el detergente (B) con detergente de HOOVER®. • 6.
8. 7. produCtos PRODUCTOS de DE liMpieza LIMPIEZA ADVERTENCIA: Para reducir el riesgo de incendio y descarga eléctrica debido a daños de los componentes internos, use únicamente productos de limpieza de Hoover® y accesorios para suelos duros diseñados para uso con este aparato (véase abajo).
9. Garantía Garantía limitada de un año (Para uso doméstico) QUÉ CUBRE ESTA GARANTÍA Siempre que el uso y el mantenimiento de su producto HOOVER® se realicen en condiciones de uso doméstico normales y según el Manual del usuario, el producto estará garantizado contra defectos originales en el material y la fabricación durante de un año completos desde la fecha de compra (el “Período de Garantía”).
Guide d’utilisation Instructions d’utilisation et d’entretien www.hoover.com IMPORTANT : LIRE CES INSTRUCTIONS ATTENTIVEMENT AVANT D’UTILISER L’ASPIRATEUR. Vous avez des questions ou des inquiétudes? Veuillez appeler le service à la clientèle au 1 800 9449200 du lundi au vendredi, de 8 h à 19 h (HNE). VEUILLEZ NE PAS RETOURNER CE PRODUIT AU MAGASIN. L’UTILISATION DE CE PRODUIT À DES FINS COMMERCIALES INVALIDE LA PRÉSENTE GARANTIE. ©2011 Techtronic Floor Care Technology Limited. Tous droits réservés.
Merci d’avoir choisi un produit HOOVERMD. Veuillez inscrire les numéros de modèle et de série COMPLETS dans les espaces fournis à cet effet 1-800-944-9200 Modèle Code de fabrication Conseil: Il est recommandé de joindre votre reçu de caisse au guide de l’utilisateur, car une vérification de la date d’achat peut être effectuée avant toute réparation couverte par la garantie de votre produit HOOVERMD. N’oubliez pas d’enregistrer votre produit en ligne, à l’adresse Hoover.
CONSIGNES DE SÉCURITÉ IMPORTANTES RANGER ET CONSERVER CES INSTRUCTIONS Durant l’utilisation d’un appareil électrique, toujours respecter les précautions élémentaires, y compris les suivantes : LIRE TOUTES LES INSTRUCTIONS AVANT D’UTILISER CET APPAREIL. AVERTISSEMENT: Afin de réduire au minimum les risques d’incendie, de choc électrique ou de blessures : • Pour éviter d’endommager les composants internes, n’utiliser que des produits nettoyants de HooverMD conçus pour être utilisés avec cet appareil.
• Ne pas ramasser de liquides inflammables ou combustibles comme de l’essence, et ne pas utiliser l’appareil dans des endroits où de telles matières sont présentes. • Ne pas ramasser de produit à blanchir au chlore, de produit de débouchage, d’essence ou tout autre matériau toxique avec cet appareil. • Ne pas utiliser la shampouineuse pour ramasser toute matière qui dégage de la fumée ou qui brûle, comme des cigarettes, des allumettes ou des cendres encore chaudes.
1. Ensamblado de la aspiradoraN Contenu de l’emballage 1.1 Bare floor cleaner Carpet Upholstery Cleaner PreCleaner G C H D F I B E A F. Porte tuyau/porte accessoires* G. Tuyau H. Buse pour escaliers/meubles I. Accessoire portatif SpinScrub®* A. Aspirateur B. Poignée supérieure C. Boulons et écrous pour le manche (trois écrous peuvent être fournis dans le sac, mais seulement deux sont nécessaires pour l’assemblage. Les boulons et les écrous sont dans le sac avec le tuyau.) D.
Replacer le réservoir supérieur 1.6 Placer le du réservoir l’aspirateur. bas sur 1.6 1.7 1.7 Pousser sur le haut du réservoir et sur sa poignée tout en soutenant l’arrière de l’aspirateur avec l’autre main. 1.8 Pousser la poignée vers le haut pour l’enclencher en place sur l’aspirateur. S’assurer que le réservoir est solidement fixé en place. Fixer le crochet pour tuyau/ cordon. 1.9 Enclencher le crochet en place sur l’aspirateur. 1.9 1.8 Fixer le porte accessoires 1.
2. Utilisation Description de l’aspirateur 2.1 1. Poignée 2. Gâchette pour l’application de solution : appuyer sur la gâchette pour vaporiser la solution nettoyante 3. Interrupteur ON/OFF (marche/arrêt) 4. Commutateur du mode de rinçage 5. Accessoire portatif SpinScrub®* 6. Poignée de transport 7. Poignée du réservoir d’eau 8. Réservoir d’eau 9. Contenant de détergent 10. Poignée du réservoir de récupération 11. Réservoir de récupération : contient la solution souillée 12.
Sélecteur de mode SpinScrub® 2.6 Votre aspirateur SteamVacMC comporte deux réglages de vitesse pour le rouleau brosse agitateur. SPILL PICK UP (ramassage de liquides renversés) – mode sous lequel les brosses sont désactivées (OFF) pour le ramassage de liquides renversés ou le nettoyage de moquettes ou de planchers durs sans l’utilisation des brosses. POWER SCRUB (récurage à haute puissance) – les brosses tournent à la vitesse maximale pour le nettoyage de moquettes.
Remplissage (continu) 2.12 2.12 Pousser la poignée vers le haut pour l’enclencher en place sur l’aspirateur. 2.13 S’assurer que le réservoir est solidement fixé en place. 2.13 Il est possible qu’il y ait une petite quantité d’eau (indiquée par des flèches) sur la base quand vous retirez le réservoir de l’appareil. Cela est normal. ! MISE EN GARDE ! Les détergents contiennent des surfactants anioniques et non ioniques. Éviter tout contact avec les yeux et la peau.
Fonction d’arrêt automatique Quand le réservoir de récupération (réservoir inférieur) est plein, le mécanisme d’arrêt automatique arrête l’action de succion de l’aspirateur (la succion sera considérablement réduite). 2.16 B 2.17 À ce moment, le disque flottant jaune remontera jusqu’au couvercle du réservoir de récupération (B). L’aspirateur ne ramassera plus le liquide et le moteur émettra un son nettement plus aigu.
Nettoyage de moquettes 3.1/3.1a Lire les instructions de la section « Avant de commencer le nettoyage » ci-dessus. 3.2 AUTO RINSE WASH OFF Rinse Pour les moquettes et les tapis, fixer le module de brosses doté de poils verts courts. (Voir les instructions portant sur le retrait et la fixation des brosses dans la section « Entretien ».) Ne pas utiliser le module de brosses pour planchers durs pour le nettoyage de moquettes. ON 3.
Ramassage de liquides renversés S’il reste une tache, la buse pour escaliers/meubles est généralement plus efficace pour l’éliminer. Bien qu’aucune solution nettoyante ne puisse enlever complètement toutes les taches, celles ci peuvent être traitées en suivant les consignes fournies par le fabricant de la moquette, du meuble ou du plancher dur à nettoyer. L’appareil SteamVacMD de HooverMD peut également servir à ramasser de petits dégâts liquides sur une moquette ou du tissu d’ameublement.
4. accessoires Fixation du tuyau ! MISE EN GARDE 4.1 ! 4.2 A Pour réduire les risques de blessures causées par des pièces en mouvement, débrancher l’appareil avant d’en effectuer l’entretien. Fixation C 4.1 Ouvrir le port de raccord du tuyau (A). Insérer l’extrémité courte du tuyau dans le port, en alignant les languettes du tuyau avec les fentes de même taille. B Retrait 4.2 Serrer les languettes de fixation (C) sur le dessus et le dessous du tuyau. Retirer le tuyau du port. Fermer le couvercle.
Fixation des accessoires ! MISE EN GARDE 4.6 G ! Pour réduire les risques de blessures causées par des pièces en mouvement, débrancher l’appareil avant d’en effectuer l’entretien. Mettre le manche en position verticale, puis retirer le tuyau du support. H Tous les accessoires se fixent au tuyau de la même façon : 4.6 Fixer l’accessoire au tuyau en le faisant glisser sur le connecteur jusqu’à ce que la languette (G) le maintienne solidement en place.
Nettoyage d’escaliers recouverts de moquette Lire les instructions de la section « Avant de commencer le nettoyage » à la page 10. 4.9 4.10 Fixer le tuyau et le tube de solution comme l’indiquent les figures 4.1 et 4.2. A Mettre le manche en position verticale. Le rouleau brosse agitateur ne tournera pas tant que le manche sera en position verticale. Remplir le réservoir d’eau en suivant les instructions des figures 2.9 à 2.11.
Nettoyage de meubles 4.11 Lire les instructions de la section « Avant de commencer le nettoyage » à la page 10. 4.12 S’assurer de vérifier le code de nettoyage figurant sur le tissu qui recouvre vos meubles. N’utiliser l’aspirateur qu’avec des tissus portant le code « W » ou « W/S ». Fixer le tuyau et le tube de solution comme l’indiquent les figures 4.1 et 4.2. Mettre le manche en position verticale. Le rouleau brosse agitateur ne tournera pas tant que le manche sera en position verticale.
5. Entretien Il est recommandé de vous familiariser avec les tâches d’entretien; l’utilisation et l’entretien appropriés de l’appareil assureront son bon fonctionnement. Toute autre tâche d’entretien doit être confiée à un représentant de service autorisé. la buse : Quand le nettoyer 5.2 5.1 Si des peluches ou d’autres débris s’accumulent dans la buse, ils peuvent être retirés pour le nettoyage.
valve: Déblocage Retirer d’eau. le réservoir 5.5-5.6 Tourner le bouchon de la valve (A) dans le sens antihoraire et le retirer. Faire tremper le bouchon dans de l’eau tiède pendant au moins 15 minutes. Essuyer ensuite le bouchon. 5.5 5.6 A 5.7 C A B 5.7 Aligner les fentes (B) du bouchon avec les languettes (C) dans l’ouverture. Tourner le bouchon dans le sens horaire pour le resserrer. Rangement Lubrification Avant de ranger l’appareil : • Vider le réservoir d’eau et le laisser sécher à l’air.
6. DÉPANNAGE Si un problème mineur survient, il est habituellement possible de le résoudre facilement si la cause est déterminée à l’aide de la liste ci dessous. Toute autre tâche d’entretien doit être confiée à un représentant de service autorisé. ! AVERTISSEMENT ! Pour réduire les risques de blessures causées par des pièces en mouvement, débrancher l’appareil avant d’en effectuer l’entretien. PROBLÈME CAUSE POSSIBLE SOLUTION POSSIBLE L’aspirateur ne démarre pas. 1.
Aide-mémoire pratique ! MISE EN GARDE 6.1 A 6.2 ! Débrancher l’appareil avant d’effectuer l’une ou l’autre des actions suivantes. • N’utiliserquelesdétergentsdemarqueHOOVERMD; les détergents d’autres marques peuvent mouss er trop ou causer des fuites. B • Passer l’aspirateur en mode extra sec pour ac célérer le séchage de la moquette. • 6.1 Remplir le réservoir (A) avec de l’eau chaude (moins de 140 ˚F/60 ˚C) du robinet SEULEMENT. Ne pas mettre de détergent dans le réservoir d’eau.
8. 7. produits PRODUITS nettoYants NETTOYANTS AVERTISSEMENT : Pour réduire les risques de choc électrique causés par des composants internes endommagés, n’utiliser que les produits nettoyants HooverMD et les accessoires pour les surfaces dures conçus pour cet appareil, tel qu’il est indiqué cidessous.
9. Garantie Garantie limitée de un an (Usage domestique) La présente garantie ne couvre pas le ramassage, la livraison, le transport ou la réparation à domicile du produit. Cette garantie ne s’applique pas aux produits achetés : hors des États-Unis (ce qui comprend ses territoires et possessions); hors du Programme d’échanges militaires américain; hors du Canada. Cette garantie ne couvre pas les produits achetés chez un tiers autre qu’un détaillant, marchand ou distributeur autorisé de produits HooverMD.