OWNER’S MANUAL Operating and Servicing Instructions Espalier patina E1 www.hoover.com Fiooriate™ SpinScrub® Hard Floor Cleaner IMPORTANT: READ CAREFULLY BEFORE ASSEMBLY AND USE. Questions or concerns? For assistance, please call Customer Service at 1-800-844-9208 Mon-Fri am-Tpm EST before resuming this product to the stare. THIS PRODUCT IS INTENDED FOR HOUSEHOLD USE ONLY. IF USED COMMERCIALLY WARRANTY IS VOID. ©2008 Technician Floor Care Technology Limited.
Thank you for choosing a HOOVER® product Please enter the complete model and Manufacturing Code in the spaces provided. MODEL eee Tisha tr Lae Ichthyology Lind RR CLARE BAA woamapkizuss YOUR MFG, CODE Hint: Attach your sales receipt to this owner's manual. Verification of date of purchase may be required for warranty service of your HOOVER® product MANUFACTURING CODE Be sure to register your product online at Hoover.
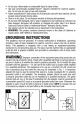
IMPORTANT SAFETY INSTRUCTIONS SAVE THESE INSTRUCTIONS When using an electrical appliance, basic precautions should always be followed, including the following: READ ALL INSTRUCTIONS BEFORE USING THIS APPLIANCE. WARNING: TO REDUCE THE RISK OF FIRE, ELECTRIC SHOCK OR INJURY: Use indoors ably. * Use only on surfaces moistened by the cleaning process or small spills. Do not immerse product. » For use on bare floors or sealed wood floors. NOT for use on carpets.
+ Do not use a flammable or combustible liquid to clean a floor. = Use only commercially available Hoover® cleaners intended for machine application. Do not use any type of wax with extractor. «Follow manufacturer's instructions for all chemicals used with this machine. Do net exceed recommended mixing ratios. = Store in a dry place. Do not expose machine to freezing temperatures, * Do not use with damaged cord or plug.
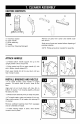
PRY aA CARTON CONTENTS A. Hard floor cleaner 8. Upper handle ©. Brush assembly 0. Nozzle E. Hard Floor Cleaning Detergent Remove all parts from carton and gently each tier show, take sure afl parts are located before disposing of packing materials. NOTE: Phillips screwdriver needed for assembly. ATTACH HANDLE 1.2 Rotate bottom handle support (A) up to the upright position until a snap fs felt. 1.3 Align control rad (B) on upper handle (C) with slot in bottom handle support (D).
UNFOLD HANDLE 1.8 Raise upper handle (A) to upright position uti it locks in place. PAL RT CLEANER DESCRIPTION Soft Hand Grip 2 ON/OFF Switch 3. Solution Trigger: squeezes to release cleaning solution 4. Mode Selector Dial: tums brushes ON for wet washing and OFF far drying and vacuuming 5.
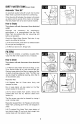
TRANSPORTING 24. To move your cleaner from rem fo room, put handle in upright position, 8 cleaner back on rear wheels and push forward. 25 Tha financier may also be sifted using the caning handier (A) on the front of the cleanse. MODE SELECTOR DIAL 2.6 The Mode selector dial (A) tums tha brushes on and of. 27 For dry debris pickup. tum the dial fo the VACUUM position. In this position, the brushes will not rotate and are raised off the floor surface. To wet clean with brushes turned ON.
THE TANKS: CLEAN WATER SOLUTION TANK {upper tariff) Tum cleaner off and disconnect from electrical outlet, The Clean Water Solution Tank holds detergent and wale that is o be dispersed onto the surface being cleaned. How fo Fill Place carpet cleaner handle in the upright, locked position. 2.8 To remove tank, sourness release button and full tank straight out. Carry tank to a sink. 24 Rotate tank cap counterclockwise and ift op to remove cap (A) 2.10 Tum cap (B) upside down fo serve as a measuring cup.
DIRTY WATER TANK goer tan Automatic “Shut Off” An automatic suction shut-off is bulk into the Dirty Water Tank to prevent the tank from overflowing. When the shut-off activates, the cleaner wil riot pick up debris and the sound of the mortar will change. The Dirty Water Tank is full and must be emptied. How to Empty “Turn cleaner off and disconnect from electrical outlet, Although not necessary for satisfactory performance.
EN UAT EAN RECOMMENDED CLEANING SEQUENCE Use your HOOVER? FloortMate™ SpinScrub® Cleaner to: + VACUUM: Vacuum to remove loose dit, hair and delis. + WASH: Clean the floor surface. The brushes will provide light agitation to help loosen dirt. DRY: Pickup reduces drying time of the floor surface The Mode selector dial turns the brushes on and off. 3.4 For dry debris pickup, tur the dial to the VACUUM position. In this position, the brushes will not rotate and ave raised off the floor surface.
PICKING UP SPILLS Your cleaner may also be used to pick up small liquid spills (1 quart or less. never to exceed 14 inch in depth) on nor-carpeted floors. Tum Mode selector dial to the WASH position and release the rigger. Continue ta move cleaner over the area to pick up the spl. A CAUTION A Do nat use the cleaner to pick up flammable or combustible liquids or chemicals. Do not use the cleaner to pick up detergents that contain solvent based ingredients.
BRUSHES: How to Change and Clean The brush assembly can be removed for easy cleaning A CAUTION A To reduce the risk of injury from moving parts, unplug cleaner before servicing. How fo Remove Claps handle in the upright position. Remove tanks to prevent leaking. Set aside 46 Pull the two nozzle release buttons (A) out. Remove nozzle. Tit cleaner back so handle rests on oar, 4.7 Push two brush release buttons (8) and remove the brush assembly. The brushes can be washed with a mild detergent and rinsed.
5. TROUBLESHOOTING if 8 minor problem occurs, it usually can be solved quite easily when the cause is found by using the checklist below. Any other servicing should be done by an authorized service representative A WARNING A Tu seduce risk of personal injury unplug cleaner before servicing PROBLEM POSSIBLE CAUSE POSSIBLE SOLUTION Cleaner won't un i Bower cord ot Sol plied nto Butler 2. Blown fuse or tipped breaker. 1 Pig nit i fii 2. Check fuse or breaker in home. Replace resentful breaker in ahem.
Ta obtain approved Hoover” service and genuine Hoover® parts, educate the nearest Authorized Hoover Warranty Service Dealer (Depot) by: + Checking the Yellow Pages Under “Vacuum Cleaners” of “Hotshot” + Visit our website af hoover com (LL8. Customers) or hoover ea (Canadian customers) Folio the service center ink to find the service outset nearest you, + For an automated referral of authorized service outlet locations call 1-800-044-4200.
par y Teg ty WARNING: To recurs the risk of fire and dyslectic shock due 10 internal component damage, use only Hoover® cleaning products ard Hoover* hard surface attachments intended for use with the appliance as Noted below.
8. WARRANTY LIMITED ONE YEAR WARRANTY {Domestic Use) WHAT THIS WARRANTY COVERS Her used and maintained in normal household use and in accordance with the Cranmer's Anus. your HOOVER" product is warranted against original defects in material and workmanship for a ful one year from date of purchase (the "Warranty Period). During the Warranty Period. Hoover? will provide labor and parts. at no cost ta you, to cataract any such defect in products purchased in the United States, U.S.
MANUAL DEL PROPIETARIO Instrucciones de Funcionamiento y Servicio Figoriate™ SpinScruty® Heard Loor Anclear www. conmover IMPORTANTE: LEA ATENTAMENTE ANTES DE ENSAMBLAR Y USAR. Tienes alguna pregunta o inquietud? Para obtener asistencia, llame al Servicio de atención al cliente al 18009445200, de lunes a viernes, hora del ESTE. antes de devolver este productos a fa tienda. ESTA ASPIRADORA PARA ALFOMBRAS ESTA DISONADA PARA USO DOMESTICO. EL USO COMERCIAL DE ESTE PRODUCTO ANULA LA GARANTÍA.
Gracias por haber elegido un producto HOOVER®. Este lus números completas de Bodigo de fabricas ion en los espacios provistos. Consejo: Adjunte su recibo de compra a este Manual del propietario. Para obtener el servicio de garantía de su grt] MODELO ABI CUM AHATTIRASPRISN maneonzignoons XOOCKKK COLIGO DE FABRICACIÓN traducirte HOVERO puse varraquera la verificación de a | código DE FABRICANTE ’ ducha de compra inscriba su producto en linea en Homocerca.
salvaguardias IMPORTANTES! guarde ESTAS INSTRUCCIONES! Al usar bh aparato eléctrico, observe siempre las precauciones básicas, incluyendo las siguientes: LEA TODAS LAS INSTRUCCIONES ANTES DE USAR ESTE APARATO ADVERTENCIA: PARA REDUCIR EL RIESGO DE INCENDIOS, CHOQUES ELÉCTRICOS 0 LESIONES: o Úsela solo en of interior. « Úsela solamente en superficies humedecidas por ef proceso de limpieza o para derrames pequeñitos. No la sumerja. «Para usarse en pisos expuestas 0 pisos de madera sellados.
+ Mantenga los deferentes y foros limpiadores fuera del alcance de los nis. * Ola use para recoger falle, liquides para destupir, gasolina ni ningún otro material toxico. » Cuando use substancias químicas recomendadas con esta maquina, cerciórese de que el rea esté bien ventilada. «No use guidos inflamables ni combustibles para limpiar suelos. «Use Unicamente limpiadores y ceras para suelos comercialmente disponibles diseñados para aplicación en la maquina.
1. ENSAMBLADO DE LA ASPIRADOR CONTENIDO DE LA CAJA A Limpiadora para pisos de superficie dura B. Mango superior ©. Conjunto de escobillas D. Boca E Concentrado de piezas para pisos Retire todas las piezas de la caja identifique cada articulo que $8 Mustia, Giraseis de ubicar todas las piezas antes de eliminar el embalsame. NOTA: Se necesita un destornillador Chillidos para el ensamblado ENSAMBLE EL MANGO 1.
LOS TANQUES: | TANQUE PARA LA SOLUCIÓN {superior} Desconecta la limpiadora de la toma de corriente fotométrica £1 cante para ta solución guarda el detergentes y «l agua que se va a disperse en la superficie que se va a limpiar Cama llenarle Coloquio ¢f mango de ta limpiadora en ia posición vertical para que quede trabado. 28 Para sacar el tange, apriete ef botón para soltar y saque of tanque directamente hacia guara.
EL TANQUE DE RECUPERACIÓN Apagado automático El tanque de recuperad ion cuenta con un apagada automatismo de la succión para evitar que el naque se desborde. Cunada ¢f apagado se active. la limpiadora ro recoger los residuos y ef sonido del motee cambiar. Ef tangue de recuperativo bastarda lena y $6 deber vaciar, Como vaciarlo Apague la limpiadora y desconéctela de Ia toma de corriente eléctrica.
PARA RECOGER DERRAMES Su limpiadora también se puede usar para recoger obsequios da mames de liquidas (0.8 L [1 cuarto de alón] o menos, nunca debe exceder Sm [1/4 de pulgada) de profundidad) en pisos sin alfombras. Gira af selector de modo a la posición FLASH y suelte of gato. Siga moviendo la limpiadora sobre
8. GARANTÍA GARANTÍA LIMITADA DE UN ARO {Para uso doméstico) QUE CUBRE ESTA GARANTÍA Siempre que of usa ¥ of mantenimiento de su producto HOVERO? se relucen en condiciones de uso domestico normales y según ef Manual del usuario, el producto estad garantizada contra doctos originales en of material y ka fabricación durante de un afta completos desde la fecha de compra {ef “Periodo de Garantieran. Durante of Periodo de Garantía, Hoover® Je proporcionar gratuitamente.
GUIDE D'UTILISATION Instructions d utilisation et d'entretien FloorMate™ SpinScrut® Hard Flood Clean walk-over com IMPORTANT : LIRE CES INSTRUCTIONS ATTENTIVEMENT AVANT D’UTILISER L'ASPIRATEUR. Vous avez des questions au des inquiétudes? Pour abstenir de Aide et avant de retourner ce produit au magasin. veuillez appeler le service & la clientèle au 1 800 9449200 du land au vendredi, (HNE) L'UTILISATION DE CE PRODUIT A DES FINS COMMERCIALES INVALIDE LA PRESSENTE GARANTIE.
CONSIGNES DE SÉCURITÉ IMPORTANTES RANGER ET CONSERVER CES INSTRUCTIONS Durant |'utilisation d’un appareil électrique, toujours respecter les précautions Élémentaires, y compris les suivantes : LIRE TOUTES LES INSTRUCTIONS AVANT D’UTILISER GET APPAREIL. AVERTISSEMENT: AFIN DE RÉDUIRE AU MINIMUM LES RISQUES D’INCENDIE, DE CHOC électrique OU DE BLESSURES : » Utiliser qua l’intérieur. » Utiliser que sur des surfaces déjà rendues humides par le procédé de nettoyage ou sur de petites quantités de pa renversé.
* Garder les détergents et autres produits nettoyants hors de la portée des enfants. « Ne pas utiliser cet appareil pour ramasser des produits de blanchiment au chicore, des nettoyants de tuyaux roucoulement, de Essence au toute autre matière toxique. * Durant Fiscalisation de produits chimiques recommandés pour cet appareil, s'assurer que la zone de travail est bien aérée.
DÉPLOYER LE MANCHE 1.8 Soulever la partie supérieure du manche (A) 4& la position vertu cale majuscule ce cit se serratule en opiace. PA RETENDRE DESCRIPTION DE L'ASPIRATEUR Poignée-confort interrupteur Marche/Arrét Tchatte application dé solution appuyer sur ka sachets pour libérer de ta solution de nettoyage. Cadran sélecteur : active les brosses pour le nettoyage humide sites désactive pour le ramassage de liquide ete ramassage & sec. Capushon/dosews du réservoir & solution propre.
LES reversoirs : RÉSERVOIR A SOLUTION (supérieur) Couper Alimentation électrique de Appareil {position OFF) et ie débrancher, Le réservoir 4 solution contient fe détergent et les qui seront appliqués sur la surface a nettoyer. Remplissage du réservoir Placer le manche de l'appareil & Ja verticale, en position verrou liée.
LE RÉSERVOIR DE recarburation André automatique Le réservoir de recarburation est muni dun mécanisme d ard somatostatine de la succion pow éviter qu'il ne déborde. Lorsque [mate de succion se produit, Appareil cesse perspicace les débous et Je build du moteur change. Le réservoir de récupération est plein ot dot ire vide Vidage Couper Alimentation électrique de Appareil {position OFF) et le débrancher. Bien que ce ne soit pas absolument nécessaire.
RAL SÉQUENCE DE NETTOYAGE RECOMMANDÉE Utiliser aspirateur Fioorhiate™® Spin Scrub” de HOVERBOARD pour © + VACUUM : Le ramassage d sec de la saleté, des cheveux et autres débris. *RASH : Le nettoyage humide du plancher. Les brosses s’agitent généralement ef aident 4 dégager les saletés. + DRY : Le ramassage do liquides, oui réduis le temps de séchage de la surface du plancher. Le cadran sélecteur active et désactive les brosses. 3.1 Pour ramasser des débris sacs. router le cadran 2 fa position VACUUM.
RAMASSAGE DE LIQUIDES RENVERSES Votre aspirateur peut également ramasser de petites quantités da liquides renversés (1 livre! pinte ou moins, sans jamais dépasser 6 po de profondeur) sir les sols nos. Tomer fe cadran sélecteur a la positon de ramassage de liquide (WET PICK-UP) et relâcher la sachets. Continuer a parsas Aspirateur sur la mémé section pour ramasser le liquide A MISE EN GARDE A Na pas coulisser Aspirateur pour ramasser des lipides inflammables ou combustibles ou des produits chimiques.
BROSSES: Changement et nettoyage Ensemble des brosses peut être enlevé pour en faciliter le nettoyage. A MISE EN GARDE A Four réduire les risques de blessures causées par des pièces en mouvement, débrancher Appareil avant d'en effectuer centration. How fo Rem ove Placer le manche & fa position verticale. Enlever les réservoirs afin d’éviter ies fuites, Métré les réservoirs de Coté. 4.6 Faire glisser les dew boutons de dégagement de Ia nuise (A) vers [extériorité. Enlever la buse.
Pour obtenu du service autorisé Huaver™ et des piges Hoverboard d’origine. trouver l’atelier de service Grant autorise (départ) 6 plus prés de chez vos. Pour ob faire © + Consister les Pages jans & la rubrique « Aspirateurs domestiquiez ». OU + Visiter notre site Wah www hoverboard com (aux États-Unis) ols www hoverboard (au Ganaderia. Liguer sur 1 len « Service 41a clientèle » pour connaître [adresse du Centre de service e puis prés de chez vous.
LAL GARANTIE LIMITÉE DE UN AN (Usage domestique) ÉLÉMENTS COUVERTS PAR LA PRESSENTE GARANTIE Votre produit HOVERBOARD est garanti pour das conditions normales d’utilisation et d’entretien domesticables, comme § est stipulé dans le Guide de utilisateur, contre les défauts de matériaux et de fabrication pour une période complété compter de la date d’achat (Ia « Période de garantie x). Pendant la Érode de garantie. Hoover® fournira, sans frets supplémentaires.