
Manual
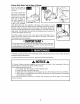


Placing Dirty Water Tank in Base of Cleaner
2.22 Lift front base of r
cleaner off carpeting with
one hand.
2.23 Grasp handle and
hook front of dirty water
tank into base of cleaner,
making sure front of dirty
water tank is resting on
the base (Diagram A).
The Dirty Water Tank has
3 tabs on the underside
\
__4,\ _ ,,
A
CL'I =
which MUST latch into the underside of the base of the cleaner. It is very
important to liftthe base of the cleaner off of the carpeting and hook the nozzle to
the base so that the nozzle is flush with the base of the cleaner (Diagram B).
Failure to install the Dirty Water Tank correctly (Diagram C), will result in poor dirty
water pickup. The Dirty Water Tank will need to be emptied once or twice per fill
up of the Clean Water Solution Tank.
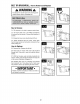
2.24 While making sure the front of the upper lower Dirty Water Tank is
resting on the base, place the rear of the tank into the base of the cleaner.
Push handle down until it latches.
• IMPORTANTo
Do not store cleaner with solution in Clean Water Solution Tank or dirty water
in Dirty Water Tank. Mineral deposits and mildew can form which will affect
the performance of your carpet cleaner.
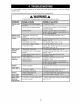
Familiarize yourself with these home maintenance tasks as proper use and care of your cleaner will ensure
continued cleaning effectiveness.
Any other servicing should be done by an authorized service representative.
,& NOTICEA
A Thermal Protector has been designed into your cleaner to protect it from overheating. When the
thermal protector activates the cleaner will stop running.
If this happens proceed as follows:
1. Turn cleaner OFF and unplug it from the electrical outlet.
2. Empty Dirty Water Tank and clean filters.
3. Inspect and remove blockage. This blockage may occur at the exhaust, inlet, hose, and filters.
4. When cleaner is unplugged and motor cools for 30 minutes, the thermal protector will deactivate
and cleaning may continue.
If the thermal protector continues to activate after following the above steps, your cleaner
needs servicing.
11