Owner’s Manual FloorMAX™ Deluxe Hard Floor Machine and Carpet Shampooer English ➜ pp. 1-11 Español ➜ Pág. 12-19 Français ➜ p. 20-28 Featuring Wet Pick - u p Thank you for selecting a HOOVER product. This cleaner was inspected and packaged carefully before being shipped from the factory. If you should happen to need assistance during assembly or operation, call 1-800-944-9200 for automated referral of authorized service outlet locations (U.S.
Fill in and retain The model and serial number are located on the bottom of the floor machine. For your personal records please enter the COMPLETE model and serial number in the spaces provided and retain this information. Your cleaner is model and has serial number It is suggested that you attach your sales receipt to this owner’s manual. Verification of date of purchase may be required for warranty service of your Hoover product. Index Accessories......................................3, 10 Assembly .....
Questions or Concerns? The Hoover Company wants to quickly resolve any concerns about your cleaner or questions regarding its use. Look on the list provided with the product for your local Hoover Factory Service Center or in the Yellow Pages under “Vacuum Cleaners Household” for the nearest Authorized Hoover Warranty Service Dealer (Depot) or call: 1-800-944-9200 for an automated referral of authorized service outlet locations (U.S.
Connect handle and tank 1-3 1-4 Polarized plug A 1. Remove bright plated (top) screw from back of tank housing. 2. Position handle as shown lining up holes (A). Push handle down firmly into place. Do not grip trigger or twist handle while installing. 2. How to use 3. The tank fits into the opening in the front of the tank housing. Place bottom of tank into position, then push top of tank until it clicks into place.
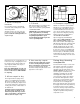
2-7 2-8 2-9 B Attach and remove brushes and pads To attach pads, insert end of fastener through opening in pad. Place pads over power scrub and cleaning brushes only. The fastener fits around the brush shaft. Press fastener to snap pad into place. Unsnap to remove pad. To carry Cleaning floors 1. Water method There are three methods of cleaning hard surface floors: Linoleum, asphalt, rubber, vinyl, masonry and stone floors may be cleaned with a soap or detergent and water solution.
1.Vacuum floor thoroughly to remove loose dirt and debris. 2. Attach the soft cloth pads to polisher referring to directions in Fig. 2-7 and 2-8. Connect cord to a wall receptacle. Press handle release lever to lower handle. Start floor machine by moving the control button to the “SCRUB-POLISH-SHAMPOO” position. 4. Move the floor machine over the area until the floor is completely dry. Do not use the “WET PICK UP”feature to pick up the hard wood floor cl e a n e r.
To achieve a high luster finish To keep floors bright and shiny 1. Attach felt buffing pads over power scrub and cleaning brushes using fasteners. Polish to a soft shine by guiding floor machine in straight lines or with the grain of the wood. If more shine is desired proceed to step 2. Buff floor often to restore sheen and remove scratches and marks. This lengthens the time between waxings. Before buffing, use a vacuum cleaner to remove dust and dirt and a damp cloth to remove sticky particles.
2-15 2-16 2-17 E 2. Attach shampoo brushes Press shampoo brushes down firmly over brush shaft, rotating brush until it clicks into position. Shampoo brushes are very soft to protect fine rugs and carpet. Do not use power scrub and cleaning brushes on carpet or rugs. Repeat the process over another 3 ft. x 3 ft. area (1m x 1m), overlapping the areas by several inches. Continue until a 3 ft. (1m) length the width of the carpet or rug has been cleaned.
3. Maintenance 3-2 3-1 B Familiarize yourself with these home maintenance tasks as proper use and care of your appliance will ensure continued cleaning effectiveness. Tank and tubing Wash and rinse tank after each use. To rinse tubing, put clear water in tank, then hold and release trigger several times. Disconnect unit from electrical outlet before performing any of the maintenance tasks or procedures listed below.
4. If you have a problem If a minor problem occurs it usually can be solved quite easily when the cause is found by using the check list below. Problem: Unit won’t run Possible cause Possible solution • Not firmly plugged in • Plug in firmly • No voltage in wall plug • Check fuse or breaker • Blown fuse/tripped breaker • Replace fuse/reset breaker Problem: Unit won’t pick up solution Possible cause Possible solution • Filter bar clogged. • Clean filter bar.
Floor care hints Floors may be difficult to care for when not treated properly. Refer to the chart below for solutions to floor problems. Problem: Slippery floor Problem:Yellow or grayed floors Problem: Black marks Po s s i ble cause Possible solution Possible cause Possible solution Possible cause Possible solution • Too mu ch wax. • Remove wax. Apply thin even coat. • Too many applications of wax. • Clean and rewax floor. Apply thin coat of wax. • Scuffing from rubber heals.