EN
Thank you for choosing this product. We are proud to offer the ideal product for you and the best complete range of home appliances for your daily routine. WEEE contains both polluting substances (which can cause negative consequences for the environment) and basic components (which can be re-used). It is important to have WEEE subjected to specific treatments, in order to remove and dispose properly all pollutants, and recover and recycle all materials.
l This appliance is intended to be used in household and similar applications such as: - Staff kitchen areas in shops, offices and other working environments; - Farm houses; - By clients in hotels, motels and other residential type environments; - Bed and breakfast type environments. A different use of this appliance from household environment or from typical housekeeping functions, as commercial use by expert or trained users, is excluded even in the above applications.
Electrical connections safety instructions l Do not expose the washing machine to rain, direct sunlight or other weather elements. Protect from possible freezing. and l The technical details (supply voltage and power input) are indicated on the product rating l When moving, do not lift the washing machine by the knobs plate or detergent drawer; during l Make sure that the electrical transport, never rest the door on system is earthed, complies the trolley.
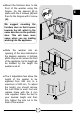
2. INSTALLATION l Remove the 2 or 4 transportation screws (A) on the back and remove the 2 or 4 flat washers, rubber bungs and plastic spacer tubes (B) as illustrated in figure 1. l If the washing machine is built-in, unscrew the 3 or 4 transportation screws (A) and remove the 3 or 4 flat washers, rubber bungs and plastic spacer tubes (B).
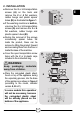
Instructions for mounting the furniture door l Position the template onto the reverse of the furniture door. It is possible to mount the hinges and closure magnet on the right or left-hand side depending on your requirements. Mark the screw hole positions, then drill out these positions. B C A l Fix the hinges in place with the 4 screws provided (A). l Fix the magnet (B) in place using screw (C).
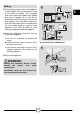
the furniture door to the front of the washer using the hinges. Fix the spacers (I) in place with the 2 screws (J) and then fix the hinges with 2 screw (H). H J EN l Mount I We suggest mounting the furniture door so that it opens towards the left, which is the same direction as the porthole door. This will leave more space when you are loading washing into the appliance. l Slide the washer into an opening of the size indicated in the diagram opposite.
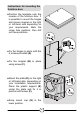
Hydraulic connections 3 l Connect the water hose to the water supply tap (fig. 3) only using the hose supplied with the appliance (do not reuse old hose-sets). l SOME MODELS may include one or more of the following features: 4 l HOT&COLD (fig. 4): water mains connection settings with hot and cold water for higher energy savings. Connect the grey tube to the cold water tap and the red one to the hot water tap.
Setting 7 EN l The washing machine should be installed in its final position such that the water fill hose is not kinked or trapped. The corrugated drain hose should be inserted into suitable drain pipe of between 50 cm and 85 cm height above the floor using the curved drain hose support. If an under sink connection is used the drain hose must be routed above the sink overfill opening to prevent back siphoning. Care must be taken to avoid kinking or trapping the drain hose (fig. 7).
3. DETERGENT DRAWER The detergent draw is split into compartments as illustrated in figure 9: 3 9 l compartment "1": for prewash detergent; l compartment “ ”: for special additives, 1 softeners, starch fragrances, etc.; 2 WARNING: only use liquid products; the washing machine is set to automatically dose additives at each cycle during the last rinse. l compartment "2": for washing 10 detergent. A liquid detergent cup is also included IN SOME MODELS (fig. 10).
Load tips Maximise the load size l Achieve the best use of energy, water, detergent and time by using the recommended maximum load size. Save up to 50% energy by washing a full load instead of 2 half loads.
The use of ecological detergents without phosphates may cause the following effects: When washing heavily soiled whites, we recommend using cotton programs of 60°C or above and a normal washing powder (heavy duty) that contains bleaching agents that at medium/high temperatures provide excellent results. - cloudier rinse drain water: This effect is tied to the suspended zeolites which do not have negative effects on rinse efficiency.
l Fill the drawer with hot water. EN 5. CLEANING AND MAINTENANCE Looking after your appliance correctly can extend its lifespan. Cleaning the appliance’s exterior l Disconnect the machine from the power supply. l Clean the appliance’s external cabinet, using a damp cloth and AVOIDING ABRASIVES, ALCOHOL AND/OR DILUENTS. Drawer cleaning l It is advisable to regularly clean the l Shake the drawer in order to let the water flow in all the compartments.
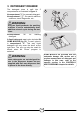
Cleaning the pump filter l The appliance has a special filter that traps larger residues that could block the draining system, such as buttons or coins (depending on the model, consider version A or B). We recommend checking and cleaning the filter 5 or 6 times a year. l Disconnect the machine from the power supply. l Ensure all the water has been emptied from the drum. l Before unscrewing the filter, we recommend you place an absorbent cloth under it to keep the floor dry.
This washing machine automatically adjusts the level of the water to the type and quantity of washing. This system gives a reduction in energy consumption and a saving in washing times. 7. CONTROLS AND PROGRAMS EN 6. QUICK USER GUIDE A Program selection l Turn on the washing machine and select the required program. L MN O I l Adjust the washing temperature if necessary and press the required "option" buttons. P H l Press the START/PAUSE button to start washing.
l Press to start the selected cycle. Opening the door When the START/PAUSE button has been pressed, the appliance can take few seconds before it starts working. A special safety device prevents the door from being opened immediately after the end of the cycle. Wait for 2 minutes after the wash cycle has finished and the "Door Security" light has gone out before opening the door.
- Confirm by pressing the START/PAUSE button. The delay countdown will begin and when it has finished the programme will start automatically. - EASY IRON This function allows you to minimizes creases as much as possible, eliminating the intermediate spins or reducing the intensity of the last one. If an option is selected that is not compatible with the selected programme then the option indicator light first flashes and then goes off.
l The key lock can be simply cancelled by SPIN SPEED button l By pressing this button, it is possible to reduce the maximum speed, and if you wish, the spin cycle can be cancelled. l If the label does not indicate specific information, it is possible to use the maximum spin expected in the program. To prevent damage to the fabrics, it is not possible to increase the speed over the maximum allowed for the programme. pressing the two buttons simultaneously again or turning off the appliance.
l When START/PAUSE If the door is not properly closed, the light will continue to flash for about 7 seconds, after which the start command will be automatically cancelled. In this case, close the door in the proper way and press the START/PAUSE button. l A special safety device prevents the door from being opened immediately after the end of the cycle. Wait for 2 minutes after the wash cycle has finished and the DOOR LOCKED light has gone out before opening the door.
Table of programmes 1) (MAX.) * PROGRAMME 2 (see control panel) (MAX.
INFORMATION FOR THE TEST LABORATORIES STANDARD PROGRAMMES ACCORDING TO (EU) No 1015/2010 e No 1061/2010 **Only available on certain models (Only for models with liquid detergent compartment) When only a limited number of articles have stains which require treatment with liquid bleaching agents, preliminary removal of stain can be carried out in the washing machine.
Description of programmes To clean different types of fabrics and various levels of dirt, the washing machine has specific programs to meet every need of washing (see table of programmes). Choose programme in accordance with the laundry instructions appearing on labels, especially the maximum recommended temperature.
Dark Colours Program designed to mix all dark garments and to avoid the loss of colour and the formation of creases. We recommend the use of liquid detergent. Allergy Care 60° This programme offers thorough cleaning of all cotton items, sanitising and eliminating bacteria. It is an efficient high temperature washing cycle. Recommended for small loads.
8. TROUBLESHOOTING AND WARRANTY If you believe the washing machine is not working correctly, consult the quick guide provided below which includes some practical tips on how to fix the most common problems. ERROR CODE FORMAT l Models with a display: the error is shown by a number preceded by the letter “E” (example: E2 = Error 2). l Models without display: an error is shown by a sequence of flashes of every LED.
Problem Possible causes and practical solutions The washing machine does not work / start The washing machine does not spin Make sure the product is plugged into a working supply socket. Make sure power is on. Make sure the wall socket is working, testing it with another appliance such as a lamp. The door may not be correctly closed: open and close it again. Check whether the required program was correctly selected and the start button pressed.
It is always recommended to use original spare parts, that are available at our Authorised Customer Service Centres. Warranty The product is guaranteed under the terms and conditions stated on the certificate included with the product. The certificate has to be stored so as to be shown to the Authorized Customer Service Centre in case of need. You can also check the warranty conditions on our web site.
fkhldsk
- HBWS D E_HBWS D A E - 20.05 - 43035831 - IDM s.r.l.