EN User instructions ® HFI 3015 DISHWASHER
CONTENTS Safety advice Setting up, installation Water softener unit Adjusting the upper basket Loading the dishes Information for test laboratories Half load washing Loading the detergent and rinse aid Cleaning the filters Some practical hints Routine cleaning and maintenance Description of the control panel Technical data Programme selection and special functions Programme guide The Watercontrol system Identifying minor faults Your guarantee pag. pag. pag. pag. pag. pag. pag. pag. pag. pag. pag. pag. pag.
SAFETY INSTRUCTIONS WARNING ! Knives and other utensils with sharp points must be loaded in the basket with their points down or placed in a horizontal position. There are certain basic safety rules which are valid for any domestic appliance. Installation Daily use ■ Make sure that the plug fitted to the machine is compatible with the power supply socket.
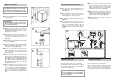
Water connection ■ The hose can be hooked over the side of the sink, but it must not be immersed in water, in order to prevent water from being syphoned back to the machine when this is in operation (fig. 4Y). Connecting the outlet hose IMPORTANT The appliance must be connected to the water mains using new hose-sets. The old hose-sets should not be reused. 1 ■ The outlet hose should disharge into a standpipe, making sure that there are no kinks (fig. 4).
WATER SOFTENER UNIT If your water is at level 0, you need not use any regenerating salt, nor need you make any adjustment, as your water is soft. Depending on the source of the supply, water contains varying amounts of limestone and minerals which are deposited on the dishes leaving whitish stains and marks. The higher the level of these minerals present in the water, the harder the water is.
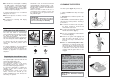
Adjustment of the upper basket ■ Salad bowls and plastic bowls may also be loaded on the upper basket. It is advisable to block these in place so that the jets of water do not make them overturn. LOADING DISHES 1 Using the upper basket If 27 cm to 31 cm plates are normally used, load them onto the lower basket after the upper basket has been placed in its upper position and proceed as detailed below: 1. Pull out the upper basket; 2. Then grasp the basket from both sides and lift it upwards (fig. 1).
A standard daily load is represented in figs. 1, 2 and 3. 1 A C B Upper basket (fig. 1) A = soup plates B = dinner plates C = dessert plates D = saucers E = cups F = glasses E D F 2 A G H B C D F F E INFORMATION FOR THE TEST LABORATORIES General programme comparison (Ref. EN 50242 Standards) (see programmes selection) 1. Upper basket position: low 2. Normal load 3. Shine setting: 6 15 international place load (Ref. EN 50242 Standards) Correct loading is indicated, in fig.
Half load wash upper basket B D C F I G H B C D F B H E I Filling the detergent container IMPORTANT It is essential to use a detergent that is specifically designed for dishwashers either in powder, liquid or tablet form. B After pouring the detergent into the container, close the lid, firstly pushing (1) and then pressing on it (2) until you hear the click. “FINISH” gives very good results and can be easily obtained. A E 2 1/2 mixed load (fig.
■ the effectiveness of detergents containing the built in water softener/salt depends on the hardness of your water supply. Check that the hardness of your water supply is within the effective range given on the detergent packaging. Should this occur, we would recommend using traditional separate products – salt, detergent and rinse agent. This will ensure that the water softener in the dishwasher operates correctly.
PRATICAL HINTS How to make savings ■ If you want the dishwasher to give a complete wash, place the dishes in the dishwasher at the end of each meal and if necessary turn on the COLD RINSE cycle to soften the food remains and remove bigger particles of food from the new load of dishes. When the dishwasher is full start the complete wash cycle programme.
DESCRIPTION OF THE CONTROL PANEL PROGRAMME SELECTION AND SPECIAL FUNCTIONS Programme interruption Opening the door when a programme is running is not recommended especially during the main wash and final hot rinse phases. However, if the door is opened while a programme is running (for example, to add dishes) the machine stops automatically. Close the door, without pressing any buttons. The cycle will start from where it left off.
If there is any break in the power supply while the dishwasher is operating, a special memory stores the selected programme and, when the power is restored, it continues where it left off. "DELAY START" button The dishwasher start time can be set with this button, delaying the start by 3, 6 or 9 hours.
PROGRAMME GUIDE ••••• • ECO Energy Saving Programme suitable for normal soiled items. Using detergents with enzyme. Programme standardised to EN 50242. ••••• RAPID 29’ Quick wash for dishes which are to be washed immediately after the meal. Wash load of 4/6 persons. •••• COLD RINSE Short cold pre-wash for items that are stored in the dishwasher until you are ready to wash a full load.
IDENTIFYING MINOR FAULTS WATERCONTROL-SYSTEM The water-stop device protects against water damages caused by leaks on the fill hose which could develop due to natural ageing of the hose. In the water-stop system the leaking water fills the corrugated hose and activates a stop valve which cuts off the water supply to the machine. This fault is shown by a red sector on the window «A». Would this occur, please refer to your Service Agent.
FAULT CAUSE See causes for no.
This appliance is marked according to the European directive 2002/96/EC on Waste Electrical and Electronic Equipment (WEEE). By ensuring this product is disposed of correctly, you will help prevent potential negative consequences for the environment and human health, which could otherwise be caused by inappropriate waste handling of this product. The symbol on the product indicates that this product may not be treated as household waste.
HOOVER SERVICE FOR YOUR LOCAL ENGINEER PLEASE CALL OUR NATIONAL NUMBER 08705-400600 EIRE 01 8301666 05.