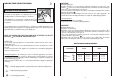
® Washer Dryer Instructions for use HDB 244 HDB 284
Introduction Please read these instructions for use carefully and all other information enclosed with the washing machine. Keep all documentation in a safe place for future reference or for any future owners. Note: this machine is solely for domestic use. Notes on disposal All packaging material used is environmentally-friendly and recyclable. Please help dispose of the packaging via environmentally-friendly means.
General delivery notes Please check that the following items are delivered with the appliance: - Instruction manual - Certificate of guarantee - Inlet hose - Liquid detergent or liquid bleach compartment Check that no damage has occurred during transit, and if so, call your nearest Authorised Technical Support Service agent. M) N.B! If the appliance is installed on a carpeted floor ensure that the ventilation holes on the base of the appliance are not obstructed.
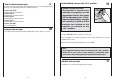
Description of controls A Door open button Important: a special safety device prevents the door from opening at the end of the wash/spin cycle. at the end of the spin phase wait up to 2 minutes before opening the door. Fig. 1 L O B DOOR SECURITY indicator light The “Door Security” indicator light is illuminated when the door is fully closed and the machine is ON. When "Start/Pause" is pressed on the machine with the door closed the indicator will flash momentarily and then illuminate.
The option buttons should be selected before pressing the "Start/Pause" button. D START DELAY BUTTON CREASE GUARD button G Press the button to select or deselect this function. The Crease Guard function minimizes creases as much as possible with a uniquely designed anti-crease system that is tailored to specific fabrics. Appliance start time can be set with this button, delaying the star by 3, 6 or 9 hours.
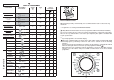
DRYING TIME SELECTOR KNOB I Rotates in both directions This knob sets a programme or a drying time up to a max. 120 minutes with a cool down final phase of 10 minutes. If the drying time is selected before or during the wash cycle the machine will automatically commence the drying programme. If a programme has been selected which does not enable the automatic drying phase (e.g.
L TIME TO END indicator light In order to manage your time better, this washing machine features an indicator light system that keeps you constantly informed on the remaining cycle time. Indicator light START: Remaining time above 60 minutes. Indicator light 60: Remaining time less than 60 minutes. Indicator light 30: Remaining time less than 30 minutes. Indicator light 15: Remaining time less than 15 minutes. Indicator light STOP: End of the programme.
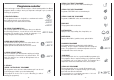
EN CHAPTER 7 TABLE OF PROGRAMMES PROGRAMMES SELECTOR ON: PROGRAM FOR WEIGHT MAX Kg TEMP. °C CHARGE DETERGENT ❙❙ Resistant fabrics ❙ 6 90° ● ● ( ) 60°C 6 60° ● ● ( ) 40°C 6 40° ● ● 6 40° ● ● 3 50° ● ● ( ) ( ) Only with the Prewash button selected.
SPECIAL “LAST RINSE” PROGRAMME This programme carries out 1 rinse with a intermediate spin. Programme selector For the various types of fabrics and various degrees of dirt the washing machine has different programme bands according to: wash cycle, temperature and length of cycle (see table of washing cycle programmes). 1 RESISTANTS FABRICS The programmes have been designed for a maximum wash and the rinses, with spin intervals, ensure perfect rinsing. The final spin gives more efficient removal of water.
SPORTS The washing machine has a unique Sportswear programme. It is specially designed to wash mixed sportswear fabrics that cannot be washed on hotter programmes and is designed to remove the soil and staining created by participation in sports activities. This programme starts with a cold prewash that breaks down and loosens any excess dirt and then washes at a cool 30°C, rinses and spins slowly for the best care of your heavily soiled, delicate garments.
Detergent drawer Detergents, washing aids and amounts to use The detergent drawer is split into 3 compartments: Choice of detergent General purpose detergents - the compartment labelled "I" is for prewash detergent; - - the compartment labelled " " is for special additives, fabric softeners, fragrances, starch, brighteners etc; - - the compartment labelled "II" is for main wash detergent.
Dosages Only use detergents which are suitable for use in a washing machine. You will obtain the best results from your wash with the minimum use of chemical products and the best care for your laundry if you take into consideration the degree of soiling as well as the type of detergent to choose. The amount of detergent to use depends on: - water hardness: depending on the hardness of the water and the type of detergent used, it is possible to reduce the amount of detergent.
Main wash Sorting the laundry - It is recommended you wash only items which are machine washable with water and detergent and not dry-clean items. - If you need to wash rugs, bedspreads or other heavy items, it is best not to spin them.
Automatic washing/drying DRYING DON’T DRY GARMENTS MADE FROM FOAM RUBBER OR FLAMMABLE MATERIALS. IMPORTANT: THIS DRYER CAN ONLY BE USED FOR LAUNDRY WHICH HAS BEEN WASHED AND SPIN DRIED. Warning: only a maximum 4 kg of dry laundry can be loaded. Refer to the list of washing programmes according to fabrics to be washed (e.g.
Drying cycle The correct way to dry: - Open door. - Fill with up to 4 kg - in case of large items (e.g. sheets) or very absorbent items (e.g. towels or jeans), it is a good idea to reduce the load. - Close door. - Turn programme dial to cotton. - If you would like your fabrics cupboard dry, turn the “drying programme selector” knob until the position. - If you would like your fabrics iron dry, turn the “drying programme selector” knob, until the position.
Investigating malfunctions What might be the cause of… Defects you can remedy yourself MALFUNCTION CAUSE REMEDY 1. Does not work on any programme Plug not in socket. Not switched on. Power failure. Fuse blown. Door open. Plug it in. Switch on. Check. Check. Close door. 2. Does not fill with water See cause 1. Tap turned off. Programme selector not correctly positioned. Fill hoses are kinked Check. Turn on tap. Position programme selector correctly. Straighten fill hoses Kink in discharge hose.
SETTING UP + INSTALLATION 1 Remove the polystyrene base and place the machine near its permanent position (diagram 1). 2 Carefully cut through the hose retaining clip at the rear of the appliance (diagram 2). Unscrew the central bolt (A); unscrew the 4 lateral screws (B) and remove the cross piece (C).Unscrew the two rods D and remove them. Two plastic spacers will fall inside the machine. (diagram 3).
Note: we recommend you keep the transit bracket, braces and screws to immobilise the machine for future transit. The Manufacturers will not be responsible for any possible damage to the machine caused by not following the rules relating to releasing the mechanism. The user is responsible for all costs of installation. Water connection The appliance must be connected to the water mains using new hose-sets. The old hose-sets should not be re-used. The machine has an inlet hose with 3/4" B.S.
NOTES ...................................................................................................................................................................................................................... ...................................................................................................................................................................................................................... ............................................................................
The manufacturer declines all responsibility in the event of any printing mistakes in this booklet. The manufacturer also reserves the right to make appropriate modifications to its products without changing the essential characteristics.
® This appliance is marked according to the European directive 2002/96/EC on Waste Electrical and Electronic Equipment (WEEE). By ensuring this product is disposed of correctly, you will help prevent potential negative consequences for the environment and human health, which could otherwise be caused by inappropriate waste handling of this product. The symbol on the product indicates that this product may not be treated as household waste.