Instruction Book ®
Contents Introduction . . . . . . . . . . . . . . . . . . . . . . . . . . . . . . . . . . . . 3 Delivery information . . . . . . . . . . . . . . . . . . . . . . . . . . . . . . . . . 3 Do’s and Don’ts . . . . . . . . . . . . . . . . . . . . . . . . . . . . . . . . . . . . . 3 Unpacking the Product . . . . . . . . . . . . . . . . . . . . . . . . 4 Installation . . . . . . . . . . . . . . . . . . . . . . . . . . . . . . . . . . . . . 6 Choose a location . . . . . . . . . . . . . . . . . . . . . . . . . . . .
Introduction Please read and follow these instructions carefully and operate the machine accordingly. This booklet provides important guidelines for safe use, installation, maintenance and some useful advice for best results when using your machine. Keep all documentation in a safe place for future reference or for any future owners. Check that no damage has occurred to the machine during transit. If it has, call for service by GIAS.
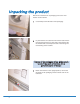
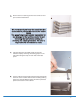
Unpacking the product Remove the machine from its packaging close to the final location of the machine. 1. Cut carefully around the base of the packaging. 2. Lay the machine on its back and remove the base and the two polystyrene spacers on each side of the machine. We recommend that a second person assist in the lifting and manoeuvring of the machine. Dispose of the packaging safely. Make sure it is out of the reach of children, it is a potential source of danger. 3.
4. Remove the four retaining screws in the transit bar and pull out the transit bracket. We recommend you keep the transit bracket and screws to protect the machine for future transit. The manufacturers will not be responsible for any damage to the machine caused by not following the instructions relating to releasing the transit protection. The user is responsible for all installation costs. 5.
7. Take the two plastic fixing clips and fix the base panel to the base of the machine. Bring the machine back to the upright position. 8. Cover the central hole in the rear of the machine with the cap enclosed in the instruction bag. Installation Choose a location Do not plug the machine in and switch it on at the mains until the installation is completed. 6 ● After the machine has been installed, ensure that the mains plug and water supply valves are easily accessible.
Electricity supply Washing machines are supplied to operate at a voltage of 230-240V, 50 Hz single phase. Check that the supply circuit is rated to at least 13A. The plug is already equipped with a 13A fuse which is BS 1362 ASTA approved. Any replacement must be the same rating and specification. If the fuse cover is lost, do not use the plug until it is replaced. You may be charged for a service call if a problem with your machine is caused by incorrect installation.
Connecting to the cold water supply This Appliance must be connected to a COLD WATER supply only. Only one hose is required to install this machine to a cold water supply. Cold fill is an energy efficient system. Only the water required to wash the laundry is heated. There is no loss of heat in the pipeline from the hot water tank or the boiler. If your previous machine installation was hot and cold fill ensure that the hot tap is firmly closed to prevent leakage.
Connection of the machine to the drain This machine must be connected in accordance with the water supply regulations. Water byelaws prohibit connection to a surface water drain. Decide which plumbing option suits you best then follow the instructions below. All machines are tested with water prior to leaving the factory so a small amount of water may remain in the drum and drain hose. Flooding could occur if any part of the installation is not completed correctly.
Moving the machine into position Do not drag or lift the machine by its door. Your machine is heavy so care must be taken when moving it. We recommend that two people move the machine to avoid strain and possible injury. ● Take care not to damage flooring when moving the machine. ● When moving the machine to its final position take care not to kink or damage the hose at the back of the machine.
Testing the installation Refer to the programme guide for details of how to select programmes. 1. Turn on the water supply and check for leaks from the fill hose. 2. Switch on the electricity supply. 3. Select the spin programme and then press the START/PAUSE button to start the machine. Allow the programme to continue for one minute and then cancel the programme by returning the selector to the OFF position. This will remove any water remaining in the machine from factory testing. 4.
Washing and Drying advice The following tips are designed to assist in getting the best results from your machine whilst utilising it in the most environmentally-friendly and economical way. It is also important to understand the items to avoid in your laundry, to ensure the continued safe and reliable operation of your machine. Loading your washing machine To make further reductions of energy, water and detergent consumption, we recommend that you put a full load into your machine.
tangling. Ensure that pockets are emptied of loose change and other small items. Check that there are no metal objects in the laundry as these may damage the laundry and the machine. Place small items in a wash bag. Drying Do not use the machine to wash or dry items that do not have a wash label. In addition to the above advice the guidelines below must be followed when drying the clothes. Sort the load for drying: ● By care symbols: On the collar or inside seam: Suitable for tumble drying.
The Dispenser COMPARTMENT I COMPARTMENT Prewash detergent Maximum dosage 100ml of powder Fabric Conditioner Maximum dosage 100ml COMPARTMENT II Mainwash detergent Maximum dosage 200ml of powder Detergent dosage DO NOT exceed the maximum detergent dosage Only use detergents which are suitable for use in a washing machine.
ARIEL Quick Wash Action – Chosen and recommended by Hoover When we produce a new washing machine we subject it to every test possible. One of the most important tests is the one that enables our experts to identify the most suitable detergent for solving laundry problems. Ariel Quick Wash Action was able to meet our needs: to make the washing machine function efficiently; not compromise the machine’s lifespan; and produce the best wash results.
The Control Panel COUNTDOWN Display START/ PAUSE OPTIONS BUTTONS The programme selector must be return to the OFF position to reset the controls between each wash cycle. TEMPERATURE SELECTOR DRYING TIME SELECTOR PROGRAMME SELECTOR Turning the machine On The machine is turned ON by selecting a programme via the programme selector.
PAUSE The programme may be paused at any time during the wash cycle by holding down the START/PAUSE button for about two seconds. When the machine is in the paused mode, the time remaining for the programme in the COUNTDOWN indicator and option buttons will flash. The door lock indicator light will remain illuminated for approximately 2 minutes. The door can be opened when this indicator goes out. To restart the programme, press the START/PAUSE button once again.
Wash and Dry Options The options should be selected BEFORE pressing the START button Prewash This option is available on the cottons and synthetics programmes. Prewash is automatic on the Sports programme. This option is particularly useful for heavily soiled loads and can be used before selecting the main wash programme. Detergent for this programme should be added to the first compartment of the soap drawer labelled "I" (Please refer to Detergent Drawer section of manual).
Temperature Selector The washing machine is equipped with a Temperature Selector knob to set the temperature you require. Bigger energy savings can be achieved by using the lower temperature settings around the dial between and 40°C. By selecting the position, the wash temperature is limited to the water inlet temperature, thus reducing energy consumption further. We recommend that the temperature shown on wash care garments should never be exceeded.
Automatic Features Automatic Variable Capacity (Half Load) The washing machine is fitted with a self adjusting water level system. This system enables the machine to use the optimum amount of water needed to wash and rinse the laundry in relation to the particular load. This results in a reduction of the water and electricity used without in any way compromising the washing and rinsing performance. The amount of water and electricity used will always be appropriate for the clothes load.
Programme Selector For handling the various types of fabric and their level of soiling in your laundry the washing machine has different programme groups according to type of wash, temperature, spin speeds and duration (see Programme Guide). Cottons The programmes are designed for maximum washing and rinsing. With spin cycles in between, they guarantee the laundry is rinsed perfectly. The final spin cycle ensures laundry is spun dry as much as possible up to the maximum speed.
Woolmark A programme dedicated to washing fabrics labelled with the woolmark symbol . The cycle comprises of alternate periods of activity and pauses. Washing and rinsing are carried out using a high water level to provide the best results. The programme has a maximum temperature of 30°C and concludes with 3 rinses, one for fabric conditioner, and a short spin. Handwash This programme allows a complete washing cycle for garments specified as 'Hand Wash only'.
Programme Guide Special Programmes Rinses, Spins and Drain Acrylics Synthetics Mixed Fabrics Cottons Programme Fabric Type Maximum Maximum Maximum Water Drying Load Load Size (kg) Temp (°C) Automatic Drying Cycle High Dry Not Low Dry available Cottons Cottons, linen 5 90 5 ✔ Colourfast Cotton, colourfast mixed fibres 5 60 5 ✔ Non-fast Cottons, mixed fabrics, Coloureds Non-fast 5 40 5 ✔ Colour Mix Cottons, mixed fabrics and synthetics 5 40 2 ✔ Synth’s Mixed fabrics and sy
A Typical Wash and Dry Cycle Liquid detergents and some concentrated powders and tablets that are to be placed directly into the drum should use the recommended dispensing device. Do not use such powders and dispensing devices if you are completing a continuous wash and dry cycle. This section summarises the main points when completing a wash cycle. For detailed explanations of features, options and details of the machine refer to the relevant section in the instruction manual.
Starting the cycle Press the START/PAUSE button. The door locked indicator and the START light illuminate, within a few seconds the programme will begin. Do not try to open the door when the door locked indicator is on. Do not open the dispenser drawer during the wash programme. If you wish to pause the programme press the START/PAUSE button and after 2 minutes the door can be opened. To cancel the programme the programme selector should be turned to the OFF position.
Cleaning and Routine Maintenance The washing machine needs very little maintenance, but regular attention to a few small details will ensure the continued performance of your washing machine. Do not use abrasive cleaners, scouring pads, solvent based cleaners or polishes; wiping the outside of the machine with a damp cloth will suffice. Cleaning the soap dispenser 1. Clean the compartments occasionally to remove detergents and additives. 2.
Cleaning the filter The washing machine is fitted with a special filter to prevent items such as coins, buttons, etc. blocking the discharge hose. These may be retrieved by: 1. Removing the kickplate by gently pulling it from the bottom in an outwards and upwards direction. 2. Use the kickplate to collect the water still in the filter. 3. Use a screwdriver to loosen the screw holding the filter, turn the filter anticlockwise until it stops, remove it and clean it.
Troubleshooting What might be the cause of... Defects you can remedy yourself Before calling GIAS Service for technical advice please run through the following checklist. A charge will be made if the machine is found to be working or has been installed incorrectly or used incorrectly. If the problem persists after completing the recommended checks, please call the GIAS Service (tel: 08705 400 600), they may be able to assist you over the telephone or arrange a service call.
The machine is noisy or vibrates a lot during the cycle… ● Has the transit system been fully removed? Check that the bracket and the polystyrene packing have been taken off the machine. ● Are there any loose items in the pockets of clothing that can rattle in the drum and cause damage? ● Is the load unbalanced? Stop the programme, re-distribute the load and restart. The programme takes a long time… ● Some programmes do take a long time (over 2 hours).
Power Failure If there is a power failure the wash cycle will be interrupted, and the wash programme and functions will be suspended. When the power is restored, the wash programme and functions will re-start from the same point and complete the programme. During a power failure the water can be drained and the load can be removed from the machine as follows: 1. Switch off the machine both via the programme knob and the mains power supply. Remove the plug from the mains power supply socket. 2.
Customer Service For a period of one year from the date of purchase the appliance is covered by a guarantee which allows you to call Hoover Service free of charge (except for the price of the call). Phone GIAS on 08705 400 600 Remember to send off the guarantee certificate for validation within 10 days of the date of purchase. You should retain the receipt issued by the retailer when you purchased the machine to show to the call out engineer, should you need to consult one.
Your Guarantee Hoover guarantees all parts of this product for 5 years from the date of purchase. During that time Hoover will replace or repair all defective parts free of charge, except for parts subject to fair wear and tear such as belts. The call out fee and labour costs are chargeable after the first 12 months.