™ SpinScrub with MAX Extract ™ ™ The Easy to Use Deep Cleaner Congratulations on your purchase ™ ™ SteamVac SpinScrub cleaners have 6 rotating brushes that deep clean carpets and scrub bare floors! SteamVac™ SpinScrub™ Deep Cleaner cleans carpet fibers by applying hot tap water and cleaning solution. www.hoover.
Fill in and Retain This HOOVER deep cleaner is designed for deep cleaning carpet, rugs, carpeted stairs and upholstery. The model and serial numbers are located on the data label on the back of the handle. For your personal records, please enter the COMPLETE model and serial numbers in the spaces provided and retain this information. Your deep cleaner is model and has serial number It is suggested that you attach your sales receipt to this owner s manual.
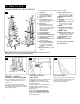
Grounding Instructions D A F B G E DANGER- C This appliance must be grounded. If it should malfunction or breakdown, grounding provides a path of least resistance for electrical current to reduce the risk of electric shock. This appliance is equipped with a cord having an equipment-grounding conductor (C) and grounding plug (A). The plug must be plugged into an appropriate outlet (B) that is properly installed and grounded in accordance with all local codes and ordinances.
The assembled cleaner will look like this drawing. Assemble handle 1-3 A1 1-2 A2 Attach upper handle Remove clean solution tank (upper tank) from deep cleaner. 1-4 1-5 B With hose hook (A1) and cord hook (A2) to back of deep cleaner, push upper handle down onto lower handle. Push bolts into holes on front of handle. If bolts will not go through hole easily handle is not pushed completely down.
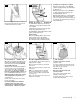
1-11 1-10 1-12 F A2 G H Storing hose & tools Press cord into cord clip on back of handle. Pull cord tight and wrap cord around hooks (A2). Store hose on rack by first positioning hose in front section of clip. Continue wrapping hose over upper hose hook (F) and under lower hook (G). Snap hose end fully into holder (H). Ensure that the hose end is pushed down completely into holder (H). 1-13 1-14 1-15 I Slide crevice tool (I) into holder.
2. How to use Deep Cleaner Description 2-1 1 3 2 6 4 8 7 9 10 11 12 5 27 13 14 24 15 7 26 16 17 18 25 22 20 23 19 21 The assembled deep cleaner will look like the drawing. 1. Hand grip 2. Solution trigger: press to release clean solution. 3. Clean Surge™ button 4. Hose 5. Hose holder: wrap hose around holder and top hose hook (6) for storage. 6. Hose hook 7. Cord hooks: wrap cord around hooks for storage. The top hook can be rotated right or left for quick and easy cord release. 8.
Amber and green lights 2-6 2-5 E G F The deep cleaner may also be lifted by placing a hand under the upper clean solution tank handle as shown. When the deep cleaner senses that dirty solution is being picked up, the amber light (F) will come on. When the deep cleaner senses that little or no dirty solution is being picked up, the green light (G) will come on. When the amber light is on, continue taking dry cleaning strokes until the green light comes on. Then move on to the next area to be cleaned.
2-11 2-10 5 OUNCES/ 150 ml A Carry tank to a sink. Rotate tank cap counterclockwise and lift up to remove cap. For heavy traffic areas: Pre-treat with HOOVER PreCleaner* Spray. If you do not have access to the PreCleaner Spray, double the amount of HOOVER Detergent (use 2 capfuls or 10 ounces per 1 gallon tank). *Available at additional cost if not included with your model. Turn cap (A) upside down to serve as a measuring cup. Using cap, measure detergent following the chart below.
For full suction, it is important that the recovery tank lid is properly secured before cleaning. Raise tank handle to carrying position to place it into base of deep cleaner. Move handle completely forward to lock tank into place (see Fig. 2-16). Raise handle of deep cleaner to upright position and reposition upper clean solution tank. Do not saturate carpet or upholstery with PreCleaner. If you do not have access to the PreCleaner Spray, double the amount of HOOVER Detergent (use 2 capfuls or 10 oz.
To clean nozzle 3-3 If lint or other debris becomes lodged in nozzle, do not attempt to remove nozzle cover. Pour one to two cups of clear water on a non-carpeted floor. Do not pour water onto a wood floor. Pick up the water with your deep cleaner. Repeat as necessary until debris is flushed out of nozzle. Carpet Cleaning Some models have a nozzle clean-out tool for removing debris or if a non-carpeted floor is not available. To use the tool: Disconnect deep cleaner from electrical outlet.
Cleaning bare floors How to attach bare floor attachment Disconnect deep cleaner from electrical outlet. To prevent possible leaking, remove clean solution tank (Fig. 2-9) and recovery tank (Fig. 2-16) before positioning bare floor attachment. Set tanks aside (do not set tank on furniture). 1. With handle in upright position, tilt cleaner back so that handle rests on the floor. 4. Return deep cleaner to upright position. Lower handle and replace recover y tank. 5.
3-11 3-12 3-13 G Using the scrub tool After using scrub tool After using tool With a little solution, test the scrub tool on a hidden area before using on the desired surface. If no surface change is visible, continue to use as described below. 1. Fill clean solution tank with HOOVER Bare Floor Cleaner according to instructions for Figs. 2-9 to 2-15. 2. Hold scrub tool above area to be cleaned and press trigger to dispense solution. 3. Release trigger and scrub area with tool.
3-16 A B 9. Lift tool, and position it against riser. Pull tool slowly over carpet without pressing trigger (dry stroke). It is best to alternate wet and dry strokes as described above. End with more dry strokes and watch for the green ‘MAX Extract’ light to come on to aid in faster drying of carpet. 10. Overlap strokes by 1/2 inch to help prevent streaking. To avoid saturating carpet, do not use more than 4 wet strokes over any one area. Always end with dry strokes.
Removable brushes 4-2 4-3 Your deep cleaner is equipped with removable brushes for easy cleaning. To remove brushes Disconnect cleaner from electrical outlet. To prevent possible leaking, remove clean solution tank and recovery tank. Set tanks aside. 2. Pull old bulb straight out of socket. 3. Push new bulb straight into socket until locked into place. Excessive force is not required. Reposition lens and secure with screw. 4-4 Press handle release pedal to lower handle.
5. If you have a problem If a minor problem occurs, it usually can be solved quite easily when the cause is found by using the check list below.