ENGLISH ➜ pp. 1-17 ESPAÑOL ➜ pág. 18-28 TM ® All Terrain Carpet and Hard Floor Cleaner with Auto Rinse™ Feature The Easy to Use Carpet and Hard Floor Cleaner SteamVac™ All Terrain™ Cleaner cleans carpet fibers and hard floors by applying, scrubbing and removing hot tap water and cleaning solution. www.hoover.
Important Safeguards! When using an electrical appliance, always follow basic precautions, including the following: READ ALL INSTRUCTIONS BEFORE USING APPLIANCE. Grounding Instructions A WARNING: To reduce the risk of fire, electric shock, or injury: • Use indoors only. • Use only on surfaces moistened by the cleaning process. Do not immerse product. • Connect to a properly grounded outlet only. See “Grounding Instructions”. • Do not clean over floor electrical outlets.
Contents Thank you for choosing a HOOVER product. Important safeguards . . . . . . . . . . 2 Parts needed for assembly. . . . . . . 3 Assembling cleaner . . . . . . . . . . . 3-6 Cleaner description . . . . . . . . . . . . 7 General operation . . . . . . . . . . . 7-10 Filling the clean water tank . . 8-10 Emptying the recovery tank . . . 10 SpinScrub mode selector . . . . . . 8 Automatic shut-off. . . . . . . . . . . . 8 How to use Before you begin . . . . . . . . . . . 10 After cleaning . . . . . . . .
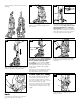
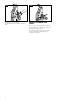
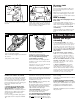
The assembled cleaner will look like this drawing. 1-2 1-3 C B A Attach upper handle Remove clean water tank (upper tank) from cleaner. 1-4 D With cord hook (D) to back of cleaner, push upper handle down onto lower handle. 1-7 1-5 Push bolts into holes on front of handle. If bolts will not go through hole easily, handle is not pushed completely down. Place nuts in recessed areas on back of the handle.
1-9 1-10 1-11 I H G I J Rotate top of caddy toward cleaner handle. Slide caddy down so notch (G) on caddy rests in hook (H) on cleaner. Identify the hose parts before storing hose. I. Nozzle connector end J. Solution tube Storing hose and tools 1-12 1-13 1-14 Press hose, a few inches from nozzle connector end (I), into caddy. Bring hose up and over top of caddy. M J L K Press hose into opposite side of caddy. Loop hose at bottom of cleaner and press into top of hook (K).
1-18 1-19 Pull tool down and outward. To reposition the tool, reverse this procedure. How to reattach tool cover The tool cover is designed with a breakaway feature which allows it to snap free if it is pushed open too far. To reattach, align hinges of cover with holes on sides of tool storage area. Snap door into place.
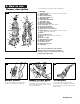
2. How to use The assembled cleaner will look like the drawing. Cleaner description 2-1 1 3 4 2 18 19 20 5 21 6 7 9 22 8 10 11 12 17 16 23 14 13 25 1. Hand grip 2. Solution trigger: press to release cleaning solution 3. ON/OFF switch 4. Rinse Setting switch 5. SpinScrub™ hand tool 6. Carrying handle 7. Clean water tank handle 8. Clean water tank 9. Detergent container 10. Recovery tank handle 11. Recovery tank: holds dirty solution 12. Recovery tank latches 13. SpinScrub mode selector 14.
2-5 2-6 Carrying handle Automatic shut off The cleaner may also be lifted by placing a hand above the upper clean solution tank handle as shown. When the recovery tank (lower tank) is full the automatic shutoff mechanism will shut off the cleaner suction (suction will be noticeably reduced). At that time, the yellow float disk will rise to the top of the recovery tank lid (B). The cleaner will no longer pick up dirty solution and the motor sound will become noticeably higher in pitch.
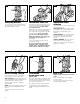
2-11 2-13 2-12 E F Carry tank to a sink. Turn tank cap counterclockwise and remove cap. Fill tank (E) (1 gallon) with hot tap water. CAUTION: Do not fill with water above 140°F (60°C). Replace tank cap and tighten. 2-14 NOTE: Use only HOOVER detergents. They are specially formulated for use with your SteamVac™ cleaner. CAUTION: Detergents contain Anionic and Nonionic Surfactants. Avoid contact with eyes and skin. In case of contact with eyes, flush with cold water for 15 minutes.
2-20 2-19 Recovery tank (lower tank) The recovery tank holds the dirty solution that is picked up from the surface being cleaned. When the recovery tank is full, the automatic shut-off will engage, suction will stop (see page 8), and the tank must be emptied. How to empty Check tank to make sure it is securely latched. NOTE: There may be a small amount of water (indicated by arrows) on the base when the tank is removed from the unit. This is a normal condition.
After cleaning a. Allow carpet or upholstery to dry. To help prevent matting and resoiling the carpet, keep children and pets away from surface until it is completely dry. If it is necessary to walk on damp carpet, place towels or white cloths on the traffic areas. If furniture must be replaced before the carpet is dry, place plastic or aluminum foil under legs of furniture so metal slides or wood finishes will not stain the carpet. b. Empty tanks, rinse with clear water and let air dry.
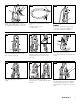
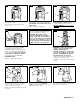
RINSE 3-7 ➡ ➡ ➡ ➡ ➡ ➡ 11. For best results, use straight, parallel strokes as shown in the diagram below. Overlap strokes by 1 inch to help prevent streaking. Keep nozzle flat on floor for both forward and reverse strokes. ON WASH Rinse 3-5 3-6 3-8 WASH OFF Read “Before you begin cleaning” instructions on page 10. 1. For carpets and rugs, attach the brush assembly with the green, shorter bristles. (Refer to Maintenance section, Removable brushes for attaching and removing brush assemblies.
3-11 3-12 E D 5. Rotate the squeegee back until secure, making sure the outside edges are pushed up tight against the nozzle. To replace nozzle, line up tabs (D) on nozzle with holes (E) in cleaner. Slide tabs into holes. Slide nozzle completely onto cleaner. Press down on nozzle to secure it. To clean floor 3. Slide SpinScrub mode selector to HARD TERRAIN. 4. Dry hands and plug cleaner into a properly grounded outlet. 5. Step on handle release pedal and lower handle to operating position. 6.
Using the tools 3-14 3-15 Attach hose Unplug cleaner from electrical outlet. 3-13 A B Insert short hose end, matching tabs on hose with same-sized slots in port. Push hose into port and lock in place. Plug solution tube firmly into solution connection port (B). Select tool How to attach tools Your model includes the following tools. 3-18 Open hose connection port (A). 3-16 F 3-17 E D C To remove hose: Squeeze latches (C) on top and bottom of hose. Remove hose from port. Close door.
Cleaning carpeted stairs Read “Before you begin cleaning” instructions on page 10. 1. Attach hose and solution tube as instructed in Figs. 3-12 to 3-14. 2. Place handle in upright position. Agitator brushes will not rotate while handle is in upright position. 3. Fill clean water tank according to instructions for Figs. 2-9 to 2-12. 4. Fill detergent container with HOOVER Carpet/Upholstery Detergent according to instructions for Figs 2-13 to 2-15. 5. Attach tool to end of hose. 6.
4. Maintenance 4-2 4-3 B D A Removable brushes B A Your cleaner is equipped with removable brushes. Follow these directions for changing brush assemblies or for easy cleaning. C To remove brushes Disconnect cleaner from electrical outlet. To prevent possible leaking, remove clean water tank and recovery tank. Set tanks aside. Grab brush assembly and pull firmly. The brushes can be cleaned under running water.
Possible cause 5. Ifsolution you have a Possible • Recovery tank full/automatic problem 5-1 A If a minor problem occurs, it usually can be solved quite easily when the cause is found by using the check list below. A Problem: Machine won’t run Possible cause Possible solution • Not firmly plugged in • Plug unit in firmly 2. Turn valve cap (A) counterclockwise and remove. • No voltage in wall receptacle • Check fuse or breaker Soak valve cap in warm water for at least 15 minutes. Wipe cap dry.
Full One Year Warranty (Domestic Use) Your HOOVER® appliance is warranted in normal household use, in accordance with the Owner’s Manual against original defects in material and workmanship for a period of one full year from date of purchase. This warranty provides, at no cost to you, all labor and parts to place this appliance in correct operating condition during the warranted period.
HOOVER® Limpiadora SteamVac™ All Terrain para alfombras y pisos de superficie dura con función AutoRinse™ La limpiadora fácil de usar para alfombras y pisos de superficie dura La limpiadora SteamVac™ All Terrain limpia las fibras de las alfombras y los pisos de superficie dura al aplicar agua caliente de grifo y solución de limpieza. Manual del proprietario ESPAÑol ➜ p. 18-28 Contenido Salvaguardias importantes ..........................18 Piezas necesarias para el ensamblado ........
Use estas instrucciones en español junto conlas figuras paso-a-paso provistas en el manual de inglés. Gracias por haber elegido un producto HOOVER. Si necesita cualquier asistencia: Visite nuestro sitio de Internet www.hoover.com. Pulse el botón “Service” para encontrar el centro de servicio más cercano a usted O llame al 1-800-944-9200 para obtener una referencia automatizada de las ubicaciones de los centros de servicio (solamente en EE.UU.
se van a utilizar, para que se pueda retirar y colgar para guardarlo. Si no lo desea instalar en la limpiadora por ahora, continúe con la figura 1-10 para ver cómo colocar adecuadamente la manguera en el portaaccesorios. Repita en el otro extremo de la manguera. Oprima el tube de solución (J) en el lado opuesto del clip. 1-8 1-15 Deslice las lengüetas (E) del portaaccesorios en las ranuras (F) que están en la parte de atrás de la limpiadora.
2-2 Interruptor de encendido y apagado (ON/OFF) Para encender la limpiadora (ON), empuje el interruptor hacia abajo. Para apagar la limpiadora (OFF), empuje el interruptor hacia arriba. 2-3 Pedal para destrabar el mango Pise el pedal (A) para bajar el mango a la posición de operación. El mango no se queda fijo en una sola posición sino que “flota” para permitir una operación cómoda.
SteamVac™. PRECAUCIÓN: Los detergentes contienen surfactantes aniónicos y no iónicos. Evite el contacto con los ojos y la piel. En caso de contacto con los ojos, lávelos con agua fría por 15 minutos. En caso de contacto con la piel, lávela con agua. Si persiste la irritación, llame a un médico.
Ninguna solución limpiadora saca todas las manchas de todas las alfombras. La eliminación de manchas varía con el tipo de derrame, el tiempo que ha transcurrido antes de que se saque, y el material y tipo de la alfombra. f. Para evitar manchar, use plástico o papel de aluminio para proteger las superficies de madera o metal de un posible rociado con agua. g.
pasadas secas hasta que se vea poca agua pasando por la tapa del tanque de recuperación. 3-7 11. Para obtener los mejores resultados, use pases rectos y paralelos como se muestra en la figura 3-7. Sobreponga los pases por 1 pulgada para evitar que queden disparejos. Mantenga la boquilla plana contra el piso tanto para los pases hacia delante como para los pases hacia atrás. 12. Si desea enjuagar la alfombra con agua solamente, coloque el interruptor de graduación para enjuague en RINSE (ENJUAGUE) (figura.
figura 2-6). 11. Cuando termine de limpiar, siga las instrucciones “Después de la limpieza” de la página 23. Desconecte la limpiadora en profundidad de la toma de corriente eléctrica y saque el escurridor de la boquilla. Enjuáguelo con agua limpia. Para recoger derrames Su limpiadora SteamVac™ también se puede usar para recoger pequeños derrames de líquidos (1 galón/3,8 L) o menos, nunca debe exceder 1/4 de pulgada/6,3 mm en profundidad) en alfombras, tapicería o pisos expuestos.
Automático). Encienda la limpiadora. Nota: El “enjuague automático” y el enjuague no están disponibles durante el use con accesorios. La manguera sólo dispensará agua mezclada con detergente. No deje de verificar el código de limpieza de su tapiz. Use su limpiadora en tapices marcados “W” o “W/S”. 3-21 2. Coloque el mango en posición vertical. Las escobillas del agitador no girarán mientras el mago esté vertical. 9.
Presione el conjunto de escobillas firmemente para encajarlo en su lugar. Almacenamiento Antes de guardar: • Vacíe el tanque para el agua limpia y déjelo secar al aire. Vuelva a colocarlo en la limpiadora. • El detergente no usado se puede guardar en el contenedor de detergente. • Vacíe el tanque de recuperación, enjuague el tanque y la tapa a fondo con agua limpia y deje secar al aire.
Garantía completa de un año (Para uso doméstico) Su artefacto HOOVER® está garantizado en caso de uso doméstico normal, según el Manual del Propietario, contra defectos originales en el material y la fabricación por el período de un año completo a contar de la fecha de compra. La presente garantía cubre gratuitamente la mano de obra y las piezas necesarias para dejar este artefacto en buen estado de funcionamiento durante el período de garantía.
® Item Description Deep Cleansing Carpet/Upholstery Detergent - 128 oz. 48 oz. Ultra Carpet/Upholstery Detergent-48 oz. Orange Essence™ Carpet/Upholstery Detergent - 48 oz. Spot and Stain Spray Cleaner - 32 oz. 16 oz. Premium Pet Formula Carpet/Upholstery Detergent - 48 oz Pet Stain & Odor Remover - 32 oz. Floor-to-Floor™ Hard Floor Cleaning Solution - 32 oz. Hard Floor Squeegee Hard Floor Brush Block Carpet Brush Block Part No. No. in Cost/ Pack Per Pack 40321128 40321048 40301448 1 1 1 $21.99 $11.
✂ $ $ $ MERCANCIA TOTAL $ AÑADA SU IMPUESTO ESTATAL CORRESPONDIENTE + GASTOS DE ENVIO + COSTO TOTAL $7.50 $ FORMULARIO DE PEDIDO DE PIEZAS Y ACCESORIOS POR CORREO ® Número de pieza Descripción del artículo Detergente para limpieza profunda de alfombras y tapicería - 128 oz. 48 oz. Detergente Ultra para alfombras y tapicería - 48 oz. No. en Costo/ Paqte. por Paqte. 40321128 40321048 1 1 $21.99 $11.99 40301448 1 $15.99 Limpiador para manchas - 32 oz. 16 oz.
31
HOOVER y R1 3-06 F7452900 ® HOOVER and son marcas registradas Printed in Mexico ® are registered trademarks 56518-193