Owner’s Manual Operating and Servicing Instructions Español - página E1 www.hoover.com IMPORTANT: READ CAREFULLY BEFORE ASSEMBLY AND USE. Questions or concerns? For assistance, please call Customer Service at 1-800-944-9200 Mon-Fri 8am-7pm EST before returning this product to the store. THIS PRODUCT IS INTENDED FOR HOUSEHOLD USE ONLY. IF USED COMMERCIALLY WARRANTY IS VOID. ©2011 Techtronic Floor Care Technology Limited. All rights reserved.
Thank you for choosing a HOOVER® product. Please enter the complete model and Manufacturing Code in the spaces provided. Model MFG. CODE Hint: Attach your sales receipt to this owner’s manual. Verification of date of purchase may be required for warranty service of your HOOVER® product. Be sure to register your product online at Hoover.com or call 1-800-263-6376 to register by phone. Manufacturing code (Label located on bottom of cleaner) Contents Important Safety Instructions ............................
IMPORTANT SAFETY INSTRUCTIONS SAVE THESE INSTRUCTIONS When using an electrical appliance, basic precautions should always be followed, including the following: READ ALL INSTRUCTIONS BEFORE USING THIS APPLIANCE. WARNING: TO REDUCE THE RISK OF FIRE, ELECTRIC SHOCK OR INJURY: • To avoid internal component damage, use only Hoover® cleaning products intended for use with this Appliance. (See Cleaning Products section of this manual.) • Use only on surfaces moistened by the cleaning process or small spills.
• Avoid picking up hard, sharp objects with the carpet cleaner. They may damage the machine. • Keep hair, loose clothing, fingers, feet and all parts of body away from openings and moving parts. • Use indoors only. • Do not put any object into openings. Do not use with any opening blocked; keep free of dust, lint, hair, and anything that may reduce air flow. • To help prevent matting and resoiling, avoid contact with carpets until they are dry.
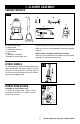
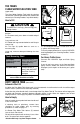
1. Cleaner ASSEMBLY Carton contents 1.1 B C D Carpet Upholstery Cleaner Bare floor cleaner PreCleaner Carpet Upholstery Cleaner A F E A. Carpet cleaner body B. Upper handle C. Handle bolts and nuts D. Hose Holder* E. Hose* F. Tool Holder with Screw* *Available on select models only Remove all parts from carton and identify each item shown. Make sure all parts are located before disposing of packing materials. NOTE: Phillips screwdriver needed for assembly.
Attach Tool holder 1.4 (Available on select models only) 1.4 Remove tool and taped screw from holder. Insert projections on holder into slots on back of cleaner. Insert screw and tighten with screw driver. Store Hose (Available on select models only) 1.5 Start with converter end of hose (H). Fit converter over tab near tool holder (I). Press converter firmly to snap in place. Press solution tube (G) into clip next to converter as shown. 1.5 G I 1.6 K H L 1.
2. HOW TO USE Cleaner Description 1. Hand Grip 2. Clean Surge® Button* 3. Hose* 4. Clean Water Solution Tank Cap/ Measuring Cup 5. Front Tool Storage* 6. Carry Handle 7. Clean Water Solution Tank 8. Dirty Water Tank Lid 9. Dirty Water Tank 10. Handle Release Pedal 11. Brush Speed Selector: HI, LO, or OFF 12. Brush Indicator: spins when brushes are rotating 13. Hood 14. Solution Tube Connection* 15. Nozzle 16. Solution Trigger 17. Cord Hooks 18. Hose Hooks* 19. Hose Holder* 20. Cord Clip 21.
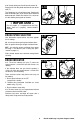
The Tanks: Clean Water Solution Tank 2.4 2.5 (upper tank) The Clean Water Solution Tank holds the cleaning solution that is to be dispersed onto the surface to be cleaned (see “Cleaning Products” on p.20 for details). How to Fill ! CAUTION ! To reduce the risk of injury from moving parts, unplug cleaner. 2.6 5 OUNCES/ 150 ml 2.7 B Place carpet cleaner handle in the upright, locked position. 2.4 To remove tank, press down on handle and pull forward. Carry tank to a sink. A 2.
2.10 2.10 Unlatch back part of tank lid and remove lid. Empty tank. Pour dirty water out from the rear of the tank (F). The lid replaces in a hinge-like manner. Position the front of lid under tabs (G) on front of tank. Rotate lid down onto tank. Make sure that the lid is secure on all sides before placing tank on cleaner. G F IMPORTANT For full suction, it is important that the Dirty Water Tank lid is properly secured before cleaning. Brush Speed Selector 2.
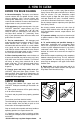
3. How to CLEAN Before you begin cleaning A. Vacuum thoroughly - For carpet, use a Hoover® vacuum cleaner with an agitator for best results. Vacuum upholstery with a vacuum cleaner with cleaning tool attachments. Use a crevice tool to reach into tufts and folds. Do not use the SteamVac® carpet cleaner as a dry vacuum cleaner. B.
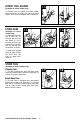
Continue to squeeze trigger and slowly pull carpet cleaner back toward you (second wet stroke). Release trigger and slowly push carpet cleaner forward over area just sprayed with solution (dry stroke). Then slowly pull carpet cleaner back toward you without squeezing trigger (dry stroke). 3.3 Start Exit Overlap strokes by 1 inch to help prevent streaking. Keep nozzle flat on floor for both forward and reverse strokes. 3.3 To get the most effective cleaning, clean room in sections as shown.
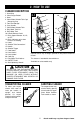
Cleaning bare floors 3.4 How to attach bare floor attachment 3.5 A TE R O TA OR FLO BARE ON (available at additional cost if not included with your model) RO R BA TA E ! F B RO CAUTION TE LOOR O N ! To reduce the risk of injury from moving parts, unplug cleaner. TA RE BA F TE LOOR O N To prevent possible leaking, remove Clean Water Solution Tank and Dirty Water Tank before positioning bare floor attachment. 3.
4. TOOLS Using the tools (Available on select models only) 4.1 A. Powered Hand Tool has rotating brushes for extra scrubbing action on small carpet areas, carpeted stairs and upholstery. A B B. Stair/Upholstery Nozzle has a built-in brush to help provide the scrubbing action some spots may need for removal. C. Nozzle Cleaning Tool for removing lint and/or debris from nozzle before storage C How to attach hose (Available on select models only) ! CAUTION 4.2 ! 4.3 3.
How to Attach Tool 4.7 (Available on select models only) ! CAUTION I ! To reduce the risk of injury from moving parts, unplug cleaner. All tools connect to the hose in the same manner. 4.7 Attach tool to connector end of hose by sliding it onto connector until the tab (I) locks it securely. J Using your thumb, push forward and up on the latch (J) to remove tool as shown.
Cleaning upholstery (Tool available on select models only) 4.10 Be sure to check the cleaning code on your upholstery. Use your HOOVER® SteamVac® carpet cleaner only on upholstery marked “W” or “W/S”. 4.10 Place handle in upright position. Agitator brushes will not rotate while handle Is In upright position. Fill Clean Water Solution Tank with HOOVER® Detergent according to instructions on page 8. Attach tool to end of hose. Manufacturers tag 4.11 IMPORTANT Do not point tools toward people or pets.
After using tool 4.14 4.13 (Available on select models only) Drain suction hose by turning carpet cleaner ON and holding end of hose up for several seconds. Do not press trigger. L M Disconnect carpet cleaner from electrical outlet. 4.13 Drain solution tube by placing round end in sink and raising nozzle above your head. Press the trigger. 4.16 3.20 4.15 Proceed with steps in “After cleaning” section of manual. 4.14 Occasionally, debris may become lodged inside of the hose at the converter end (L).
5. MAINTENANCE Familiarize yourself with these home maintenance tasks as proper use and care of your cleaner will ensure continued cleaning effectiveness. Any other servicing should be done by an authorized service representative. nozzle: How to Clean (Available on select models only) If lint or other debris becomes lodged in nozzle, do not attempt to remove nozzle cover. 5.1 Pour one to two cups of clear water on a non-carpeted floor Do not pour water onto a wood floor.
Storage Before storing: • Empty Clean Water Solution Tank and rinse thoroughly with clean water. • Replace empty Clean Water Solution Tank and turn carpet cleaner ON. Squeeze trigger and push carpet cleaner forward and back several times to expel any solution remaining in the carpet cleaner’s system. (Do not use carpet cleaner on wood floors.) • Empty Dirty Water Tank and rinse thoroughly with clean water.
Helpful Reminders ! CAUTION 6.1 6.2 ! Unplug the cleaner before doing any of the following. • Use HOOVER® brand detergents; others may cause excessive foam. • 6.1 Push recovery tank front panel completely down when cleaning floors. • 6.2 Secure Dirty Water Tank lid on all sides before cleaning. • Empty Dirty Water Tank when full or when automatic shut-off engages. • Use extra dry strokes to aid in faster drying of the carpet. 7.
8. 7. CleaninG CLEANING produCts PRODUCTS WARNING: To reduce the risk of fire and electric shock due to internal component damage, use only Hoover® cleaning products and Hoover® hard surface attachments intended for use with the appliance as noted below.
9. WARRANTY Limited ONE Year Warranty (Domestic Use) WHAT THIS WARRANTY COVERS When used and maintained in normal household use and in accordance with the Owner’s Manual, your HOOVER® product is warranted against original defects in material and workmanship for a full one year from date of purchase (the “Warranty Period”). During the Warranty Period, Hoover® will provide labor and parts, at no cost to you, to correct any such defect in products purchased in the United States, U.S.
MANUAL DEL PROPIETARIO Instrucciones de Funcionamiento y Servicio www.hoover.com IMPORTANTE: LEA ATENTAMENTE ANTES DE ENSAMBLAR Y USAR. ¿Tiene alguna pregunta o inquietud? Para obtener asistencia, llame al Servicio de atención al cliente al 18009449200, de lunes a viernes, de 8 a.m. a 7 p.m., hora del ESTE, antes de devolver este producto a la tienda. ESTA ASPIRADORA PARA ALFOMBRAS ESTÁ DISEÑADA PARA USO DOMÉSTICO. EL USO COMERCIAL DE ESTE PRODUCTO ANULA LA GARANTÍA.
Gracias por haber elegido un producto HOOVER®. Anote los números completos de Código de fabricación en los espacios provistos. Modelo CÓDIGO DE FABRICACIÓN Consejo: Adjunte su recibo de compra a este Manual del propietario. Para obtener el servicio de garantía de su producto HOOVER® puede requerirse la verificación de la fecha de compra. Inscriba su producto en línea en Hoover.com, o llame al 1-800-263-6376 si prefiere hacerlo por teléfono.
¡SALVAGUARDIAS IMPORTANTES! ¡GUARDE ESTAS INSTRUCCIONES! Al usar un aparato eléctrico, observe siempre las precauciones básicas, incluyendo las siguientes: LEA TODAS LAS INSTRUCCIONES ANTES DE USAR ESTE APARATO ADVERTENCIA: PARA REDUCIR EL RIESGO DE INCENDIOS, CHOQUES ELÉCTRICOS O LESIONES: • Para evitar daños a los componentes internos, use únicamente productos de limpieza Hoover® diseñados para uso con este aparato. (Vea la sección Productos de limpieza de este manual).
• Para ayudar a reducir el tiempo de secado, asegúrese de que el área esté bien ventilada al usar detergentes y otros limpiadores con esta máquina. • Mantenga los detergentes y otros limpiadores fuera del alcance de los niños. • No use este aparato para aspirar líquidos inflamables o combustibles, como gasolina, ni lo use en áreas donde dichos líquidos pudieran estar presentes. • No aspire blanqueadores con cloro, limpiadores de drenaje, gasolina ni ningún otro material tóxico con este aparato.
1. ENSAMBLADO DE LA ASPIRADORA Contenido de la caja 1.1 B C D Carpet Upholstery Cleaner Bare floor cleaner PreCleaner Carpet Upholstery Cleaner A F E Retire todas las piezas de la caja e identifique cada artículo que se muestra. A.Cuerpo de la limpiadora para alfombras B. Mango superior C. Pernos y tuercas D.Sujetador para la manguera* E. Manguera* F. Sujetador del mango con tornillo del mango* Asegúrese de ubicar todas las piezas antes de eliminar el embalaje.
Coloque el sujetador de accesorios 1.4 (en algunos modelos) 1.4 Retire la boquilla para tapizados y el tornillo del sujetador para accesorios. Introduzca las lengüetas. Deslice hacia abajo. Introduzca el tornillo en y apriételo con un destornillador. Para guardar la manguera 1.5 (en algunos modelos) 1.5 Comience con el extremo del convertidor de la manguera (H). Coloque el convertidor sobre la lengüeta cerca del sujetador de accesorios (I).
2. FUNCIONAMIENTO Descripción de la aspiradora 1. Empuñadura del mango 2. Botón Clean Surge™* 3. Manguera* 4. Cubierta del tanque de solución limpia/ taza medidora 5. Almacenamiento delantero del accesorio* 6. Mango de transporte 7. Tanque de solución limpia 8. Tapa del tanque de recuperación 9. Tanque de recuperación 10. Pedal para soltar el mango 11. Selector de velocidad de las escobillas: HI, LO, u OFF 12. Indicador de escobillas: rota cuando las escobillas giran 13. Cubierta 14.
Los tanques: Tanque de solución limpia 2.4 2.5 (tanque superior) El tanque de solución limpia contiene la solución de limpieza que se dispersará sobre la superficie que se desea limpiar (vea “Productos de limpieza” en la página 20 para obtener detalles). Cómo llenar ! PRECAUCIÓN ! Para reducir el riesgo de lesiones ocasionadas por piezas en movimiento, desenchufe la aspiradora. 2.6 5 OUNCES/ 150 ml 2.7 B Coloque el mango de la limpiadora para alfombras en posición vertical y trabada. 2.
2.10 2.10 Desenganche la parte posterior de la tapa del tanque y retire la tapa. Vacíe el tanque. Vierta el agua sucia de la parte posterior del tanque (F). La tapa se vuelve a colocar con un mecanismo de bisagra. Coloque la parte delantera de la tapa debajo de las lengüetas (G) en la parte delantera del tanque. Gire la tapa hacia abajo sobre el tanque. Asegúrese de que la tapa esté firme en todos los lados antes de colocar el tanque en la limpiadora.
3. Cómo limpiar Antes de comenzar a limpiar A. Aspire bien - En el caso de alfombras, use una aspiradora Hoover® con un agitador para obtener los mejores resultados. Limpie los tapizados con una aspiradora que tenga accesorios de limpieza. Use un accesorio para hendiduras para limpiar nudos y pliegues. No use la limpiadora para alfombras SteamVac™ como aspiradora en seco. B.
3.2 3.2 Oprima el gatillo (B) para liberar la solución de limpieza y empuje lentamente la limpiadora para alfombras hacia adelante (equivale a una pasada húmeda). Continúe oprimiendo el gatillo y tire lentamente de la limpiadora para alfombras hacia atrás en dirección a usted (segunda pasada húmeda). Suelte el gatillo y empuje lentamente la limpiadora para alfombras hacia adelante sobre un área donde recién se haya rociado la solución (pasada seca).
Limpieza de pisos sin alfombras 3.4 TE R O TA OR FLO BARE ON Cómo conectar el accesorio para pisos sin alfombras R BA TA TE LOOR O N E F B ! RO TA RE BA TE LOOR O N PRECAUCIÓN RO (disponible a un costo adicional) ! 3.5 A F Para reducir el riesgo de lesiones ocasionadas por piezas en movimiento, desenchufe la aspiradora. Para evitar posibles fugas, retire el tanque de solución limpia y el tanque de recuperación antes de colocar el accesorio para pisos sin alfombras. 3.
4. accesorios Uso de los accesorios (en algunos modelos) A. El accesorio de mano turboaccionado tiene escobillas giratorias para una acción de fregado A adicional en áreas pequeñas de alfombras, escaleras alfombradas y tapizados. 4.1 B. La boquilla para escaleras/tapizados tiene una escobilla incorporada que ayuda a proporcionar la acción de fregado que puede ser necesaria para eliminar algunas manchas. B C C.
Cómo conectar el accesorio ! PRECAUCIÓN (en algunos modelos) 4.7 I ! Para reducir el riesgo de lesiones ocasionadas por piezas en movimiento, desenchufe la aspiradora. Todos los accesorios deben conectarse a la manguera de la misma manera. 4.7 Conecte el accesorio al extremo de la manguera con el conector deslizándolo sobre el conector hasta que la lengüeta (I) lo trabe con seguridad. J Con el pulgar, empuje hacia adelante y hacia arriba sobre la traba (J) para retirar el accesorio como se muestra.
Limpieza de tapizados (en algunos modelos) 4.10 Asegúrese de consultar el código de limpieza en su tapizado. Use su limpiadora para alfombras SteamVac® HOOVER® únicamente en tapizados marcados con “W” o “W/S”. 4.10 Coloque el mango en posición vertical. Las escobillas del agitador no giran mientras el mango se encuentra en posición vertical. Llene el tanque de solución limpia con Detergente para alfombras/tapizados HOOVER® de acuerdo con las instrucciones incluidas en la página 8. Manufacturers tag 4.
Después de usar el accesorio 4.14 4.13 (en algunos modelos) Drene la manguera de succión encendiendo la limpiadora para alfombras levantando el extremo de la manguera durante algunos segundos. No presione el gatillo. L M Desconecte la limpiadora para alfombras de la toma de corriente eléctrica. 4.13 Drene el tubo de solución colocando el extremo redondo en el fregadero y levantando la boquilla sobre su cabeza. Presione el gatillo. 4.16 3.20 4.15 4.
5. MANTENIMIENTO Familiarícese con estas tareas de mantenimiento en el hogar, ya que el uso y cuidado apropiados de su aspiradora asegurarán una limpieza continuamente eficaz. Cualquier otra tarea de mantenimiento debe ser realizada por un representante de mantenimiento autorizado. boquilla: Cuándo limpiarlo (en algunos modelos) Si se depositan pelusas o cualquier otro residuo en la boquilla, no intente retirar la tapa de la boquilla. 5.
Almacenamiento Antes de guardarlo: • Vacíe el tanque de solución y enjuáguelo bien con agua limpia. • Vuelva a colocar el tanque de solución vacío y encienda la limpiadora para alfombras. Oprima el gatillo y tire la limpiadora para alfombras hacia adelante y hacia atrás varias veces para expulsar cualquier solución que haya quedado en el sistema de la limpiadora para alfombras. (No use la limpiadora para alfombras en pisos de madera).
Problema Causa posible Las escobillas/ el indicador de escobillas no giran durante la limpieza del piso. 1. La pantalla del indicador está sucia. Causa posible 1. Retire la tapa transparente sobre el indicador y limpie la pantalla; vuelva a colocar la tapa. 2. El selector de velocidad está en la 2. Mueva el selector de velocidad a la posición OFF. posición LO o HI. Recordatorios útiles ! PRECAUCIÓN 6.1 6.2 ! Desenchufe la limpiadora antes de realizar cualquiera de los siguientes pasos.
8. 7. produCtos PRODUCTOS de DE liMpieza LIMPIEZA ADVERTENCIA: Para reducir el riesgo de incendio y descarga eléctrica debido a daños de los componentes internos, use únicamente productos de limpieza de Hoover® y accesorios para suelos duros diseñados para uso con este aparato (véase abajo).
9. Garantía Garantie limitée de un an (Para uso doméstico) QUÉ CUBRE ESTA GARANTÍA Siempre que el uso y el mantenimiento de su producto HOOVER® se realicen en condiciones de uso doméstico normales y según el Manual del usuario, el producto estará garantizado contra defectos originales en el material y la fabricación durante de un an à completos desde la fecha de compra (el “Período de Garantía”).
Guide d’utilisation Instructions d’utilisation et d’entretien www.hoover.com IMPORTANT : LIRE CES INSTRUCTIONS ATTENTIVEMENT AVANT D’UTILISER L’ASPIRATEUR. Vous avez des questions ou des inquiétudes? Pour obtenir de l’aide et avant de retourner ce produit au magasin, veuillez appeler le service à la clientèle au 1 800 9449200 du lundi au vendredi, de 8 h à 19 h (HNE). L’UTILISATION DE CE PRODUIT À DES FINS COMMERCIALES INVALIDE LA PRÉSENTE GARANTIE. ©2011 Techtronic Floor Care Technology Limited.
Merci d’avoir choisi un produit HOOVERMD. Veuillez inscrire les numéros de modèle et de série COMPLETS dans les espaces fournis à cet effet Modèle Code de fabrication Conseil: Il est recommandé de joindre votre reçu de caisse au guide de l’utilisateur, car une vérification de la date d’achat peut être effectuée avant toute réparation couverte par la garantie de votre produit HOOVERMD. N’oubliez pas d’enregistrer votre produit en ligne, à l’adresse Hoover.com, ou par téléphone, au 1 800 263-6376.
CONSIGNES DE SÉCURITÉ IMPORTANTES RANGER ET CONSERVER CES INSTRUCTIONS Durant l’utilisation d’un appareil électrique, toujours respecter les précautions élémentaires, y compris les suivantes : LIRE TOUTES LES INSTRUCTIONS AVANT D’UTILISER CET APPAREIL. AVERTISSEMENT: Afin de réduire au minimum les risques d’incendie, de choc électrique ou de blessures : • Pour éviter d’endommager les composants internes, n’utiliser que des produits nettoyants de HooverMD conçus pour être utilisés avec cet appareil.
• Ne pas pointer les accessoires vers des personnes ou des animaux de compagnie. • Pour réduire le temps de séchage, s’assurer de bien aérer l’espace nettoyé quand vous utilisez des détergents ou d’autres produits nettoyants avec cet appareil. • Garder les détergents et les autres produits nettoyants hors de la portée des enfants. • Ne pas ramasser de liquides inflammables ou combustibles comme de l’essence, et ne pas utiliser l’appareil dans des endroits où de telles matières sont présentes.
1. Ensamblado de la aspiradoraN Contenu de l’emballage 1.1 B C D Carpet Upholstery Cleaner Bare floor cleaner PreCleaner Carpet Upholstery Cleaner A F E Retirer toutes les pièces de l’emballage. A. Shampouineuse B. Poignée supérieure C. Boulons et écrous pour le manche D. Support à tuyau* E. Tuyau* F. Porte-accessoires avec vis* *Seulement sur certains modèles. Avant d’éliminer les matériaux d’emballage, s’assurer qu’aucune des pièces illustrées ne manque.
Fixer le porte-accessoires 1.4 (sur certains modèles) 1.4 Retirer l’outil et la vis (fixée par un ruban adhésif) du support. Insérer les boutons saillants dans les encoches à l’arrière de la shampouineuse. Insérer la vis et resserrer avec un tournevis. Rangement du tuyau (sur certains modèles) 1.5 Commencer par l’extrémité du connecteur sur le tuyau (H). Mettre en place le connecteur sur la languette près du porte-accessoires (I). Appuyer fermement sur le connecteur pour l’enclencher en place.
2. Utilisation Description de l’aspirateur 1. 2. 3. 4. Poignée Bouton Clean SurgeMC* Tuyau* Bouchon du réservoir de solution nettoyante/tasse à mesurer 5. Rangement avant pour les accessoires* 6. Poignée de transport 7. Réservoir de solution nettoyante 8. Couvercle du réservoir de récupération 9. Réservoir de récupération 10. Pédale de déblocage du manche 11. Sélecteur de vitesse des brosses : HI (élevée), LO (basse) ou OFF (arrêt) 12.
Réservoirs : Réservoir de solution nettoyante (réservoir supérieur) Le réservoir de solution nettoyante contient la solution nettoyante qui est dispersée sur la surface à nettoyer (voir « Produits nettoyants » à la page 20 pour obtenir de plus amples renseignements). 2.4 2.5 Remplissage ! MISE EN GARDE ! Pour réduire les risques de blessures causées par des pièces en mouvement, débrancher l’appareil avant d’en effectuer l’entretien. Enclencher le manche de la shampouineuse en position verticale. 2.
2.9 2.9 Tourner les languettes du réservoir de récupération (E) vers l’extérieur (une sur chaque côté du réservoir). Soulever le réservoir et le retirer de la shampouineuse, puis le transporter jusqu’à un évier ou un lavabo. Pour remettre en place le réservoir, faire l’inverse. 2.10 Détacher la partie arrière du réservoir de récupération et retirer le couvercle. Vider le réservoir. Verser l’eau sale par l’arrière du réservoir (F). E Le couvercle se remet en place comme une charnière.
3. Nettoyage Avant de commencer le nettoyage HOOVERMD. - Tester de nouveau la solidité des couleurs avec le nettoyant en vaporisant le produit sur une surface hors de vue; attendre dix minutes, puis essuyer avec un essuie-tout ou un chiffon blanc. A. Bien passer l’aspirateur - Pour le tapis, utiliser un aspirateur HooverMD doté d’un rouleau-brosse agitateur pour obtenir les meilleurs résultats possibles. Passer l’aspirateur sur les meubles à l’aide d’un aspirateur doté d’une buse pour meubles.
Nettoyage de la moquette (continu) 3.2 Pour éviter de marcher sur une moquette humide, commencer par nettoyer la zone la plus éloignée de la porte ou du chemin vers l’évier où les réservoirs seront vidés et remplis. 3.3 Start Peser sur la pédale de déblocage du manche et abaisser le manche en position pour l’utilisation; mettre en marche (ON) la shampouineuse. Exit 3.
Nettoyage de parquets 3.4 Fixation de l’accessoire pour parquet TE R O TA OR FLO BARE ! RO R BA TA TE LOOR O N E F Pour réduire les risques de blessures causées par des pièces en mouvement, débrancher l’appareil avant d’en effectuer l’entretien. B RO MISE EN GARDE ON (vendu séparément) ! 3.5 A TA RE BA TE LOOR O N F Pour prévenir une fuite éventuelle, retirer le réservoir de solution nettoyante et le réservoir de récupération avant de fixer l’accessoire pour parquets. 3.
4. accessoires Utilisation des accessoires (vendus séparément) A. L’accessoire portatif à turbine comporte des brosses rotatives permettant un récurage supplémentaire sur les petits tapis, les escaliers recouverts de moquette et les meubles. 4.1 A B B. La buse pour escaliers/meubles comporte une brosse intégrée qui produit l’action de récurage parfois nécessaire pour l’élimination des taches. C.
Fixation des accessoires ! MISE EN GARDE (sur certains modèles) 4.7 ! I Pour réduire les risques de blessures causées par des pièces en mouvement, débrancher l’appareil avant d’en effectuer l’entretien. Tous les accessoires se fixent de la même façon. 4.7 Fixer l’accessoire au connecteur à l’extrémité du tuyau en le faisant glisser dans le connecteur jusqu’à ce que la languette (I) le maintienne en place solidement.
Nettoyage de meubles (sur certains modèles) 4.10 S’assurer de vérifier le code de nettoyage figurant sur le tissu qui recouvre vos meubles. N’utiliser la shampouineuse SteamVacMC de HOOVERMD qu’avec des tissus portant le code « W » ou « W/S ». 4.10 Placer le manche en position verticale. Le rouleau-brosse agitateur ne tournera pas quand le manche est en position verticale.
Après l’utilisation d’un accessoire (sur certains modèles) 4.14 4.13 Drainer le tuyau d’aspiration en mettant la shampouineuse en marche (ON) et en tenant l’extrémité du tuyau en l’air pendant plusieurs secondes. Ne pas appuyer sur la gâchette. Débrancher l’appareil. 4.13 Drainer le tube de solution en plaçant l’extrémité ronde du tube dans l’évier et en soulevant la buse au-dessus de votre tête. Appuyer sur la gâchette.
5. Entretien Il est recommandé de vous familiariser avec les tâches d’entretien; l’utilisation et l’entretien appropriés de l’appareil assureront son bon fonctionnement. Toute autre tâche d’entretien doit être confiée à un représentant de service autorisé. la buse: Quand le nettoyer (sur certains modèles) Si des peluches ou d’autres débris s’accumulent dans la buse, ne pas tenter de retirer le couvercle de la buse. 5.1 Verser une à deux tasses d’eau propre sur un plancher non recouvert de moquette.
Rangement Avant de ranger l’appareil : • Vider le réservoir de solution et bien rincer à l’eau propre. • Remettre en place le réservoir de solution vide et mettre l’appareil en marche (ON). Appuyer sur la gâchette et pousser puis tirer la shampouineuse plusieurs fois pour évacuer toute solution se trouvant encore dans l’appareil. (Ne pas utiliser l’appareil sur des planchers en bois.) • Vider le réservoir de récupération et bien rincer à l’eau propre.
PROBLÈME CAUSE POSSIBLE SOLUTION POSSIBLE Les brosses/ l’indicateur de rotation des brosses ne tournent pas pendant le nettoyage. 1. L’écran de l’indicateur est sale. 1. Retirer le couvercle transparent et nettoyer l’écran; replacer le couvercle. 2. Le sélecteur de vitesse est désactivé (OFF). 2. Changer la vitesse du sélecteur à Low (basse) ou Hi (élevée). Aide-mémoire pratique ! MISE EN GARDE 6.1 6.
8. 7. produits PRODUITS nettoyants NETTOYANTS AVERTISSEMENT : Pour réduire les risques de choc électrique causés par des composants internes endommagés, n’utiliser que les produits nettoyants HooverMD et les accessoires pour les surfaces dures conçus pour cet appareil, tel qu’il est indiqué cidessous.
9. Garantie Garantie limitée de un an (Usage domestique) La présente garantie ne couvre pas le ramassage, la livraison, le transport ou la réparation à domicile du produit. Cette garantie ne s’applique pas aux produits achetés : hors des États-Unis (ce qui comprend ses territoires et possessions); hors du Programme d’échanges militaires américain; hors du Canada. Cette garantie ne couvre pas les produits achetés chez un tiers autre qu’un détaillant, marchand ou distributeur autorisé de produits HooverMD.