OWNER’S MANUAL Operating and Servicing Instructions Español - página E1 www.hoover.com IMPORTANT: READ CAREFULLY BEFORE ASSEMBLY AND USE. Questions or concerns? For assistance please call Customer Service at 1 800 944 9200 Mon Fri 8am 7pm EST PLEASE DO NOT RETURN THIS PRODUCT TO THE STORE. THIS PRODUCT IS INTENDED FOR HOUSEHOLD USE ONLY. IF USED COMMERCIALLY WARRANTY IS VOID.
Thank you for choosing a HOOVER® product. Please enter the complete model and Manufacturing Code in the spaces provided MODEL MFG. CODE Hint: Attach your sales receipt to this owner s manual Verification of date of purchase may be required for warranty service of your HOOVER® product Be sure to register your product online at Hoover com or call 1 800 944 9200 to register by phone Visit Hoover com for additional video instructions for assembly and maintenance CONTENTS Important Safety Instructions..........
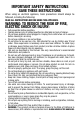
IMPORTANT SAFETY INSTRUCTIONS SAVE THESE INSTRUCTIONS When using an electrical appliance, basic precautions should always be followed, including the following: READ ALL INSTRUCTIONS BEFORE USING THIS APPLIANCE. WARNING: TO REDUCE THE RISK OF FIRE, ELECTRIC SHOCK OR INJURY: • Fully assemble before operating. • Operate cleaner only at voltage specified on data label on back of cleaner. • Do not leave appliance when plugged in. Unplug from outlet when not in use and before cleaning or servicing.
CAUTION: TO REDUCE THE RISK OF DAMAGE: • Avoid picking up hard, sharp objects with this product, as they may cause damage. • Store appropriately indoors in a dry place. Do not expose machine to freezing temperatures. • Do not use sharp objects to clean out hose as they can cause damage. • With brushroll on, do not allow cleaner to sit in one location for an extended period of time, as damage to floor can result.
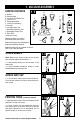
1. VACUUM ASSEMBLY CARTON CONTENTS A Handle B Vacuum Base C Pet Turbo Tool/Turbo Tool* D Crevice Tool E Telescoping Wand F Screw (for assembly) G Dirt Cup H Pet Upholstery Tool* Articulating Upholstry Tool* J Articulating Dusting Tool* K Extra Filter* *Varies per model 1.1 B E C D A Remove all parts from carton and identify each item shown F H G K J Make sure all parts are located before disposing of packing materials Additional parts may be ordered at Hoover com or call 1 800 944 9200 1.
2.
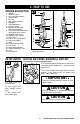
TRANSPORTING CLEANER 2 6 To move your cleaner from room to room put handle in upright position tilt cleaner back on rear wheels and push forward 2.6 HANDLE POSITIONS 2 7 The handle of your cleaner has two positions: 1) Upright for storage and when using cleaning tools 2) Operating position for general operation on carpets and floors 2.7 1 2 Step on handle release pedal to lower handle CARPET HEIGHT ADJUSTMENT 2 8 To adjust height setting TURN knob (A) to desired height setting 2.
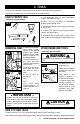
3. TOOLS Tools allow for cleaning surfaces above the floor and for reaching hard to clean areas The vacuum is ready for tool use when handle is in upright position SELECT PROPER TOOL A Use Upholstery Tool to clean upholstered furniture and carpeted stairs (Tools may vary per model) B Turbo Tool may be used for upholstered furniture and carpeted stairs 3.
3.4 STAIR CLEANING 3 4 Lift vacuum by Stair Cleaning Handle and position on stairs Clean forward to back Never leave the vacuum standing on stairs when not cleaning 3.
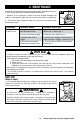
4. MAINTENANCE Familiarize yourself with these home maintenance tasks as proper use and care of your vacuum will ensure continued cleaning effectiveness 4.
How to Empty 4 3 Press dirt cup release button (A) and pivot cup out 4.3 4.4 A 4 4 Hold dirt cup over trash receptacle push dirt cup door release lever (B) to open dirt cup door (C) 4.
Carbon Filter : How to Clean What to Buy: Carbon Filter (Available on select models only).
HOSE: How to Clean ! WARNING ! To reduce the risk of personal injury Unplug before cleaning or servicing 4 16 To remove hose for tool use press the hose release button (A) and pull hose end out 4.16 A Clear away debris or obstructions from hose Do not use sharp objects to clean out hose as they can cause damage To lock back into place push hose into hose tube until you hear a click TURBO TOOL: How to Clean 4.17 (Tool varies per model) ! CAUTION A 4.
4.23 BELT ! CAUTION 4.24 A ! To reduce the risk of injury from moving parts Unplug before servicing The belt is located under the bottom plate of the vacuum and should be checked from time to time to be sure it is in good condition B When To Replace 4.25 Replace belt if it is stretched cut or broken To check the belt refer to Fig 4 26 4 28 How To Replace D 4.26 E 4.
5.
6.
7.
GUIDE D’UTILISATION Instructions d’utilisation et d’entretien www.hoover.com IMPORTANT : LIRE CES INSTRUCTIONS ATTENTIVEMENT AVANT D’UTILISER L’ASPIRATEUR. Vous avez des questions ou des inquiétudes? Veuillez appeler le service à la clientèle au 1 800 9449200 du lundi au vendredi de 8 h à 19 h (HNE) VEUILLEZ NE PAS RETOURNER CE PRODUIT AU MAGASIN. L’UTILISATION DE CE PRODUIT À DES FINS COMMERCIALES INVALIDE LA PRÉSENTE GARANTIE.
Merci d’avoir choisi un produit HOOVERMD.
CONSIGNES DE SÉCURITÉ IMPORTANTES RANGER ET CONSERVER CES INSTRUCTIONS Durant l’utilisation d’un appareil électrique, toujours respecter les précautions élémentaires, y compris les suivantes : LIRE TOUTES LES INSTRUCTIONS AVANT D’UTILISER CET APPAREIL. AVERTISSEMENT: AFIN DE RÉDUIRE AU MINIMUM LES RISQUES D’INCENDIE, DE CHOC ÉLECTRIQUE OU DE BLESSURES : • Assembler complètement avant l’utilisation. • N’utiliser l’aspirateur qu’à la tension spécifiée sur la plaque signalétique située au dos de l’appareil.
• Ne pas aspirer les liquides inflammables ou combustibles comme l’essence, ni utiliser l’appareil à proximité de ces matériaux. • Tenir la fiche lors de l’enroulement du cordon afin qu’elle ne cingle pas. • Débrancher l’appareil avant de fixer un accessoire portatif électrique. • N’aspirer aucune matière brûlante ou dégageant de la fumée, comme des ciga rettes, des allumettes ou des cendres chaudes. • Ne pas utiliser l’appareil sans son vide-poussière ou ses filtres.
1.
2.
TRANSPORT DE L’ASPIRATEUR 2 6 Pour déplacer l appareil d une pièce à l autre placer le manche en position verticale incliner l appareil vers l arrière pour le faire reposer sur ses roues arrière puis le pousser vers l avant 2.6 2.
3. ACCESSOIRES Les accessoires permettent de nettoyer les surfaces plus élevées et les endroits difficiles à atteindre Pour utiliser les accessoires placer le manche à la position verticale SÉLECTION DE L’ACCESSOIRE APPROPRIÉ (Les accessoires peuvent varier selon les modèles) 3.
3.4 NETTOYAGE D’ESCALIERS 3 4 Soulever l aspirateur à l aide de la poignée pour le nettoyage des escaliers et le placer dans les escaliers Nettoyer de l avant vers l arrière Ne jamais laisser l aspirateur dans un escalier lorsqu il n est pas utilisé 3.
4. ENTRETIEN l est recommandé de vous familiariser avec les tâches d entretien; l utilisation et l entretien appropriés de l appareil assureront son bon fonctionnement Si l aspirateur ne fonctionne pas adéquatement s il est tombé a été endommagé a été laissé à l extérieur ou est tombé dans l eau l expédier à un centre de réparation avant de poursuivre l utilisation 4.
Comment le nettoyer 4 3 Appuyer sur le bouton de dégagement du videpoussière (A) et faire pivoter le videpoussière pour le retirer 4 4 Tenir le videpou ssière audessus d une poubelle appuyer sur le bouton de dégagement de la porte du videpoussière (B) pour ouvrir la porte du vide poussière (C) 4.3 4.4 A 4.
Filtre au charbon : comment le nettoyer Quoi acheter : Carbon Filter (Seulement sur certains modèles.
TUYAU : Comment le nettoyer ! MISE EN GARDE 4.
4.23 COURROIE ! MISE EN GARDE 4.24 A ! Pour réduire les risques de blessures causées par des pièces en mouvement débrancher l appareil avant d en effectuer l entretien La courroie située sous la plaque au bas de l aspirateur doit être vérifiée périodiquement B Quand procéder au remplacement 4.25 Remplacer la courroie si elle est étirée coupée ou brisée Pour vérifier la courroie plate consulter les Fig 4 24 à 4 26 D 4.26 E 4.
5.
6.
7.
MANUAL DEL PROPIETARIO Instrucciones de Funcionamiento y Servicio www.hoover.com IMPORTANTE: LEA ATENTAMENTE ANTES DE ENSAMBLAR Y USAR. ¿Tiene alguna pregunta o inquietud? Para obtener asistencia llame al Servicio de atención al cliente al 1 800 944 9200 de lunes a viernes de 8 a m a 7 p m hora del ESTE POR FAVOR, NO DEVUELVA ESTE PRODUCTO A LA TIENDA. ESTA ASPIRADORA PARA ALFOMBRAS ESTÁ DISEÑADA PARA USO DOMÉSTICO. EL USO COMERCIAL DE ESTE PRODUCTO ANULA LA GARANTÍA.
Gracias por haber elegido un producto HOOVER.
¡SALVAGUARDIAS IMPORTANTES! ¡GUARDE ESTAS INSTRUCCIONES! Al usar un aparato eléctrico, observe siempre las precauciones básicas, incluyendo las siguientes: LEA TODAS LAS INSTRUCCIONES ANTES DE USAR ESTE APARATO ADVERTENCIA: PARA REDUCIR EL RIESGO DE INCENDIOS, CHOQUES ELÉCTRICOS O LESIONES: • Ensamble completamente el producto antes de hacerlo funcionar. • Cualquier otra tarea de mantenimiento debe ser realizada por un representante de mantenimiento autorizado.
• Sujete el enchufe cuando enrolle el cordón en la bobina. No permita que el enchufe dé latigazos al enrollarlo. • Desenchufe el aparato antes de conectar el accesorio de mano turboaccionado. • No aspire ningún objeto que se esté quemando o que libere humo, como cigarrillos, fósforos o cenizas calientes. • No use el producto sin el contenedor para polvo y/o los filtros colocados en su lugar.
1. ENSAMBLADO DE LA ASPIRADORA CONTENIDO DE LA CAJA 1.
2.
TRASLADO DE LA ASPIRADORA POSICIONES DEL MANGO 2 6 Para mover su aspi radora de una habit ación a otra coloque el mango en posición ver tical incline la aspirado ra hacia atrás sobre las ruedas posteriores y empuje hacia delante 2 7 El mango de su aspiradora tiene dos posiciones: 1) vertical para almacenarla o para usar los accesorios de limpieza; 2) posición de funcionamiento para su uso general en moqu etas y suelos 2.6 2.
3.
3.5 3.
4. MANTENIMIENTO Familiarícese con estas tareas de mantenimiento en el hogar ya que el uso y cuidado apropiados de su aspiradora asegurarán una limpieza continua mente eficaz Si el aparato no está funcionando adecuadamente se dejó caer se dañó se dejó a la intemperie o se dejó caer dentro del agua llévelo a un centro de servicio antes de continuar usándolo 4.
DEPÓSITO PARA POLVO Como vaciarlo 4 3 Presione el botón de liberación del con tenedor para polvo (A) y gire el contenedor hacia afuera 4 4 Sujetando el con tenedor para polvo sobre el recipiente de basura presione el botón de liberación de la puerta del contenedor para polvo (A) para abrir la puerta del contenedor para polvo (B) 4.3 A 4.4 4.
Filtro de carbono: Cómo limpiar Qué comprar: Filtro de carbono: Si lo desea hay filtros adicionales disponibles Solicite la pieza n ° 902404001 de Hoover® (Disponible sólo en algunos modelos) El filtro de carbón se ubica en la parte inferior del filtro hecho con medio filtrante HEPA IMPORTANTE NO ENJUAGUE N LAVE el cartucho de Filtro de carbono ! ADVERTENCIA ! Para reducir el riesgo de lesiones ocasionadas por piezas en movimiento desenchufe la aspi radora antes de realizar el mantenimiento No use l
MANGUERA: Cómo limpiar ! ADVERTENCIA 4.
4.23 CORREA ! PRECAUCIÓN 4.24 A ! Para reducir el riesgo de lesiones ocasionadas por piezas en movimiento desenchufe la aspi radora antes de realizar el mantenimiento La correa se encuentra debajo de la placa inferior de la aspiradora y debe verificarse periódica mente para asegurarse de que esté en buenas condiciones B 4.25 Cuándo reemplazarla Reemplace la correa si está estirada cortada o rota Para revisar la correa plana consulte la Fig 4 24 4 26 D 4.26 E 4.
5.
6.
7.