™ ™ Deep Cleaner The Easy to Use Deep Cleaner ENGLISH ➜ pp. 1-15 ESPAÑOL ➜ pág. 17-26 FRANÇAIS ➜ p. 28-37 SteamVac™ V2™ Deep Cleaner cleans carpet fibers by applying hot tap water and cleaning solution. www.hoover.
Important Safeguards! Grounding Instructions When using an electrical appliance, always follow basic precautions, including the following: A READ ALL INSTRUCTIONS BEFORE USING APPLIANCE. B WARNING: To reduce the risk of fire, electric shock, or injury: • Use indoors only. • Use only on surfaces moistened by the cleaning process. Do not immerse product. • Connect to a properly grounded outlet only. See “Grounding Instructions”. • Do not clean over floor electrical outlets.
Thank you for choosing a HOOVER product. Contents Important safeguards . . . . . . . . . . 2 Parts needed for assembly. . . . . . . 3 Assembling deep cleaner . . . . . . 3-5 Deep cleaner description . . . . . . . . 6 General operation . . . . . . . . . . . . 6-8 Filling the clean water tank . . . 7-8 Emptying the recovery tank . . . . 8 Brush speed selector . . . . . . . . . 7 Automatic shut-off. . . . . . . . . . . . 7 How to use Before you begin . . . . . . . . . . . . 9 After cleaning. . . . . . . . . .
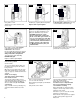
The assembled cleaner will look like this drawing. Model with SpinScrub™ hand tool is shown. 1-2 1-3 A Attach upper handle Remove clean water tank (upper tank) from deep cleaner. With cord hook (A) to back of deep cleaner, push upper handle down onto lower handle. 1-4 1-6 1-5 B Push bolts into holes on front of handle. If bolts will not go through hole easily, handle is not pushed completely down. Place nuts in recessed areas on back of the handle.
1-9 G 1-10 1-11 I H Identify the hose parts before storing hose. G. Nozzle connector end H. Solution tube Storing hose and tools Press hose, a few inches from nozzle connector end, into caddy. Bring hose up and over top of caddy. Press hose into opposite side of caddy. Loop hose at bottom of cleaner and press into top of hook (I). 1-13 1-14 Insert top of bare floor tool (available at additional cost if not included with your cleaner) through “loop” on caddy. Slide tool down into place.
2. How to use Deep Cleaner Description 2-1 1 3 4 2 17 19 5 18 6 20 7 9 8 21 10 11 12 16 15 17 14 13 22 The assembled deep cleaner will look like the drawing. Model with SpinScrub™ hand tool is shown. 1. Hand grip 2. Solution trigger: press to release cleaning solution 3. ON/OFF switch 4. Wash/Rinse switch 5. SpinScrub™ hand tool (not included with all models) 6. Carrying handle 7. Clean water tank handle 8. Clean water tank 9. Detergent container 10. Recovery tank handle 11.
2-5 2-6 2-7 B Carrying handle The deep cleaner may also be lifted by placing a hand above the upper clean solution tank handle as shown. 2-8 Automatic shut off Brush setting selector When the recovery tank (lower tank) is full the automatic shutoff mechanism will shut off the deep cleaner suction (suction will be noticeably reduced). At that time, the yellow float disk will rise to the top of the recovery tank lid (B).
2-11 2-12 2-13 E F Carry tank to a sink. Turn tank cap counterclockwise and remove cap. 2-14 Fill tank (E) (1 gallon) with hot tap water. Replace tank cap and tighten. NOTE: Use only HOOVER detergents. They are specially formulated for use with your ‘SteamVac’ deep cleaner. CAUTION: Detergents contain Anionic and Nonionic Surfactants. Avoid contact with eyes and skin. In case of contact with eyes, flush with cold water for 15 minutes. In case of contact with skin, wash with water.
3. How to clean Before you begin cleaning a. Vacuum thoroughly - For carpet, use a HOOVER vacuum cleaner with an agitator for best results. Vacuum upholstery with a vacuum cleaner with cleaning tool attachments. Use a crevice tool to reach into tufts and folds. Do not use the ‘SteamVac’ deep cleaner as a dry vacuum cleaner. b.
To clean nozzle 3-4 If lint or other debris becomes lodged in nozzle, it can be removed for cleaning. B A 3-3 To replace nozzle, line up tabs (A) on nozzle with holes (B) in cleaner. Slide tabs into holes. Unplug deep cleaner from electrical outlet. Remove both tanks as described in Fig. 2-16. With handle in upright position, tilt cleaner back so that handle rests on the floor. Lift up rear edge of nozzle. Slide nozzle up and remove from cleaner. Slide nozzle completely onto cleaner.
Cleaning bare floors 3-9 How to attach bare floor attachment (Available at additional cost if not included with your cleaner.) Unplug deep cleaner from electrical outlet. To prevent possible leaking, remove clean water tank (Fig. 2-10) and recovery tank (Fig. 2-16) before positioning bare floor attachment. Set tanks aside (do not set tank on furniture). 1. With handle in upright position, tilt cleaner back so that handle rests on the floor. 3-8 D C 3.
Select tool How to attach tools Your model includes some combination of the following tools, but may not include them all. 3-13 H G I G. SpinScrub™ hand tool has rotating brushes for extra scrubbing action on small carpet areas, carpeted stairs and upholstery. For some models, the brushes can be removed for converting to the scrub module. H. Stair/upholstery nozzle has a built-in brush to help provide the scrubbing action some spots may need for removal. I.
Attaching scrub module 3-17 3-18 After using scrub tool To clean scrub pad, pull it off module. Wash it in water with mild detergent. Rinse and let air dry. Pad must be completely dry before reattaching to module. Replacement pads may also be purchased. Ask for HOOVER part no. 40308001. M L Using the scrub tool Available at additional cost if not included with your cleaner. 1. Open the tool door and remove the SpinScrub™ hand tool. 2. Grasp the sides of the brush module and lift it from the base (L).
Cleaning upholstery Read “Before you begin cleaning” instructions on page 9. Be sure to check the cleaning code on your upholstery. Use your deep cleaner only on upholstery marked “W” or “W/S”. 1. Attach hose and solution tube as instructed in Figs. 3-10 to 3-12. 2. Place handle in upright position. Agitator brushes will not rotate while handle is in upright position. 3. Fill clean water tank according to instructions for Figs. 2-9 to 2-12. 4.
Storage Before storing: • Empty clean water tank and replace on deep cleaner. • Unused detergent can be stored in the detergent container. • Empty recovery tank and rinse thoroughly with clean water. Allow brushes and underside of deep cleaner to air dry thoroughly before storing deep cleaner on a carpeted or wood surface. Do not store deep cleaner with a full clean water tank in place. Lubrication The motor is equipped with bearings which contain sufficient lubrication for the life of the motor.
Full One Year Warranty (Domestic Use) Your HOOVER® appliance is warranted in normal household use, in accordance with the Owner’s Manual against original defects in material and workmanship for a period of one full year from date of purchase. This warranty provides, at no cost to you, all labor and parts to place this appliance in correct operating condition during the warranted period.
HOOVER y HOOVER and 6-02 F7205-/20-/25-900 HOOVER et son marcas registradas sont des marques déposées are registered trademarks Litho USA 56518-148