EN
Thank-you for choosing a Hoover washing machine. We are proud to always offer new, innovative and technologically advanced products, with a complete range of home appliances to ensure true assistance in your daily routine. Environmental conditions This appliance is marked according to the European directive 2012/19/EU on Waste Electrical and Electronic Equipment (WEEE).
l This appliances is intended to be used in household and similar applications such as: - Staff kitchen areas in shops, offices and other working environments; - Farm houses; - By clients in hotels, motels and other residential type environments; - Bed and breakfast type environments. A different use of this appliance from household environment or from typical housekeeping functions, as commercial use by expert or trained users, is excluded even in the above applications.
l The final part of a washer dryer l Items that have been soiled with cycle occurs without heat (cool substances such as cooking oil, down cycle) to ensure that the acetone, alcohol, petrol, kerosene, items are left at a temperature spot removers, turpentine, waxes that ensures that the items will and wax removers should be not be damaged. washed in hot water with an extra amount of detergent before being dried in the washer dryer.
WARNING: water may reach very high temperatures during the wash cycle. Appliance complies with European Directives: l 2006/95/EC (LVD); l 2004/108/EC (EMC); l 2009/125/EC (ErP); l 2011/65/EU (RoHS) and subsequent amendments. l Make sure there is no water in the drum before opening the porthole. 5 EN by hair care products be l Do not pull on the power cord placed in a washer dryer they or appliance to unplug the should first be washed in hot machine.
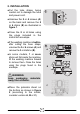
2. INSTALLATION l Cut the tube straps, being careful not to damage the tube and power cord. 1 A B A B l Unscrew the 2 or 4 screws (A) on the back and remove the 2 or 4 shims (B) as illustrated in figure 1. B B A A l Close the 2 or 4 holes using the plugs included in the instruction envelope. l If the washing machine is built-in, after cutting the hose straps, unscrew the 3 or 4 screws (A) and remove the 3 or 4 shims (B).
Hydraulic connections EN 3 l Connect the water tube to the faucet, only using the drain tube supplied with the washing machine (fig. 3). DO NOT OPEN THE FAUCET. l Some models may include one or more of the following features: 4 l HOT&COLD (fig. 4): water mains connection settings with hot and cold water for higher energy savings. Connect the grey tube to the cold water faucet and the red one to the hot water faucet.
l Level the appliance using the feet as 8 illustrated in figure 8: a. turn the nut clockwise to release the screw; b. rotate the foot to raise or lower it until it adheres to the floor; c. lock the foot, screwing in the nut, until it adheres to the bottom of the washing machine. l Plug in the appliance. A B WARNING: contact the Customer Service Centre should the power cord need replacement.
Load tips Before using a drying programme… WARNING: when sorting laundry, make sure: l SAVE energy and time by selecting a - have eliminated metallic objects such as barrettes, pins, coins, from laundry; - to have buttoned pillow cases, closed zips, tied loose belts and long robe ribbons; - to have removed rollers from curtains; - to have carefully read clothing washing labels; - to have removed any persistent stains using specific detergents.
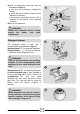
4. MAINTENANCE AND CLEANING To clean the washing machine exterior, use a damp cloth, avoiding abrasives, alcohol and/or solvents. The washing machine does not require any special care for ordinary cleaning: clean drawer compartments and the filter; some tips on how to move the machine or on long periods of disuse are provided below. Drawer cleaning l We recommend you clean the drawer to avoid accumulating additive residue.
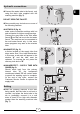
This washing machine automatically adapts the level of the water to the type and quantity of washing. This system gives a decrease in energy consumption and a sensible reduction in washing times. 6. CONTROLS AND PROGRAMS EN 5. QUICK USER GUIDE A Program selection l Turn on the washing machine and select the required program. P l Adjust the washing temperature if necessary and press the required "option" buttons.
The programme selector must be returned to the OFF position at the end of each cycle or when starting a subsequent wash cycle prior to the next programme being selected and started. WARNING: Don’t touch the display while inserting the plug because the machines calibrates the systems during the first seconds: touching the display, the machine couldn’t work property. In this case, remove the plug and repeat the operation. START/PAUSE button Close the door BEFORE selecting the button START/PAUSE.
l To delay the start use the following procedure: l By pressing this button, it is possible to reduce the maximum speed, and if you wish, the spin cycle can be cancelled. - Set the required programme. spin speed cancelled. - Press the button once to activate it (h00 appears on the display) and then press it again to set a 1 hour delay (h01 appears on the display).
l To cancel the cycle during the drying PREWASH button phase, hold the button down for about 3 seconds until the cooling indicator lights up. l This option allows you to make a prewash and it is particularly useful for heavily soiled loads (can be used only on some programmes as shown in the table of programmes).
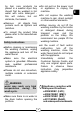
l Once you recall a memorized program, Digital Display The display’s indicator system allows you to be constantly informed about the status of the machine. If you accidently select a memorized program, simply turn the program knob to select another one. 1 15 held in the tub, the relevant indicator light blink to show that the machine is at a standstill. 7 13 14 7 8 7 9 11 7 4 l The indicator light is illuminated when the door is fully closed.
2) SPIN SPEED 7) OPTIONS This show the spin speed of the selected programme that can be changed or omitted by the relevant button. The indicator lights show the options that can be selected by the relevant buttons. 8) Wi-Fi (some models only) spin speed cancelled. l In the models with the Wi-Fi option, the icon indicates that the Wi-Fi system is working. 3) WASH TEMPERATURE This show the washing temperature of the selected programme that can be changed (where allowed) by the relevant button.
l By selecting one of these automatic programmes, the washer dryer will calculate the time needed for drying and the level of moisture remaining in the laundry, according to the load and drying type selected. The indicator light show that the memory function is working. 12) KEY LOCK The indicator light show that the keys are locked. l After pressing the START/PAUSE button, the display will show the drying time remaining.
Table of programmes 1 2 TEMP.°C kg * (MAX.) PROGRAM Recommended Max. All In One 20°C 2) 4 5,5 6 6,5 7 20° 20° All Baby 60°C 2) 4 5,5 6 6,5 7 60° 60° All In One 59 Min. 2) 6 8 9 10 11 40° 40° Rapid 30 Min. 2) 2 2,5 2,5 2,5 2,5 30° 30° Rapid 14 Min.
Please read these notes: * Maximum load capacity of dry clothes, according to the model used (see control panel). INFORMATION FOR THE LABORATORIES (Ref. EN Standards) TEST 50229 ( ) Only with PREWASH option selected (programmes with PREWASH option available). Washing Use the programme ** with the maximum degree of soiling selected, maximum spin speed and a temperature of 60°C. Programme recommended also for test with a lower temperature.
Programmes selection detergent, that is sprayed onto the laundry through the jet activating the enzymes at 50°C. To clean different types of fabrics and various levels of dirt, the washing machine has specific programs to meet every need of washing (see table of programmes). All In One 59 Min. This programme allows you to wash mixed fabrics such as cottons, synthetics and mixed fabrics in only 59 minutes, using the full load of the washing machine, at 40°C (or less) temperature.
The drum changes direction during the drying cycle to prevent the laundry from tangling and producing even more drying. Cool air is used during the last 10/20 minutes of the drying cycle to minimize creasing. Mixed The washing and rinsing are optimized in the rhythms of rotation of the drum and to the water levels. The gentle spin, ensures a reduced formation of creases in the fabric.
l Only dry pre-spun laundry. 7. DRYING CYCLE l Drying guidance advice is general, but practical experience of using the product will help you to achieve the best drying results. l We recommend setting a lower drying time than indicated, when first using the appliance in order to establish the degree of dryness required. l The washer dryer can perform the following types of drying: - Low temperature drying programme recommended for mixed fabrics (synthetics/cotton) synthetic fabrics.
l When the programme is finished the word button to switch on the appliance. "End" will appear on the display. After 5 minutes the appliance will go into standby mode (on certain models, the display will show two lines). l Press the DRYING PROGRAMME SELECTION button to select the more suitable drying programme for your laundry. l After the programme has finished please wait for about 2 minutes until the DOOR LOCKED indicator has gone out before opening the door.
SELECTION" button until the required time indicator lights up. 8. AUTOMATIC WASHING/DRYING CYCLE l Press the START/PAUSE button. l At the end of the wash phase the display You cannot exceed the maximum dryable load of laundry indicated in the programme table, otherwise the laundry will not be dried satisfactory. will show the drying time remaining. l The washer dryer will then complete the entire drying programme. - Washing l Open the drawer and put in the correct amount of detergent.
If you believe the washing machine is not working correctly, consult the quick guide provided below with some practical tips on how to fix the most common problems. Problem Possible causes and practical solutions The washing machine does not work/start Make sure it is correctly plugged in. Make sure power is on. Check whether the required program was correctly selected and to have correctly started the machine.
The use of ecological detergents without phosphates may cause the following effects: Warranty The product is guaranteed under the terms and conditions stated on the certificate included with the product. The warranty certificate must be duly filled in and stored, so as to be shown to the Authorised Hoover Service Centre in case of need. - cloudier rinse drain water: This effect is tied to the suspended zeolites which do not have negative effects on rinse efficiency.
fkhldsk
- WDXP - A - 15.