Owner’s Manual Operating and Servicing Instructions Español - página E1 hoover.com IMPORTANT: READ CAREFULLY BEFORE ASSEMBLY AND USE. Questions or concerns? For assistance, please call Customer Service at 1-800-944-9200 Mon-Fri 8am-7pm EST. PLEASE DO NOT RETURN THIS PRODUCT TO THE STORE. THIS PRODUCT IS INTENDED FOR HOUSEHOLD USE ONLY. IF USED COMMERCIALLY WARRANTY IS VOID. ©2011 Techtronic Floor Care Technology Limited. All Rights Reserved.
Thank you for choosing a HOOVER® product. Please enter the complete model and Manufacturing Code in the spaces provided. Model MFG. CODE Tip: Attach your sales receipt to this owner’s manual. Verification of date of purchase may be required for warranty service of your HOOVER® product. Be sure to register your product online at Hoover.com or call 1-800-944-9200 to register by phone. Visit hoover.com for additional video instructions for assembly and maintenance.
IMPORTANT SAFETY INSTRUCTIONS SAVE THESE INSTRUCTIONS When using an electrical steam cleaner, basic precautions should always be followed, including the following: READ ALL INSTRUCTIONS BEFORE USING THIS Steam cleaner. WARNING: TO REDUCE THE RISK OF FIRE, ELECTRIC SHOCK OR INJURY: • Fully assemble before operating. • Operate steam cleaner only at voltage specified on data label on back of steam cleaner. • Do not leave steam cleaner when plugged in.
• Only use water to refill the water tank. Do not use any type of chemicals or additives in the water tank. • Do not add descaling, aromatic, alcoholic products, cleaning solutions, scented perfumes, oils or any other chemicals to the water used in this steam cleaner as this may damage the steam cleaner or make it unsafe for use. While this Steam Mop is designed for tap water, to increase effectiveness of the steam and to avoid build up of minerals, you may use distilled water to fill Steam Mop.
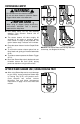
1. Steam cleaner Assembly Carton contents 1.1 A. Handle B. Steam Mop Body (Water Tank and Solution Tank attached) C. Multi-Surface Microfiber Pad (x2) D. Hard Floor Microfiber Pad E. Carpet Glider F. Water Filter (Pre-assembled in steam cleaner, remove water tank to expose filter) G. Cooling Tray H. 8 oz 2X Hoover® SteamPlus™ Cleaning Solution B C D A F Remove all parts from carton and identify each item shown.
2. How to Use Steam cleaner Description 2.1 1. Handle 2. Upper Cord Hook (Rotating Quick Release Cord Hook) 3. Lower Cord Hook (Fixed Cord Hook) 4. Power Cord 5. Water Tank 6. Power Button 7. Mop Head 8. Steam Trigger 9. Solution Tank 10. Solution Control Dial 11. Power Indicator Light Blue Light = Steam cleaner On 12. Steam Ready Indicator Light Green Light = Steam Ready No Light = Steam NOT Ready Front 1 8 2 4 3 5 10 11 Accessories 13.
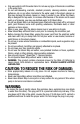
Attaching the Microfiber pads ! WARNING 2.7 2.6 ! To reduce the risk of personal injury - Unplug the steam cleaner when assembling the accessories. A IMPORTANT B Never use the Steam Mop without the Microfiber Pad correctly attached to the Mop Head. To attach, place the Microfiber Pad on the floor, white side up. The “Hard Floor Microfiber Pad” (2.6, A) is used specifically for sealed hard floor surfaces, the pad cannot be used on carpets. The “Multi-Surface Microfiber Pad” (2.
Using the Solution Control dial and adjusting the SOLUTION The Solution Control Dial controls the amount of cleaning solution that is added to the steam. It does not adjust the amount of steam, only the cleaning solution. If you wish to clean with steam alone, simply turn the Solution Control Dial to “STEAM ONLY”. Now every time you press the Steam Trigger, you will release steam alone. If you wish to clean using cleaning solution, simply turn the Solution Control Dial to the desired setting.
REFRESHING CARPET ! WARNING 2.17 2.18 2.19 2.20 ! Do not clean over floor electrical outlets. Do not use steam cleaner or press the Steam Trigger without water in the water tank. IMPORTANT When using on carpets, always ensure the multi-surface Microfiber Pad is properly attached to the Mop Head. Use steam alone. Do not use cleaning solution. Turn Solution Control dial to “STEAM ONLY”. The steam cleaner will take roughly 30 seconds to be ready to produce steam.
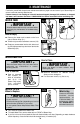
3. MAINTENANCE Familiarize yourself with these home maintenance tasks as proper use and care of your Steam Mop will ensure continued cleaning effectiveness. If steam cleaner is not working as it should, has been dropped, damaged, left outdoors, or dropped into water, call Customer Service at 1-800-944-9200 for further instruction before continuing use. water tank IMPORTANT 3.1 3.2 Allow the steam cleaner to fully cool down before performing any maintenance or troubleshooting checks.
4. Storage Unplug the power cord. Place steam cleaner in Cooling Tray and allow to cool. Empty the residual water from the water tank and clean the external surface with a dry cloth. Allow to dry. Re-install water tank, replace in Cooling Tray to prevent damage to floor and store in upright position. You may leave solution in solution tank for short period of time, but if you are going to leave solution in tank for more than 2 weeks, it is recommended to empty the solution tank. 5.
CleaRinG bloCkaGes There is a small opening towards the bottom of the trim that goes around the perimeter of the back of the steam cleaner. This opening is a steam exhaust vent (5.1), should the primary steam path become blocked. If steam starts to escape from this opening you should: Turn the steam cleaner off, and unplug. 5.1 5.2 Let it cool completely. Remove the Microfiber Pad and inspect the steam port on the bottom of the Mop Head for blockages.
7. Warranty Limited TWO Year Warranty (Domestic Use) This warranty does not apply to appliances purchased outside the United States, including its territories and possessions, outside a U.S. Military Exchange and outside of Canada. This warranty does not cover appliances purchased from a party that is not an authorized retailer, dealer, or distributor of Hoover® appliances.
MANUAL DEL PROPIETARIO Instrucciones de Funcionamiento y Servicio www.hoover.com IMPORTANTE: LEA ATENTAMENTE ANTES DE ENSAMBLAR Y USAR. ¿Tiene alguna pregunta o inquietud? Para obtener asistencia, llame al Servicio de atención al cliente al 1-800 944 9200, de lunes a viernes, de 8 a.m. a 7 p.m., hora del ESTE. POR FAVOR, NO DEVUELVA ESTE PRODUCTO A LA TIENDA. ESTA ASPIRADORA PARA ALFOMBRAS ESTÁ DISEÑADA PARA USO DOMÉSTICO. EL USO COMERCIAL DE ESTE PRODUCTO ANULA LA GARANTÍA.
Gracias por haber elegido un producto HOOVER®. Anote los números completos de Código de fabricación en los espacios provistos. Modelo CÓDIGO DE FABRICACIÓN Consejo: Adjunte su recibo de compra a este Manual del propietario. Para obtener el servicio de garantía de su producto HOOVER® puede requerirse la verificación de la fecha de compra. Inscriba su producto en línea en Hoover.com, o llame al 1-800-944-9200 si prefiere hacerlo por teléfono. Visite Hoover.
¡SALVAGUARDIAS IMPORTANTES! ¡GUARDE ESTAS INSTRUCCIONES! Al usar un aparato eléctrico, observe siempre las precauciones básicas, incluyendo las siguientes: LEA TODAS LAS INSTRUCCIONES ANTES DE USAR ESTE APARATO ADVERTENCIA: PARA REDUCIR EL RIESGO DE INCENDIOS, CHOQUES ELÉCTRICOS O LESIONES: • Ensamble completamente el producto antes de hacerlo funcionar. • Opere el limpiador a vapor únicamente con la tensión que se especifica en la etiqueta de datos en la parte posterior de la fregona a vapor.
• Utilice únicamente agua para llenar el tanque de agua limpia. No utilice ningún tipo de producto químico o aditivo en el tanque de agua limpia. • No abra la tapa del llenado de agua mientras esté utilizando la fregona a vapor. • No agregue productos desincrustantes, aromáticos, alcohólicos, soluciones limpiadoras, perfumes, aceites ni ningún otro producto químico al agua que se utiliza en este aparato, ya que esto puede dañar la unidad o hacer que su uso sea peligroso.
1. Ensamblado Contenido de la caja 1.1 A. Mango B. Cuerpo del trapeador a vapor (Tanque de agua y tanque de solución colocados) C. Almohadilla de limpieza de microfibra (x2) D. Hard Floor Microfiber Pad E. Deslizador para alfombras F. Filtro de agua dura (colocado previamente en el limpiador a vapor; quite el tanque delantero para dejar expuesto el filtro) G. Base de enfriamiento H.
2. Cómo usar Descripción de la aspiradora 1. Mango 2. Gancho superior para el cable 3. Gancho inferior para el cable 4. Cable de alimentación 5. Tanque de agua limpia 6. Botón de encendido 7. Cabezal de piso 8. Gatillo liberador de vapor 9. Tanque de solución 10. Dial de control de solución 11. Luz indicadora de alimentación eléctrica Luz azul = Unidad encendida 12. Luz indicadora de vapor listo Luz verde = Limpiador a vapor listo Luz apagada = Tanque calentándose 2.
COLOCACIÓN DE LA ALMOHADILLA DE LIMPIEZA DE MICROFIBRA ! ADVERTENCIA ! Para reducir el riesgo de lesiones personales, desenchufe el limpiador a vapor cuando conecte los accesorios. IMPORTANTE Nunca use el trapeador a vapor sin la almohadilla de limpieza de microfibra correctamente colocada en el cabezal de piso. La “Almohadilla de Microfibra para Pisos Duros” (2.6, A) se utiliza específicamente para superficies de pisos duros sellados, la almohadilla no se puede utilizar sobre moquetas.
Uso del dial de control de solución y ajuste del limpiador El dial de control de solución controla la cantidad de limpiador que se agrega al vapor. No ajusta la cantidad de vapor, solamente la de limpiador. Si desea limpiar solo con vapor, simplemente gire el dial de control de solución a “STEAM ONLY”. Ahora, cada vez que presione el gatillo de vapor usted liberará solamente vapor.
PARA RENOVAR MOQUETAS ! ADVERTENCIA 2.17 2.18 2.19 2.20 ! No limpie sobre tomacorrientes eléctricos de piso. No utilice la unidad ni presione el gatillo sin agua en el tanque de agua. IMPORTANTE Cuando se utilice en moquetas, verifique siempre que la almohadilla de microfibra para superficies múltiples se encuentre correctamente colocada en el cabezal de piso. Utilice vapor por sí solo. No utilice solución limpiadora. Gire el dial de control de solución a “OFF” (Apagado).
3. Mantenimiento Familiarícese con estas tareas domésticas de mantenimiento, ya que el uso y cuidado correctos de su trapeador a vapor asegurará una prolongada eficacia de limpieza. Si el electrodoméstico no está funcionando como debería, se ha dejado caer, se ha dañado, se ha dejado a la intemperie, o ha caído dentro del agua, llame al Servicio al Cliente al 1-800-944-9200 para obtener más instrucciones antes de continuar con el uso. TANQUE DE AGUA 3.1 3.
4. Almacenaje Desenchufe el cable de alimentación. Coloque el limpiador a vapor en la base de enfriamiento y deje enfriar. Vacíe el agua que quede en el tanque de agua y limpie la superficie exterior con un trapo seco. Deje secar. Vuelva a instalar el tanque de agua, vuelva a colocar en la base de enfriamiento para evitar daños al piso y guarde en posición vertical.
PaRa desPejaR bloQueos Hay una peque–a abertura en la parte inferior del reborde que rodea el per’metro de la parte posterior del limpiador a vapor. Esta abertura es un escape de vapor (5.1), en caso de que la v’a principal de vapor se bloquee. Si comienza a salir vapor de esta abertura, usted debe: 5.1 Apagar el limpiador a vapor y desenchufarlo. Dejar que se enfr’e por completo. Quitar la almohadilla de limpieza de microfibra e inspeccionar la 5.
7. Garantía Garantía limitada de DOS años (Para uso doméstico) QUÉ CUBRE ESTA GARANTÍA Si se utiliza y mantiene conforme al uso normal en una casa de familia según las instrucciones del Manual del Pçpropietario, su aparato HOOVER® y conjunto de manguera están garantizados contra defectos originales en materiales y mano de obra durante dos años completos a partir de la fecha de compra (el “Período de garantía”).
Guide d’utilisation Instructions d’utilisation et d’entretien www.hoover.com IMPORTANT : LIRE CES INSTRUCTIONS ATTENTIVEMENT AVANT D’UTILISER L’ASPIRATEUR. Vous avez des questions ou des inquiétudes? Veuillez appeler le service à la clientèle au 1 800 9449200 du lundi au vendredi, de 8 h à 19 h (HNE). VEUILLEZ NE PAS RETOURNER CE PRODUIT AU MAGASIN. L’UTILISATION DE CE PRODUIT À DES FINS COMMERCIALES INVALIDE LA PRÉSENTE GARANTIE. ©2011 Techtronic Floor Care Technology Limited. Tous droits réservés.
Merci d’avoir choisi un produit HOOVERMD. Veuillez inscrire les numéros de modèle et de série COMPLETS dans les espaces fournis à cet effet Modèle Code de fabrication Conseil: Il est recommandé de joindre votre reçu de caisse au guide de l’utilisateur, car une vérification de la date d’achat peut être effectuée avant toute réparation couverte par la garantie de votre produit HOOVERMD. N’oubliez pas d’enregistrer votre produit en ligne, à l’adresse Hoover.com, ou par téléphone, au 1-800-944-9200.
CONSIGNES DE SÉCURITÉ IMPORTANTES RANGER ET CONSERVER CES INSTRUCTIONS Durant l’utilisation d’un appareil électrique, toujours respecter les précautions élémentaires, y compris les suivantes : LIRE TOUTES LES INSTRUCTIONS AVANT D’UTILISER CET APPAREIL. AVERTISSEMENT: AFIN DE RÉDUIRE AU MINIMUM LES RISQUES D’INCENDIE, DE CHOC ÉLECTRIQUE OU DE BLESSURES : • Assembler complètement avant l’utilisation. • Operate Steamer only at voltage specified on data label on back of cleaner.
• N’utiliser que de l’eau pour remplir le réservoir d’eau propre. Ne pas verser de produits ou d’agents chimiques dans le réservoir d’eau propre. • Ne pas retirer le capuchon de sécurité du réservoir pendant l’utilisation du balai à vapeur.
1. Assemblage 1.1 Contenu de l'emballage A. Poignée B. Corps du balai à vapeur (Réservoir d’eau et réservoir de solution nettoyante intégrés) C. Tampon en microfibres pour surfaces multiples (x2) D. Tampon en microfibres pour planchers durs E. Patin à moquette F. Filtre à eau dure (pré-assemblé dans le nettoyeur vapeur, retirer du réservoir pour exposer le filtre) G. Base refroidissante H.
2. Utilisation Description du nettoyeur vapeur 1. Poignée 2. Crochet à cordon supérieur 3. Crochet à cordon inférieur 4. Cordon d’alimentation 5. Réservoir de solution propre 6. Commutateur d’alimentation Marche/Arrêt (On/Off) 7. Tête pour plancher 8. Déclencheur de vapeur 9. Réservoir de solution 10. Cadran de réglage de la solution net toyante 11. Témoin de fonctionnement Lumière bleue = appareil en marche 12.
FIXATION DU FILTRE NETTOYANT EN MICROFIBRES ! AVERTISSEMENT 2.7 2.6 ! Pour réduire les risques de blessures, débrancher le nettoyeur vapeur lors de l’assemblage des accessoires. A IMPORTANT B Ne jamais utiliser le balai à vapeur sans que le tampon nettoyant en microfibres soit adéquatement fixé à la tête du balai. Pour fixer le tampon en microfibres à l’appareil, le déposer sur le sol (côté blanc vers le haut). Le « tampon en microfibres pour planchers durs » (2.
UTILISATION DU CADRAN DE RÉGLAGE DE LA SOLUTION NETTOYANTE ET RÉGLAGE DE LA SOLUTION NETTOYANTE Le cadran de réglage de la solution nettoyante règle la quantité de solution nettoyante ajoutée à la vapeur. Il ne règle pas la quantité de vapeur, mais uniquement la solution nettoyante. Pour nettoyer à la vapeur seulement, il suffit de régler le cadran de réglage de la solution nettoyante à la position « STEAM ONLY ».
RAFRAÎCHISSEMENT DES MOQUETTES ! AVERTISSEMENT ! 2.17 2.18 2.19 2.20 Ne pas nettoyer au-dessus de prises électriques sur le plancher. Ne pas utiliser l’appareil ni appuyer sur la gâchette s’il n’y a pas d’eau dans le réservoir d’eau. IMPORTANT Lorsque l’appareil est utilisé sur une moquette, toujours s’assurer que le tampon en microfibres pour surfaces multiples est adéquatement fixé à la tête de l’appareil. Utiliser la vapeur seulement. Ne pas utiliser de solution nettoyante.
3. Entretien Il est important de se familiariser avec ces tâches d’entretien ménager, car une utilisation et des soins adéquats assureront l’efficacité continue du nettoyage du balai à vapeur. Si l’aspirateur ne fonctionne pas adéquatement, s’il est tombé, a été endommagé, a été laissé à l’extérieur ou est tombé dans l’eau, l’expédier à un centre de réparation avant de poursuivre l’utilisation. RÉSERVOIR D’EAU 3.1 IMPORTANT 3.
4. Storage Débrancher le cordon d’alimentation. Placer le nettoyeur vapeur dans la base refroidissante et laisser refroidir. Vider l’eau résiduelle du réservoir et nettoyer la surface externe à l’aide d’un chiffon sec. Les laisser sécher. Installer de nouveau le réservoir d’eau, replacer l’appareil dans la base refroidissante pour ne pas endommager le plancher et entreposer en position debout.
ÉliMination des obstRuCtions Il y a une petite ouverture vers lÕ extrŽ mitŽ de la bordure qui fait le tour du pŽ rim• tre derri• re le nettoyeur vapeur. Cette ouverture est un conduit de sortie de la vapeur (5.1), au cas o• le conduit principal sÕ obstrue. Si la vapeur commence ˆ sortir par cette ouverture, il faut : Fermer le nettoyeur vapeur et le dŽ brancher. Le laisser compl• tement refroidir. 5.1 5.
7. GARANTIE Garantie limitée de DEUX ans (Usage domestique) ÉLÉMENTS COUVERTS PAR LA PRÉSENTE GARANTIE Votre produit HOOVERMD est garanti pour des conditions normales d’utilisation et d’entretien domestiques, comme il est stipulé dans le Guide de l’utilisateur, contre les défauts de matériaux et de fabrication pour une période complète de deux ans à compter de la date d’achat (la « Période de garantie »).