
Manual

example, if your Region and language setting on
your PC is “English (United States),” you’d select
English from the list.
3. Select the link provided for the download under
the drop-down lists.
4. Open the .exe file downloaded from your
browser, and then select Yes to approve
installation, if asked.
5. Select Run. The Xbox 360 program installs the
necessary files on your computer. You might be
prompted to restart the computer when finished.
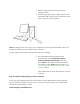
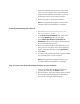
Step 2: Connect the Xbox 360 wired controller to your computer
After you install the software, plug your controller’s USB connector into a USB 2.0 or 3.0 port
on your computer.
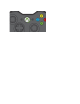
Step 3: Test the controller
1. On your computer, select Start, type Run, type
joy.cpl, and then press ENTER.
2. Select Xbox 360 Controller, and then select
Properties.
3. Test your Xbox 360 wired controller by pressing
a button, pulling a trigger, or moving a stick on
the controller. If the controller is functioning
correctly, you’ll see the corresponding action
light up in the application.
If the application doesn’t recognize your
controller, try plugging it into a different USB
port, and then test it again. If the application still
doesn't recognize it, see Troubleshoot your Xbox
360 controller for Windows.
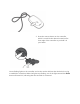
Set up a wireless controller on a Windows PC
Note A standard Xbox 360 wireless controller can be connected to a Windows PC, but you
must have an Xbox 360 Wireless Gaming Receiver to play games, even if you have an Xbox
360 Play & Charge Kit.
Step 1: Connect the Xbox 360 Wireless Gaming Receiver to your computer