TREADMILL Owner’s Guide ELITE 5.
TABLE OF CONTENTS SAFETY INSTRUCTIONS FOLDING & MOVING LEVELING, POWER & EMERGENCY STOP KNOW YOUR TREADMILL GETTING STARTED DISPLAY PROGRAM PROFILES COLOUR MONITOR OPERATING INSTRUCTIONS USING YOUR ROAD RACER PROGRAM USING YOUR THR ZoneTM PROGRAM USING YOUR EXPEDITION PROGRAM TROUBLESHOOTING COMMON QUESTIONS MAINTENANCE PROCEDURES EXERCISE GUIDELINES DEVELOPING A FITNESS PROGRAM & IMPORTANCE OF WARM UP/ COOL DOWN FITNESS GOALS WEEKLY LOG SHEETS MONTHLY LOG SHEETS LIMITED HOME USE WARRANTY ○ ○ ○ ○ ○ ○
I M P O RTA N T SAFETY INSTRUCTIONS SAVE THESE INSTRUCTIONS Read all instructions before using this treadmill. When using an electrical product, basic precautions should always be followed, including the following: Read all instructions before using this HORIZON FITNESS treadmill WARNING WARNING! Connect this exercise product to a properly grounded outlet only. See grounding instructions. GROUNDING INSTRUCTIONS This product must be grounded.
WARNING WARNING! To reduce the risk of burns, fire, electrical shock or injury to persons: • Never use the treadmill before securing the safety tether clip to your clothing. • If you experience chest pains, nausea, dizziness, or shortness of breath, stop exercising immediately and consult your physician before continuing. • Do not wear clothes that might catch on any part of the treadmill. • Keep power cord away from heated surfaces. • Keep children off of treadmill at all times.
CONGRATULATIONS! on choosing an Elite Series treadmill. You’ve taken an important step in developing and sustaining an exercise program! Your Horizon Fitness treadmill is a tremendously effective tool for achieving your personal fitness goals. Regular use of your Horizon Fitness treadmill can improve the quality of your life in so many ways.
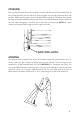
FOLDING Firmly grasp the back end of the treadmill. Carefully lift the end of the treadmill deck to the upright position until the foot lock latch engages and securely locks the deck into position. Make sure the deck is securely latched before letting go. To unfold, firmly grasp the back end of the treadmill. Gently press down on the foot lock latch with your foot until the lock latch disengages. Carefully lower the deck to the ground.
LEVELING The treadmill should be level for optimum use. Once you have placed the treadmill where you intend to use it, raise or lower the adjustable levelers located on the treadmill base frame. Once you have leveled the treadmill, lock the levelers in place by tightening the nuts against the frame. To assure the treadmill is level, a carpenter’s level is recommended. TURN POWER ON Make sure that your treadmill is properly connected to a power outlet. The on/off switch is located next to the power cord.
KNOW YOUR TREADMILL CONSOLE TOUCH PAD QUICK SPEED KEY WATER BOTTLE HOLDER GRIP PULSE HANDLEBARS UPRIGHT SUPPORT MOTOR COVER SIDE RAIL QUICK INCLINE KEY END CAP LEVELERS TRANSPORT WHEEL RUNNING BELT 8
GETTING STARTED QUICK START UP Simply press the Start button to begin exercising. PAUSE Press the Stop button to pause your workout. RESET Press and hold the Stop button to reset the treadmill.
CHANGING THE SPEED When in a program, the user is able to press any of the desired quick speed keys or up and down buttons to get to a specific speed more quickly. NOTE: When in a speed-based program, if the user presses any of the quick speed keys, all of the remaining speed segments in the program will be modified as well. For example, when in P2, the first segment default speed is 2.5 mph. If the user presses the 4 mph quick speed key, all of the remaining segments will increase by 1.5 mph as well.
CHOOSING A PROGRAM Choose a Program by pressing the up or down buttons. Once the desired programs is selected, press the SELECT button. CHOOSING THE LEVEL Choose the program difficulty level, level 1-10, by pressing the up or down buttons. Available only on certain programs. You may also choose your program level by pressing the numbered quick speed key that correlates with the program level number. For example, to choose a program level of 5, simply press quick speed key number 5.
DISPLAY SELECT Used to view your Calories and Laps during your workout. CALORIES Total Calories burned during your workout. DISTANCE Miles traveled during your workout. TIME Shown as Minutes:Seconds. View the time remaining or the time elapsed in your workout. PULSE Shown as Beats Per Minute. Used to monitor your heart rate during your workout (displayed when contact is made with both grips or the chest strap is used).
DISPLAY ELEVATION Shown in the top left-hand window. Indicates the incline of your walking or running surface. SPEED Shown in the top right-hand display window. Indicates how fast your walking or running surface is moving. PROGRAM PROFILE Represents the Program profile that you have chosen.
PROGRAM PROFILES MANUAL Customized workout, with no default time INTERVAL Speed changes; time defaults to 30 minutes ROLLING Speed changes; time defaults to 30 minutes WEIGHT LOSS Elevation changes; time defaults to 30 minutes HILL RUN Elevation and speed changes; time defaults to 30 minutes HILL CLIMB Elevation and speed changes; time defaults to 30 minutes RACE speed changes; time defaults to 30 minutes 14
PROGRAM PROFILES AFTER BURNER Elevation changes; time defaults to 30 minutes HRC1 Elevation changes to keep you in your target heart rate; time defaults to 30 minutes HRC2 Elevation changes to keep you in your target heart rate; time defaults to 30 minutes CUSTOM 1 (USER PROGRAM) Speed & Elevation changes; time defaults to 30 minutes CUSTOM 2 (USER PROGRAM) Speed & Elevation changes; time defaults to 30 minutes CUSTOM 3 (USER PROGRAM) Speed & Elevation changes; time defaults to 30 minutes CUSTOM 4 (U
16 INTERVAL: Speed changes; time defaults to 30 minutes 1 2 3 4 5 6 7 8 9 10 11 12 13 14 15 16 17 18 19 20 21 22 23 24 25 26 27 28 29 30 Level 1 2.5 3.0 3.0 4.5 3.0 4.0 3.0 5.0 3.0 5.0 3.0 5.0 3.5 5.0 3.5 5.0 3.5 5.0 3.5 5.0 3.0 5.0 3.0 5.0 3.0 4.5 3.0 4.0 3.0 2.5 Level 2 2.5 3.0 3.5 5.0 3.5 4.5 3.5 5.5 3.5 5.5 3.5 5.5 4.0 5.5 4.0 5.5 4.0 5.5 4.0 5.5 3.5 5.5 3.5 5.5 3.5 5.0 3.5 4.5 3.0 2.5 Level 3 2.5 3.0 4.0 5.
WEIGHT LOSS: Elevation changes; time defaults to 30 minutes 1 2 3 4 5 6 7 8 9 10 11 12 13 14 15 16 17 18 19 20 21 22 23 24 25 26 27 28 29 30 Level 1 0.5 1.0 1.5 2.0 2.0 2.5 2.5 3.0 3.0 3.5 3.5 4.0 4.0 4.5 4.5 4.5 4.0 4.0 3.5 3.5 3.0 3.0 2.5 2.5 2.0 2.0 1.5 1.5 1.0 0.5 Level 2 1.0 1.5 2.0 2.5 2.5 3.0 3.0 3.5 3.5 4.0 4.0 4.5 4.5 5.0 5.0 5.0 4.5 4.5 4.0 4.0 3.5 3.5 3.0 3.0 2.5 2.5 2.0 2.0 1.5 1.0 Level 3 1.5 2.0 2.
18 HILL CLIMB: Elevation and speed changes; time defaults to 30 minutes 1 2 3 4 5 6 7 8 9 10 11 12 13 14 15 16 17 18 19 20 21 22 23 24 25 26 27 28 29 30 0.5 1.0 1.5 2.0 2.0 2.5 2.5 3.0 3.0 3.5 3.5 4.0 4.0 4.5 4.5 4.5 4.0 4.0 3.5 3.5 3.0 3.0 2.5 2.5 2.0 2.0 1.5 1.5 1.0 0.5 Level 1 elevation Speed 2.5 3.0 3.0 4.5 3.0 4.0 3.0 5.0 3.0 5.0 3.0 5.0 3.5 5.0 3.5 5.0 3.5 5.0 3.5 5.0 3.0 5.0 3.0 5.0 3.0 4.5 3.0 4.0 3.0 2.
COLOUR MONITOR OPERATING INSTRUCTIONS Caution • Do not try to repair the device by yourself. Please switch off the television immediately and then inform our dealers if there is a problem. This television is comprised of many precision electronic components. Disassembling or self-renovation may damage or break the television. • Do not expose the television to moisture, dust, direct sunlight or other environmental conditions/factors. • Do not use solvents or other chemical detergents or cleaners.
1. DISPLAY 2. BUILT-IN SPEAKER 3. REMOTE SENSOR 1 4. VOLUME 5. VOLUME + 6. CHANNEL 7. CHANNEL+ 8. MODE 9. MENU 10. SET 2 11 11. VIDEO IN 12 13 12. EARPHONE. JACK 13.
Remote Control Operation Guide MUTE MUTE on/off ON/OFF Power switch TIME No function SYS No function 0~9 Digit key (0~9) and -/— MIRROR Mirror image setting VIDEO AV/TV slection MENU Main menu -/— Tens digit channel select VIEWMODE Setting picture display dimension.
Important 1). Please align the remote control with the infrared-receiving window on the TV. 2). Never add pressure, drop, immerse in water or disassemble the remote control. 3). Never press any button continuously and swiftly. Operation interval is at least 2 sec onds. 4). Press power to turn on the machine before pressing P /P for programme channel selection. 1. Channel (digit key 0~9 and -/—) There are 0~99 channels in total available on the remote control.
Menu Operation Press MENU to display TV programming menu. PICTURE SYSTEM EXIT PRESET 1. PICTURE. Brightness, Colour and Contrast are displayed on the screen 1>. Press Menu to display program as follows: Brightness, Colour, Contrast. 2>. Enter into PICTURE, press CH+/CH- to select the item which needs to be set and is indicated by an arrowhead. Characters are in red. 3>. Press VOL+/VOL- to increase or reduce the number of the selected items.
5. PRESET 1>. Includes such functions as: Auto Search, Search, Fine Tune, Frequncy, Languge and Default. 2>. Enter into PRESET, Press CH+/CH- to select the item which needs to be set and is indicated by an arrowhead. Characters are in red. 3>. Press VOL+/ VOL- to set the number of the selected items. When it’s in Fine Tune and Search functions, press VOL+ to move upwards, press VOL- to move downwards. 4>. Press CH+/CH- to choose Auto Search.
Before you request a maintenance service call The following conditions do not indicate that the television is faulty. Before you request a maintenance service call, follow the listed methods to check the device. Suspected Fault No picture and sound No picture Is the channel selected correctly? Redo automatic channel tuning. Channels should be reset in a new region. No sound Check Whether audio volume is off or audio system is improperly set. Check Whether earphone is inserted.
Specifications Type A102 V W 01 Product name Color TFT-LCD module Receivable VHF-L: CH1~5,49.75MHz~91.75MHz; VHF-H: CH6~12,168.25MHz~222.75MHz;UHF:CH13~57,471.2 5MHz~869.75MHz; Cable channels Z1~Z7: 112.25MHz~166.75MHz; Z8~Z35: 224.25MHz~446.75MHz. Display component Colour TFT-LCD Screen dimensions 10.2 Inches Speaker Two stereo speaker Connectors External antenna jack, earphone jack, audio/video(AV) input jack, External power input jack.
USING YOUR RACK PROGRAM Your Race Program is designed to add motivation to a workout by allowing you to compete against a selected pacer. To use your Race Program, follow these instructions: 1. Once the Race Program is selected, Press ‘Select’. 2. Choose the desired Pace (speed) using the up or down buttons or incline keys and press ‘Select’. The selected pace is the pace you will be racing against. You will choose your own speed after the program started. 3.
U S I N G Y O U R T H R Z o n e TM P R O G R A M Once the ‘THR Zone’ quick program key is selected (5.0T only), wait for 5 seconds and you will see the target heart rate flashing in the Heart Rate window. Using the chart on page 26, determine your target heart rate. Your target heart rate should be set at a number that you will be able to exercise at throughout the majority of your workout. To adjust the target heart rate, press the up or down buttons.
TARGET ZONE HEART RATE CHART Your Target Zone is a percentage of your maximum heart rate. Target Zone will vary for each individual, depending on age, current level of conditioning, and personal fitness goals. The American Heart Association recommends working-out at a Target Heart Rate Zone of between 60% and 75% of your maximum heart rate. See the chart below for convenient reference.
USING YOUR CUSTOM PROGRAM Your Custom Program is designed to allow you to create your own programming, with the ability to save your program settings for future workouts. To use your Custom Program, follow these instructions: 1. Once the Custom Program has been selected, press ‘Select’. 2. Choose your desired time using the up or down buttons or incline keys and press ‘Select’. 3. Choose your desired speed using the up or down buttons or incline keys and press ‘Select’.
USING YOUR RACK PROGRAM Horizon Fitness treadmills are designed to be reliable and easy to use. However, if you experience a problem, please reference the troubleshooting guide listed below. PROBLEM: The console does not light up. SOLUTION: Verify that the power cord is plugged in properly to the outlet, and that the treadmill switch is turned on. PROBLEM: The treadmill circuit breaker trips during a workout. SOLUTION: Verify that the treadmill is plugged into a dedicated 20amp circuit.
• Constant movement and vibration due to constantly holding the heart rate handle bars while exercising. If you are receiving erratic heart rate readouts, try to only hold the grips long enough to monitor your heart rate. • When you are breathing heavily during a workout. • When your hands are constricted by wearing a ring. • When your hands are dry or cold. Try to moisten your palms by rubbing them together to warm. • Anyone with heavy arrhythmia.
COMMON PRODUCT QUESTIONS ARE THE SOUNDS MY TREADMILL MAKES NORMAL? All treadmills make a certain type of thumping noise due to the belt riding over the rollers, especially new treadmills. This noise will diminish over time, although may not totally go away. Over time, the belt will stretch, causing the belt to ride smoother over the rollers.
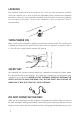
TENSIONING THE BELT If you can feel a slipping sensation when running on the treadmill, the running belt must be tightened. In most cases, the belt has stretched from use, causing the belt to slip. This is a normal and common adjustment. To eliminate this slipping, tension both the rear roller bolts with the appropriate size allen wrench, turning it 1/4 TURN to the right as shown. Try the treadmill again to check for slipping.
MAINTENANCE PROCEDURES Cleanliness of your Horizon Fitness treadmill and its operating environment will keep maintenance problems and service calls to a minimum. For this reason, Horizon Fitness recommends that the following preventive maintenance schedule be followed. AFTER EACH USE (DAILY) Turn off the treadmill with the on/off switch, and unplug the power cord from the wall outlet. WARNING WARNING! To remove power from the treadmill, the power cord must be disconnected from the wall outlet.
EXERCISE GUIDELINES Always consult your physician before beginning an exercise program. HOW OFTEN? The American Heart Association recommends that you exercise at least 3 to 4 days per week to maintain cardiovascular fitness. If you have other goals such as weight or fat loss, you will achieve your goal faster with more frequent exercise. Whether it’s 3 days or 6 days, remember that your ultimate goal should be to make exercise a lifetime habit.
D E V E L O P I N G A F I T N E SS P R O G R A M TIPS STRETCH FIRST Before using your Horizon Fitness product, it is best to take a few minutes doing a few gentle stretching exercises. Stretching prior to exercise will improve flexibility and reduce chances of exercise related injury. Ease into each of these stretches with a slow gentle motion. Do not stretch to the point of pain. Make sure not to bounce while doing these stretches.
ACHIEVING Y O U R F I T N E SS G O A L S An important step in developing a long term fitness program is to determine your goals. Is your primary goal for exercising on your Horizon Fitness treadmill to lose weight? Improve muscle? Burn Stress? Prepare for the spring racing schedule? Knowing what your goals are will help you develop a more successful exercise program.
W E E K LY 39 LOG SHEET
M O N T H LY LOG SHEET 40
L I M I T E D H O M E U S E WA R R A N T Y FRAME • LIFETIME Horizon Fitness warrants the frame against defects in workmanship and materials for the lifetime of the original owner. ELECTRONICS & PARTS Horizon Fitness warrants the electronic components and all original parts for a period from the date of original purchase, so long as the device remains in the possession of the original owner.
TM Designed for life. HORIZON FITNESS Rev. 1.