TREADMILL USER'S GUIDE
CONGRATULATIONS and THANKYOUforyour purchaseof this HorizonSeriestreadmill! Whether your goal is to win races or simply enjoy a fuller, healthier lifestyle, a Horizon Series treadmill can help you attain it- adding club-quality performance toyour at-home workouts, with the ergonomics and innovative features you need to get stronger and healthier, faster. Because we're committed to designing fitness equipment from the inside out, we use only the highest quafity components.
SAVETHESE INSTRUCTIONS Read all instructions before using this treadmill. Whenusing an electrical product, basic precautions should alwaysbe followed,including the following: Readaft instructions beforeusing this treadmill. It is the responsibilityof the ownerto ensurethat aft usersof this treadmill are adequatelyinformed of aft warnings and precautions.
• Never use the treadmill before securing the safety tether clip toyour clothing. • Ifyou experience any kind of pain, including but not limited to chest pains, nausea, dizziness, or shortness of breath, stop exercising immediately and consult your physician before continuing. • Do not wear clothes that might catch on any part of the treadmill. • Always wear athletic shoes while using this equipment. • Do not jump on the treadmill. • Keep power cord away from heated surfaces.
IMPORTANT.. READTHESESAFETY INSTRUCTIONS BEFORE USE! During the assembly process of the treadmill there are several areas that special attention must be paid. It is very important to follow the assembly instructions correctly and to make sure aft parts are firmly tightened. If the assembly instructions are not followed correctly, the treadmill could have frame parts that are not tightened and will seem loose and may cause irritating noises.
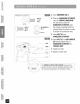
READING RACK CONSOLE (T72SHOWN) •TOUCH PADPANEL WITHBLUEBACK-LIT DISPLAY FAN ON/OFFSWITCH SAFETY KEYPLACEMENT CIRCUITBREAKER CONSOLE MAST FOOTLOCKLATCH POWER CORD_ O MOTOR COVER RUNNING BELT/ RUNNING DECK FOOTPLATE (T72) SIDERAIL TRANSPORT WHEEL _ ROLLER ENDCAP AIRCELL REARROLLER ADJUSTMENT BOLTS [] 4 rnrnAllen Wrench [] 5 rnrnAllen Wrench [] 6 rnrn T-wrench [] 1Safety _ey [] 1ConsoleAssembly(locatedunder treadmill deck) [] 1 Power Cord [] 4 HardwareBags [] 2 SupportBars/Boots [] 2
DONOTCUTSTRAPSUNTILSTEPI-E!* Disassemble box and remove the cardboard packaging that is not beneaththe treadmill. Do not attempt to lift the treadmill at this time. Remove plastic wrap from console masts. NOTE: During each assembly step, ensure that ALL nuts and bolts are in place and partially threaded in before completely tightening any ONEbolt. NOTE:A light application of grease may aid in the installation of hardware. Any grease, such as lithium bike grease is recommended.
A OpenHARDWARE BAG2. Qty:2 LOCKWASHER (C) B Withrunning deck in lowered positbn, place CONSOLE on upright masts. Slide the brackets that are underneath the BOLT (B) 16 mm Qty:4 top_ew Qty: 2 ARCWASHER (D) _ console into the top holes of the upright masts. ang/eview C PlaceLOCKWASHER (C) and BOLT(D)into fiat side of LEFT upright MASTand lightly tighten. CONSOLE CABLE B PlaceARCWASHER (D) and BOLT (D) into curvedside of LEFT upright MASTand lightly tighten.
A OpenHARDWARE BAG3. B Slide the HANDLEBAR EXTENSION onto the CONSOLE HANDLEBAR. Youwill needto slide the HANDLEBAR EXTENSION under BOLT (E) 12ram Qty:2 top_ew BOLT (F) 20 mm Qty:2 © _ i_ I _ iii ARCWASHER (D) Qty:2 angle view the consoleassemblyplastic by slightly lifting the plastic in order to attach the connectionbolts. C InsertBOLT(E)into HANDLEBAR EXTENSION.
........................................ L IIIIIIWIII£ III $ 00R_'£7115: BOLT(E) 10 mm Qty:2 Qty: 2 ARCWASHER (D) _ ang/eview BOLT(F) 115mm Qty:2 A OpenHARDWARE BAG3. j CONSOLE HANDLEBAR / .................................... EXTENSION BOLT(E) 7j ARC WASHER(H) B Slide the HANDLEBAR EXTENSION onto the CONSOLE HANDLEBAR. C InsertBOLTS(E)into HANDLEBAR EXTENSION and fully tighten.
i _ ¸ A OpenHARDWARE BAG4. BOLT (E) 10 mm B SlideSUPPORT BARSonto side MOUNTING BRACKETS and fine up with top MOUNTING BRACKETS. Qty:8 topview C Insert2 BOLTS (E) into the tops and 2 BOLTS (E)into the bottomsof eachSUPPORT BAR. TheBRACKET should beon the outside of the SUPPORT BAR as shownin the drawingto the left. SUPPORTBARBOOT SUPPORTBARS _ BOLT(E_ I_ mRTI,°U,AO_T D SlideSUPPORT BARBOOTS downto coverBOLTS(E).
CONGRATULATIONS! on choosingyour treadmill. You'vetakenan important step in developingand sustaining an exerciseprogram! Yourtreadmill is a tremendouslyeffective tool for achievingyour personal fitness goals. Regularuseof your treadmill can improvethe quality ofyour life in so many ways. HEREAREJUSTA FEWOFTHEHEALTH BENEFITS OFEXERCISE: • Weight Loss • A Healthier Heart • Improved Muscle Tone • Increased Daily Energy Levels The key to reaping these benefits is to develop an exercise habit.
PROPERUSAGE Yourtreadmill is capableof reaching high speeds.Alwaysstart off using a slowerspeedand adjust the speedin srnafl incrementsto reach a higher speedlevel Neverleave the treadmill unattendedwhile it is running. When not in use, removethe safety key,turn the on/off switch to off and unplug the powercord. Makesure to follow the MAINTENANCE schedulelocatedon page34 in this manual. Keepyour bodyand headfacing forward.Donot attempt to turn aroundor look backwards while the treadmifl is running.
TENSIONING THERUNNINGBELT The running belt has been properly adjusted at the factory before it was shipped. At times the belt can moveoff-center during shipment. CAUTION:Running belt should NOT be moving during tensioning. Over-tightening the running belt can cause excessivewear on the treadmill as well as its components. Neverover-tighten the belt. If youcan feela slipping sensation whenrunning onthe treadmill, the running belt must be tightened.
i_ I _ iii Note: Thereis a thin protective sheetof clear plastic on the overlayof the consoleand should be removed. A) MONITOR DISPLAY:Speed,Time,Pulse,Distance,Incline, Caloriesand ProgramProfiles. B) STOP:Pressto pause/endyour workout.Hold for 3 secondsto reset the treadrni/L C) STARESimplypress to begin exercisingor starts your program. D) ENTER:Usedto select Program,Leveland Time.Pressto change display feedbackduring workout. Hold to scan.
l /J sssr_Ur_i L;ru -I 000000000 ||0000|000| 0000000000000 0000000000000 SPEED• Shown as MPH. Indicates how fast your walking or running surface is moving. TIME • Shown as Minutes: Seconds. View the time remaining or the time elapsed in your workout. PULSE • Shown as Beats Per Minute. Used to monitor your heart rate (displayed when contact is made with both pulse grips). DISTANCE • Shown as Miles. Indicates distance traveled during your workout. INCLINE • Shown as Percent.
I) Checkto makesure nothing will hinderthe movementof the treadmill. 2) Plug in the powercordand turn the treadmill ON. 3) Standon the side rails of the treadmill. 4) Attach the safetykeyclip topart ofyour clothing. 5) Insertthe safetykeyinto the safetykeyholein the console. 6) Youhavetwo options to start your workout: A) QUICKSTARTUP Simplypress the STARTkeyto begin workingout. OR... B) SELECT A PROGRAM i_ I _ iii Select a PROGRAM using the SPEEDARROWkeys.
¸¸4¸¸ Note: Thereis a thin protective sheetof clear plastic on the overlayof the consoleand should be removed. A) MONITOR DISPLAY:Time,Pulse,Distance, Caloriesand ProgramProfiles. B) INCLINEDISPLAY.. Displayscurrent incline. C) SPEEDDISPLAY.. Displayscurrent speed. D) STOP:Pressto pause/endyour workout.Hold for 3 secondsto reset the treadmill. E) START.. Simplypress to begin exercisingor starts your program. F) ENTER:Usedto select Program,Leveland Time.
PRESS ENTER TOCONFIRM PROGRAM PRESS START TOBEGIN 8 Q.Q °o INCLINE SPEED _ _ CALORIES _ _ !2100 . !2!O.O n _'=_ i4='i SETLEVEL U 121UPOLSE _! _I:121 ,_,o,s=NcE SPEED• Shown as MPH. Indicates how fast your walking or running surface is moving. i_ I "_ i_ii i!l TIME • Shown as Minutes: Seconds. View the time remaining or the time elapsed in your workout. PULSE • Shown as Beats Per Minute. Used to monitor your heart rate (displayed when contact is made with both pulse grips).
¸¸4¸¸ I) Checkto makesure nothingis on or will hinder the movementof the treadmill. 2) Plug in the powercordand turn the treadmill ON. 3) Standon the side rails of the treadmill. 4) Attach the safetykeyclip topart ofyour clothing. 5) Insertthe safetykeyinto the safetykeyholein the console. 6) Youhavetwo options to start your workout: A) QUICKSTARTUP Simplypress the STARTkeyto begin workingout. OR... B) SELECT A PROGRAM(Press ENTERto confirm.
Allows 'On The Fly' manual SPEEDand INCLINE changes. Time-based goal. !i ::i:!i¸! :!2:!2!!!!i¸!2 ¸ Walkor run a series of alternating SPEEDlevels. Time-basedgoal with 10 difficulty levels to choosefrom. INTERVALS PROGRAM SEGMENTS (peak segments last 30 seconds, valley segments last 90 seconds) i_ I _ iii Level1 1,0 1.5 2.0 4.0 2.0 4.0 1.5 d.5 1.5 1.0 i Level2 1,0 1,5 2.0 d.5 2.0 .,,.,a 1.9 Level31.3 1.9 _.9 5.0 2.5 5.0 _ Level4 Level5 Level6 Leve/7 Level8 Level9 Leve/10 1.
54 Challengeswith variouscombinations of hills and valleys (INCLINE& SPEEDlevels). Time-basedgoal with 10 difficulty levels to choosefrom. WEIGHTLOSSPROGRAM SEGMENTS (all segmentslast 30 seconds) I 2 3 4 5 6 7 8 L5 L5 LO 0,5 a5 0,5 LO L5 0,5 0,0 1,5 0,0 i Elevation 0.0 0,5 Level I Speed 1.0 Elevation 0.0 L5 2,0 2,5 3,0 3,5 4,0 3,,f 3,0 2,5 2.3 0,5 L5 L5 LO 0,5 0,5 0,5 LO L5 0,5 2.5 3,0 3,5 4,0 4,5 4.0 3.5 3,0 1,0 2.0 2.0 1.5 1.0 1.0 1.0 1.5 2.
.................................. ............................................................................... f>locIA .................................................................. J:ll!f lll!s! yi,i ...................................... i Simulates various INCLINESand yardages for holes on a golf course, with 4 tee-off boxes and 9 or I8 holes to choose from. Distance-basedgoal. GOLFCOURSE PROGRAM SEGMENTS HOLE HUMBER: Redtee Elevation 0,0 1.0 2`0 3.0 2`5 1.0 2`0 2`5 1.
54 i_i-:_ _,,' TyTy _ ' .... 7? _!'_o Letsyou create and reusea perfect workoutfor you with specific speed,incline and time combination. Theultimate in personalprogramming. Time-basedgoal. I. Oncethe CUSTOM programhas beenchosen,press ENTER 2. Choosethe desired TiMEusing the SPEEOARROWKEYSand press ENTER. 3. Choosethe desired SPEEOfor each segment, using the SPEEOARROWKEYS and press ENTER.Note: Youwill needto pressENTERafter eachsegment. 4.
ALWAYS CONSULT YOURPHYSICIAN BEFORE BEGINNING ANEXERCISE PROGRAM. HOWOFTEN? (Frequency of Workouts) The American Heart Association recommends that you exercise at least 3 to 4 days per week to maintain cardiovascular fitness. If you have other goals such as weight or fat loss, you will achieve your goal faster with more frequent exercise. Whether it's 3 days or 6 days, remember that your ultimate goal should be to make exercise a lifetime habit.
¸¸4¸¸ Whatis TargetHeartRateZone? Target Heart Rate Zone tells you the number of times per minute your heart needs to beat to achieve a desired workout effect. It is represented as a percentage of the maximum number of times your heart can beat per minute. Target Zone will vary for each individual, depending on age, current level of conditioning, and personal fitness goals. The American Heart Association recommends working-out at a Target Heart Rate Zone of between 60% and 75% of your maximum heart rate.
STRETCHING i • STRETCH FIRST Before using your product, it is best to take a few minutes doing a few gentle stretching exercises. Stretching prior to exercise will improve flexibility and reduce chances of exercise related injury. Ease into each of these stretches with a slow gentle motion. Do not stretch to the point of pain. Make sure not to bounce while doing these stretches. I.
54 WARMUP The first 2 to 5 minutes of a workout should be devoted to warming up. The warm-up will limber your muscles and prepare them for more strenuous exercise. Make sure that you warm-up on your product at a slow pace. The warm up should gradually bring your heart rate into your Target Heart Rate Zone. COOL DOWN Never stop exercising suddenly! A cool-down period of 3-5 minutes allows your heart to readjust to the decreased demand.
ioNII[,> o DAY DATE DISTANCE CALORIES TIME COMMENTS DISTANCE CALORIES TIME COMMENTS DISTANCE CALORIES TIME COMMENTS SUNDAY MONDAY TUESDAY WEDNESDAY THURSDAY FRIDAY SATURDAY WEEKLY TOTALS : i!l DAY DATE SUNDAY MONDAY TUESDAY WEDNESDAY THURSDAY FRIDAY SATURDAY WEEKLY TOTALS : DAY DATE SUNDAY MONDAY TUESDAY WEDNESDAY THURSDAY FRIDAY SATURDAY WEEKLY TOTALS :
¸¸4¸¸ WEEK # DISTANCE CALORIES TIME DISTANCE CALORIES TIME DISTANCE CALORIES TIME MONTHLY TOTALS : WEEK # MONTHLY TOTALS : WEEK # MONTHLY TOTALS :
COMMON PRODUCT QUESTIONS ARETHESOUNDS MY TREADMILL MAKES NORMAL? All treadmills make a certain type of thumping noise clueto the belt riding over the milers,especially new treadmills. This noise will diminish over time, although may not totally go away.Overtime, the belt will stretch, causing the belt to ride smootherover the rollers.
54 PROBLEM: Thetreadmill circuit breakertrips during a workout. $SLUTJON: Verifythe following: • Make sure the treadmill is plugged into a dedicated 20-amp circuit. • Verifythat you do not ha ve the machine on an extensioncord or surge protector • Confirm that the machine is not plugged into a GFCI-equippefi outlet or on a circuit that has a GFCI-equippefloutlet on it. PROBLEM: The running belt does not stay centered during a workout.
Cleanliness of your treadmill and its operation environment will keep maintenanceproblems and service calls to a minimum. For this reason, werecommendthat the following preventive maintenance schedule be followed. AFTEREACHUSE(DALLY) Clean and inspect, following these steps: • Turnoff the treadmill with the on/off switch, then unplug the power cord at the waft outlet. • Wipedown the running belt, deck, motor cover,and console casing with a damp cloth.
54 FRAME• LIFETIME WhatIScovered: HorizonFitness warrants the frame against defects in workmanship and materials for the fifefime of the original owner (Theframe is definedas the weldedmetal baseof the • Repairor replacementof a defective motor,electroniccomponent,or defectivepart and is the sole remedyof the warranty unit and doesnot include anyparts that can be removed.
E Forfast and friendly service,please contact one of our trained customertechnicians via phone, email or our website. Customer Tech Support Hotline.. 1- 800- 244- 4192 Email.. comments@horizonfitness.com Website.. www.horizonfitness.com Everyemployeeat HorizonFitnesstakes pride in providing you with a high quality product. HZSeries.Re_2.0 I © 2006 HorizonFitnessProductsI Designed& Engineeredin the U.S.A.