
Operating Instructions and Installation Instructions

6107.2006 TR10A021-B RE
4.2 Menu selection
Menu selection is made via the PRG button. Here pressing
the button results in changing to the next menu. On
reaching menu P, the system changes back to menu 0.
Note
The menus are released for approx. 60 s, after which the
system changes back to menu 0.
4.3 Putting into service
On first-time operation, the control system automatically
switches to menu J. After having set the door type,
press the PRG button to change to menu 1. On com-
pleting the learning cycles, the system automatically
changes back to menu 0 (normal operation).
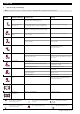
4.4 MENU J – adjustment / setting of the door type
(see fig. 17)
Note
Menu J can only be accessed on first-time operation or
after restoring the factory settings (see section 4.6/fig. 30).
In this menu, the operator is optimally adjusted to the
corresponding door. To be able to alter a parameter,
press the PRG button until the display flashes rapidly. By
pressing the OPEN button () or the CLOSE button ()
you can page through the menu. To be able to alter the
parameter, first select the parameter to be changed. Then
press the PRG button until the decimal point flashes in
addition.
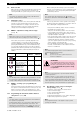
Display Operator on Active settings
Menu 7 Menu 9
Sectional door 1, 2, 5 1, 3, 5, 9
Up-and-over door 0, 2, 5 1, 3, 5, 8
(door swinging open
towards outside)
Retractable up-and- 1, 2, 5 0, 3, 6, 9
over door (door
swinging open
towards inside)
Side sectional door, 1, 2, 5 1, 3, 5,
... 8, A
Note
For side-hinged doors (with two leaves) parameter "3" should
be set. If the door speeds need to be reduced, then the
corresponding settings should be made in menus 7 and 9.
4.5 MENU 1 – learning cycle / programming the
operator
Select menu 1 by pressing the PRG button. In this menu
the operator can be tuned to the door. In the process, the
distance of travel as well as the required force to open
and close the door are learned and automatically stored.
4.5.1 Programming the travel limits and the attached
safety devices (see fig. 18)
Note
The safety devices must be mounted and connected before
the operator is programmed.
If further safety devices are connected at a later date, then
the operator must be programmed to learn these. This
requires that a new learning cycle is carried out or the cor-
responding parameter must be set manually in menu 4.
Before starting the first learning cycle in the CLOSE
direction, check whether one or more safety devices are
connected. If so, the corresponding menu (menu 4) is
automatically selected.
Note
The carriage must be engaged (see fig. 6) and there
must be no obstructions in the functional area of the safety
devices!
If necessary, switch the control system to the learning
mode by pressing the PRG button to change to menu 1.
Now, a flashing L is displayed after the 1:
- First press the OPEN () button. The door travels to
the OPEN end-of-travel position.
- Then press the CLOSE () button. The door travels
to the CLOSE end-of-travel position. Now, the door
automatically performs a complete opening cycle and
a rapidly flashing L is displayed.
- Press the CLOSE () button again. Once the door has
reached the CLOSE end-of travel position, the door
automatically performs another complete opening
cycle. The operator performs the next cycle (a closing
and an opening cycle) automatically.
- Once the OPEN end-of-travel position has been
reached, a number flashes. This indicates the maxi-
mum force established.
Note
The numbers displayed in relation to the maximum force
established indicate the following:
0-2 optimum forces
3-9 poor forces; the door system needs to be
checked / readjusted
ATTENTION
On completing the learning cycles, the person
putting the system into service must check the
functions of the safety devices and the settings
in menu 4. Afterwards the system is ready
for operation.
Note
The motor of the garage door operator features thermal
overload protection.
If within 2 minutes 2-3 fast-opening cycles take place in
succession, this safeguard reduces the speed, i.e. travel
in both the OPEN and CLOSE directions proceeds at the
same speed. After a rest period of a further two minutes,
the next opening cycle is performed at fast speed again.
4.6 Resetting the control system / restoring the
factory settings (see fig. 30)
To reset the control system, proceed as follows:
1. Pull out the mains plug
2. Press and hold the PRG button
3. Insert the mains plug
4. Release the PRG button as soon as C is displayed
5. Adjust and programme the operator
Note
The programmed radio codes (impulse / light / partial
opening) are retained.
ENGLISH