
User guide
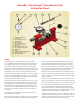

The Hornady® Lock-N-Load™ Concentricity Tool ships
pre-assembled with a bullet spindle (5) that will work for
most applications. However, if a smaller or larger spindle
(included) is required, simply unscrew the ball knob (8),
remove the bullet spindle (5), bullet spindle spring (6) and
bullet spindle collar (7), then place the spring and collar on
the spindle of your choice and reassemble in the frame.
Place the dial indicator (4) in the dial indicator hole located
on the indicator/straightening cradle (13). Secure the dial
indicator by tightening the dial indicator lock screw (9) to
hold the dial indicator (4) in position.
Pull the dial indicator spindle (1) back and slide the o-ring
holds (2) down to hold the dial indicator spindle (1) from
protruding too far into the indicator cradle opening. Also,
back the nylon-tipped thumbscrew (10) out of the indica-
tor cradle opening. This will allow the first cartridge to be
easily inserted into the Hornady® Lock-N-Load™ Concen-
tricity Tool.
Loosen the case head spindle lock (14) and slide the case
head spindle (15) rearward.
Place selected cartridge case head in the case head spindle
(15) and slide the spindle forward guiding the bullet into
the recess in the bullet spindle (5). Continue to push the
cartridge forward until the ball knob (8) moves approxi-
mately 1/8 inch away from the frame (12) (this 1/8 inch is
a place to start and may be increased or decreased to the
user’s preference). Now, lock the case head spindle (15) in
place by tightening the case head spindle lock (14).
Cartridges can now be removed and replaced by pulling
the ball knob (8) away from the tip of the cartridge which
will create clearance between the bullet spindle (5) and tip
of the cartridge.
Slide the o-ring holds (2) on the dial indicator spindle (1)
back to allow spindle to come into contact with the bullet.
Loosen the indicator/straightening cradle (13) by loosening
the cradle lock (11), then slide the cradle until the indica-
tor is located where the ogive meets the shank of the
bullet. (This position can be adjusted according to bullet
design and/or user preference). Now tighten the indicator/
straightening cradle (13) with the cradle lock (11).
Adjust the o-ring holds (2) on the dial indicator spindle (1)
so that the spindle only drops .020" to .030" when the car-
tridge is removed from the concentricity tool. This allows
the cartridge to be removed and replaced easily.
Hornady® Lock-N-Load™ Concentricity Tool
Instruction Sheet
4 5 6
8
9
10
11
12
13
1415
7
321
DIAL INDICATOR SPINDLE
1.
O-RING HOLDS
2.
DIAL INDICATOR FACE LOCK
3.
DIAL INDICATOR
4.
BULLET SPINDLE
5.
BULLET SPINDLE SPRING
6.
BULLET SPINDLE COLLAR
7.
BALL KNOB
8.
DIAL INDICATOR LOCK SCREW
9.
NYLON-TIPPED THUMB SCREW
10.
CRADLE LOCK
11.
FRAME
12.
INDICATOR/STRAIGHTENING CRADLE
13.
CASE HEAD SPINDLE LOCK
14 .
CASE HEAD SPINDLE
15.
Setup