
User's Manual


INSTALLATION
GUIDE
Welcome
It is very important that you familiarize your-
self with these installation instructions be-
fore attempting to install your device. Basic
knowledge of automotive electrical systems
and functional components are needed in order
to successfully install your FleetHawk device.
If you are not a qualied automotive electrical
technician or do not feel comfortable performing
this installation, we strongly recommend that
you work with a trusted automotive professional
in your area to install FleetHawk according to
your needs. The instructions provided are only
a guide and do not necessarily apply to your
particular vehicle.
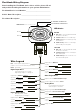
Component List
n Installation Guide
n FleetHawk Pro device
n GPS/RF combination antenna, OR
l GPS antenna, AND
l Radio (RF) antenna
n Installation Kit:
l (1) In Line Fuse Holder
l (2) 3 amp Fuses
l (4) Butt Connectors
l (2) Female Quick Disconnects
l (1) Blade Style Connectors
l (2) Mini Fuse Taps
l (2) ATO Blade Type Fuse Taps
l (4) Nylon Cable Ties
n Extension Power cable (if purchased)
n One of the following (if purchased):
l Power cable (from device to accessory
or cigarette lighter power outlet in ve-
hicle)
l Power cable with 16 loose wires for
connectivity to systems for control and
monitoring (advanced installation).
l Power cable with 16 loose wires and
two DB9 (serial) connectors for control,
monitoring and connectivity to other
intelligent hardware (advanced installa-
tion).
Cautions
Only persons experienced with automotive
electrical installations should attempt to hard-
wire power to the FleetHawk device. Improper
installation of electrical components and any
resulting damage may impact your vehicle war-
ranty. SkyTel will not be responsible or liable
for any damage, injury or other loss suffered
as a result of installations covered by these
instructions.
n Using pull ties, fastener screws, or Velcro,
install or store the FleetHawk device inside
the vehicle passenger cab or trunk. Do not
install or store the device inside the en-
gine compartment.
n Exposure to excessive moisture or extreme
heat can damage the FleetHawk device. The
optimum operating temperature range for
the device is -10º to 160º F.
n All excess wiring should be neatly coiled
and stored so that it is not crimped or rub-
bing against other parts of the vehicle or
interfering with use of the vehicle.
n Any unused wires should be properly taped
or capped so that they do not come into
contact with one another or with other ve-
hicular electrical sources.
Power Sources for
the FleetHawk Device
1 Constant Power: Locate a suitable
12- or 24-volt constant power source on the
vehicle’s fuse block. Acceptable sources
for power are: The vehicle’s battery; the
fuse block; or wiring under the dash of the
vehicle
l The installation hardware kit shipped
with your device includes an in line fuse
holder that must be used to feed power
to the device. A 3-amp fuse is also in-
cluded but do not install the fuse until
everything else has been installed,
the cable is connected to the device,
and you are ready to use the device.
Installing the fuse should be your last
step in completing the installation.
l If you choose to get power from the
fuse block on your vehicle, you can use
a fuse tap and a female quick discon-
nect. The fuse tap must be installed on
the hot side of the fuse. To nd the hot
side of the fuse, remove the existing
fuse from the fuse block and use a test
light to probe the fuse socket. The side
that lights the test probe is the hot side
of the fuse where you should insert the
fuse tap.
l If you choose to get power directly from
the battery or another wire on the ve-
hicle be sure to use a suitable connector
or splice method (such as soldering) to
ensure a permanent connection. The
device will not work without power.
2 Ground: Locate a suitable area to ground
the device that is free from dirt and grease.
Fasten the black wire from the cable to the
ground source. Be sure the ground wire is
securely fastened to the ground source.
3 Key On: Locate a “key on” power source
using a test light. Connect the white wire
marked with the number 1 (one) to the ‘key
on’ power source.
In most vehicles, there will be a number of
sources for Constant Power, Ground, and Key On
located under the dash. It is up to the installer
to choose the best sources for their particular
vehicle.
It is impossible to cover wiring scenarios for
all makes and models of vehicles in this installa-
tion guide. If you have questions please contact
a trusted automotive electrical professional to
assist in the installation.
Mounting the
Antenna
Depending on the type of antenna provided,
locate a suitable place on your vehicle for the
antenna to be installed.
For optimal performance, both antennas
should be mounted on the outside of the
vehicle, on the windshield, roof, hood, or trunk.
While you can mount the antennas elsewhere,
performance may suffer as a result.
n For the GPS/RF combination antenna, see
the instruction sheet provided by the an-
tenna manufacturer.
n The GPS antenna will need an unobstructed
sky view.
n The RF antenna can be mounted in the inte-
rior of the vehicle, if necessary.
Make sure there is sufcient cabling to
reach from the point of the antenna mount back
to the where you have installed the FleetHawk
device. Conceal any excess cable under the car-
pet, trim, or dash where it will not be exposed to
wear. Be careful not to crimp or kink the cable
as this may damage the antenna or reduce its
effectiveness.
Component List, continued... Power Sources, continued...
Customer Support
email: skytel-eethawk@mci.com
phone: 888-759-6818
8002028 1/05
© 2005 SkyTel Corp. SkyTel and FleetHawk are registered trademarks or
service marks of SkyTel Corp.