
Instruction Manual


20
• When completely clear water is dispensed through the double All-in-One filters, close the angle stop valve (C)
again, and remove the temporary water line.
• Run a line from the back of the dispenser to the 3/8” 2-way divider which is connected to the filters’ outlet port.
• Now that the entire water line is connected, as per the picture on the next page, open the angle stop valve (C)
and also the shutoff valve (A).
• IMPORTANT: make sure DWM-20A is fully connected to the water line and to the CO
2
line and dispense some
water from DWM-20A. Now pull all the lines: the 3/8” water inlet line, the 1/4” CO
2
gas line and, also, the 1/2”
water drain line, if present) in order to check if they are all properly connected with the various John Guest
connectors. Make sure there are no leaks. Insert collect locking clips 1/4” and 3/8” as appropriate at any junction.
• Insert the battery (included) into the water leak detector. Use a small piece of wet fabric or wet paper towel in
order to test the leak detector by using the wet fabric or paper towel to touch both electrodes and close the
circuit. Check that the leak detector gets triggered correctly by listening for a loud beep. To reset the leak
detector, press and hold its reset button for five (5) seconds until the water solenoid valve of the leak detector
opens.
• Make sure that the entire installation area is clean and dry. Cut a small square of (completely dry) paper towel,
fold it and position the paper towel under the electrodes of the leak detector: if the paper towel gets wet due to a
flooding, the leak detector will activate and the solenoid valve will close the water line. Then the leak detector will
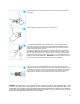
BACK VIEW