
Spec Sheet


618 Hwy, 74 S., Peachtree City, GA 30269 | TEL 800-438-6087 | FAX 800-345-1325 | www.hoshizakiamerica.com
© HOSHIZAKI AMERICA, INC.
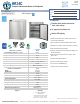
HR24C
11/03/20
Item # 13556
Compact Undercounter Reach-in Refrigerator
inch
[mm]
PLAN VIEW
SIDE VIEW
FRONT VIEW
HR24C
23 3/8 [594]
19 1/4 [489]
26 9/16 [675]
22 1/2 [572]
18 7/8 [479]
12 3/16 [310]
23 3/8 [594]
31 1/2 [800]
46 11/16 [1186]
24 11/16 [627]
24 3/4 [628]
18 7/8 [479]
30 3/4 [781]
23 3/8 [594]
19 1/4 [489]
26 9/16 [675]
22 1/2 [572]
18 7/8 [479]
12 3/16 [310]
23 3/8 [594]
31 1/2 [800]
46 11/16 [1186]
24 11/16 [627]
24 3/4 [628]
18 7/8 [479]
30 3/4 [781]
23 3/8 [594]
19 1/4 [489]
26 9/16 [675]
22 1/2 [572]
18 7/8 [479]
12 3/16 [310]
23 3/8 [594]
31 1/2 [800]
46 11/16 [1186]
24 11/16 [627]
24 3/4 [628]
18 7/8 [479]
30 3/4 [781]
23 3/8 [594]
19 1/4 [489]
26 9/16 [675]
22 1/2 [572]
18 7/8 [479]
12 3/16 [310]
23 3/8 [594]
31 1/2 [800]
46 11/16 [1186]
24 11/16 [627]
24 3/4 [628]
18 7/8 [479]
30 3/4 [781]
10
D. Setup
1. Install the Top Trim
To achieve a built-in look when installing in a cabinet application, the top trim can be
between the top of the unit and bottom of the counter in your installation. To install the top
trim, follow the directions below.
2) Clean the appliance's top panel with a clean soft cloth using a mild soap to remove any
oil or dirt. Dry the top panel thoroughly with a clean soft cloth.
3) Peel off the liner from the double-sided tape on the top trim.
4) Attach the top trim to the top panel.
2. Position and Level the Appliance
Position the appliance in its permanent location. Level the appliance by adjusting the
legs.
NOTICE! Do not remove the legs or rollers. The legs and rollers are necessary to
3. Adjust the Shelves
The appliance comes with 2 lower shelves and 1 upper shelf. Adjust shelf positions as
needed.
Fig. 2
Top Trim: Use the one of the
appropriate height for your installation
2.5”
.80”
Top Trim: Use one
of the appropriate
heights for your
installation