
Use and Care


10
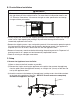
5. Install the Rail Dividers and Pans (Prep Table Models)
Install the rail dividers and 1/6 size pans included with the appliance. See Fig. 3 and the
table below. The entire rail must always be covered by rail dividers and pans. Otherwise,
the appliance will not cool properly. Use pans with a depth of up to 6"(15cm). Do not use
damaged rail dividers or pans.
Pans
Rail Dividers
Fig. 3
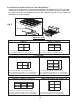
Rail Divider Layout
-8 Models
CRMR27-8 CRMR48-8, CRMR60-8
Front-to-Back: HS-5187 (13-3/4"; 348 mm) Qty 1
Side-to-Side: HS-5185 (12-1/2"; 319 mm) Qty 2
Front-to-Back: HS-5188 (12-5/8"; 322 mm) Qty 1
Side-to-Side: HS-5189 (13-5/8"; 346 mm) Qty 2
-10, -15M Models
CRMR36-10 CRMR36-15M
Front-to-Back: HS-5187 (13-3/4"; 348 mm) Qty 2
Side-to-Side (Outer): HS-5185 (12-1/2"; 319 mm) Qty 1
Side-to-Side: HS-5186 (Center) (12-1/2"; 316 mm) Qty 1
Front-to-Back: HS-5184 (20-3/4"; 526 mm) Qty 2
Side-to-Side (Outer): HS-5185 (12-1/2"; 319 mm) Qty 2
Side-to-Side: HS-5186 (Center) (12-1/2"; 316 mm) Qty 2
-12, -12M Models
CRMR48-12, CRMR60-12, CRMR72-12 CRMR27-12M, CRMR48-12M, CRMR60-12M
Front-to-Back: HS-5188 (12-5/8"; 322 mm) Qty 2
Side-to-Side (Outer): HS-5189 (13-5/8"; 346 mm) Qty 2
Side-to-Side (Center): HS-5190 (13-1/2"; 344 mm) Qty 1
Front-to-Back: HS-5184 (20-3/4"; 526 mm) Qty 1
Side-to-Side: HS-5185 (12-1/2"; 319 mm) Qty 4