
Instructions Manual
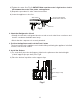


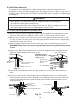

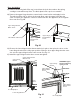
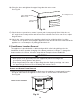

Table Of Contents
- Important Safety Information
- I. Installation Instructions
- II. Operating Instructions
- III. Cleaning and Maintenance Instructions
- IV. Preparing the Appliance for Periods of Non-Use
- V. Disposal

16
5) Remove the lower hinge bracket. See Fig. 14. Be sure to leave the thrust washer in
place.
6) Clear the foam from the lower hinge bracket mounting holes prior to securing lower
hinge bracket in its new location. Install the lower hinge bracket in its new location. Be
sure the lower hinge bracket is pushed all the way in and the thrustwasher is in its
original position.
D. Solid Door Reversal
The appliance is provided with a cabinet design which, after being delivered to the
installation location, permits changing of the door swing from left to right or right to left. To
change the door swing, follow the steps below. Example shows change from right hinged
to left hinged.
WARNING
• Wear proper PPE (personal protection equipment) when executing these
procedures (safety glasses and gloves).
• Keep ngers away from edge of upper hinge bracket. Spring cartridge can cause
the upper hinge bracket to move suddenly with extreme force.
Door and Lower Hinge Removal and Relocation
1) Remove all items from the appliance. Make sure the appliance is unplugged from the
electrical outlet. Move the appliance out for ease of access then lock the casters.
2) With the door closed, loosen, but do not remove, the upper hinge bracket outer screw.
See Fig. 12. Next, open the door to the fully open position and remove the upper hinge
bracket inner screw. See Fig. 13.
3) Slide the upper hinge bracket out from under the outer screw and remove the door.
WARNING! Keep away from upper hinge bracket. Upper hinge bracket may spring
closed.
4) Replace the upper hinge bracket inner screw in its original position and tighten, then
tighten the upper hinge bracket outer screw.
Fig. 12
Fig. 13
Upper Hinge
Bracket Inner
Screw
Door Fully Open
WARNING! Upper
hinge bracket may
spring closed
Upper Hinge Bracket
Outer Screw
Door Closed
Upper Hinge Bracket
Upper Hinge
Bracket
Lower Hinge Bracket
Fig. 14
Bolts
Thrust
Washer
Lower Hinge Bracket
Bolts
Thrust Washer
Lower Hinge
Bracket
Mounting Holes