
Instructions Manual
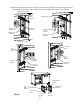
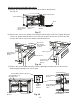
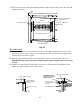
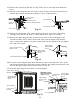
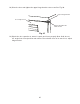
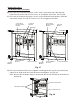
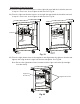
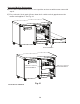

Table Of Contents
- Important Safety Information
- I. Installation Instructions
- II. Operating Instructions
- III. Cleaning and Maintenance Instructions
- IV. Preparing the Appliance for Periods of Non-Use
- V. Disposal

24
12) Remove the lower hinge bracket. See Fig. 33. Be sure to leave the thrust washer in
place.
13) Install the lower hinge bracket in its new location. Be sure the lower hinge bracket is
pushed all the way in and the thrust washer is in its original position.
Lower Hinge Bracket
Bolts
Thrust
Washer
Lower Hinge Bracket
Bolts
Thrust Washer
Fig. 33
Fig. 34
Upper Hinge Bracket
Outer Screw
Upper Hinge
Bracket Inner
Screw
Black Plastic Filler Cap
Upper Hinge
Bracket Outer
Screw
Lower Hinge
Bracket
Mounting Holes
14) Remove the black plastic ller cap located from the hole above where the spring
cartridge screw will line up. Note: The black plastic ller cap is not reusable.
15) Remove the upper hinge bracket screws from the new location and apply Loctite
Threadlocker Blue 242 or 243 to the threads. Next, start the upper hinge bracket
outer screw into the appliance. Rotate a few threads into the appliance; do not tighten
thescrew. See Fig. 34.
16) Be sure the lower hinge bracket thrust washer is in place, then place the door on the
lower hinge bracket in the fully open position. Slide the door upper hinge bracket outer
slot onto the upper hinge bracket outer screw. See Fig. 35.
17) Install the upper hinge bracket inner screw and tighten.
Upper Hinge
Bracket Inner
Screw
Door Fully Open
WARNING! Upper
hinge bracket may
spring closed
Fig. 35
Upper Hinge
Bracket Outer
Screw
Upper Hinge
Bracket Outer
Screw
Door Fully
Open
Lower Hinge
Bracket
Upper Hinge
Bracket
Thrust Washer
Upper Hinge
Bracket