
Instruction Manual


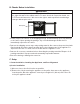
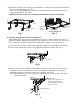
Table Of Contents
- Important Safety Information
- I. Installation Instructions
- II. Operating Instructions
- III. Cleaning and Maintenance Instructions
- IV. Preparing the Appliance for Periods of Non-Use
- V. Disposal

10
Door
Locking Casters
in Front
Fig. 1
3) Attach the casters to the bottom of the appliance. Locking casters should be attached to
the front of the appliance. See Fig. 1.
Note: For UR_WR_SR48A(-xx), rear caster brackets must be installed with the rear
casters as illustrated. See Fig. 2.
NOTICE! Ensure casters are completely threaded into appliance and tight.
Fig. 3
Caster
Fig. 4
Shim Plates
Rotate each shim plate 90°
from the adjoining shim
plate. Maximum of 3 shim
plates per caster.
Caster
3) Position the necessary number of shim plates in place (no more than 3 per caster).
If using more than one shim plate, rotate each additional shim plate 90° from the
adjoining shim plate so that the slots are not aligned. See Fig. 4.
Note: Do not shim the rear of the appliance higher than the front as this could affect
door performance.
b) Leveling the Appliance and Door Alignment
After installing the casters, lower the appliance to the oor and check the level of the
appliance and the alignment of the doors. If the appliance is out of level or the doors are
out of alignment, follow the steps below. Otherwise, continue to the next section.
1) Secure the doors. Raise and block the appliance. Make sure the appliance is stable.
2) Unscrew the appropriate caster to the approximate desired height. See Fig. 3.
Rear Caster
Bracket
Casters
Rear
Caster
Bracket
Fig. 2
UR_WR_SR48A(-xx)