HIGHLIFE COLLECTION ® Grandee® • Envoy® • Aria® • Vanguard® • Sovereign® • Prodigy® • Jetsetter® OWNER’S MANUAL
Highlife ® Collection Watkins Manufacturing Corporation congratulates you on your decision to enjoy the finest spa available... Welcome to the growing family of HOT SPRING spa owners. Before you begin reviewing the manual, please take a moment to register your warranty. By doing so will help assist us in contacting you for any important product notification, and ensure that you and other can enjoy quality products for years to come.
TABLE OF CONTENTS SAFETY INFORMATION IMPORTANT SAFETY INSTRUCTIONS............................... 1 IMPORTANT SPA INSTRUCTIONS.............................................................. 3 GETTING STARTED SPA FEATURES...................................................................... 4 QUICK START-UP INSTRUCTIONS..................................... 5 EQUIPMENT COMPARTMENT............................................. 7 WATER QUALITY AND MAINTENANCE BASIC INFORMATION...................................
Safety Information IMPORTANT SAFETY INSTRUCTIONS (READ AND FOLLOW ALL INSTRUCTIONS) • Do not operate the audio main controls while inside the spa (if spa is equipped with an audio component). • Do not connect any auxiliary components (for example, cable additional speakers, headphones, additional audio components) to the audio system unless approved by Watkins Manufacturing Corporation . • Do not self service audio component by opening spa door as this may expose dangerous voltage or other risk of injury.
DANGER - RISK OF ELECTRICAL SHOCK • Install at least 5 feet (1.5 m) from all metal surfaces. A spa may be installed within 5 feet of a metal surface if each metal surface is permanently connected by a minimum No. 8 AWG (8.4 mm²) solid copper conductor attached to the wire ground connector on the terminal box that is provided for this purpose if in accordance with National Electrical Code ANSI/NMFPA70-1993.
AVOIDING THE RISK OF SKIN BURNS • To reduce the risk of injury, before entering a spa the user should measure the water temperature with an accurate thermometer. • Test the water with your hand before entering the spa to be sure it’s comfortable. SAFETY SIGN Each HOT SPRING spa is shipped with a SAFETY SIGN in the owner’s package. The sign, which is required as a condition of Product Listing, should be permanently installed where it is visible to the users of the spa.
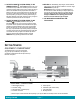
Getting Started 3 SPA FEATURES 10 14 1) Standard LCD Contol Panel. The control panel is accessible from inside or outside the spa and is designed for ease of use. 9 11 Wireless Remote Contol Panel. The wireless remote control panel can be removed from the spa and used as a remote inside or outside the spa. Available on GRANDEE & ENVOY models only. 2 ) The SmartJet ® system lets you divert water to different combinations of jets simply by turning the lever.
MOTO-MASSAGE DX JET WATER FEATURE The MOTO-MASSAGE DX jet automatically travels up and down in a sweeping motion, simulating the natural stroking effects of a manual massage. The intensity of the MOTO-MASSAGE DX jet may be adjusted by turning the COMFORT CONTROL lever. The MOTO-MASSAGE DX jet has been factory adjusted to provide maximum hydromassage, and to achieve full vertical travel with its COMFORT CONTROL lever in the full air volume position.
VANGUARD, ARIA, SOVEREIGN, PRODIGY & JETSETTER Models: • Push the JETS hardbutton once. • Push the JET MAX soft button to make both jet pumps run on high speed for one minute. • Press the ALL OFF soft button once the jet system is full operational (as indicated by strong, non-surging jets), priming of the spa is complete, to shut the jets off. Weak or surging jets are an indication of a low water level condition or clogged filter cartridges.
8. ROTATE THE SMARTJET SYSTEM LEVER(S) TO THE PRIMARY POSITION (3 O’CLOCK) Activate the clean cycle 10. RECHECK the Total Alkalinity (TA) at 80 ppm, Calcium Hardness (CH) at 100 ppm, then spa water pH at between 7.2 and 7.6. using a FRESHWATER 5-way test strip. IMPORTANT: Make sure you adjust your Total Alkalinity first, as an out-of-balance condition will affect your ability to adjust the pH correctly, and will prevent the sanitizer from operating effectively.
Water Quality and Maintenance BASIC INFORMATION It’s important to have clean water. Water maintenance is one of the least understood, yet most important, areas of spa ownership. Your dealer can guide you through the process of achieving and maintaining perfect water in your spa, given your local conditions. IMPORTANT: Water Terminology can be found at the end of this section. • Always read & refer to the owner's manual for complete information.
FUNDAMENTALS OF WATER MAINTENANCE • Testing: Test the water weekly or each time the spa is used with convenient FRESHWATER 5-way test strips or more accurate liquid/ tablet reagent test kit per instructions. Critical parameters: sanitizer level, pH, Calcium Hardness (CH), and Total Alkalinity (TA). Store test equipment in a dark, cool, dry place to maintain potency.
ACE SALT WATER SANITIZING SYSTEM IMPORTANT: DO NOT use tri-chlor chlorine, bromo-chloro-dimethylhydantoin (BCDMH), or any type of compressed bromine or chlorine, acid or any type of sanitizer which is not recommended by Watkins Manufacturing Corporation. (OPTIONAL) The ACE Salt Water Sanitizing System converts water and sodium chloride salt into chlorine sanitizer. The ACE is compatible with chlorine based systems and chemicals. Although the system is reduced maintenance, it is not automatic.
OZONE MAINTENANCE Reduced or no ozone bubbles coming from heater return (clogged ozone injector) or no ozone, clean the injector: 1. Place 16 ounces of white vinegar into a cup or bucket. 2. Carefully loosen the long tubing attached to the bottom of the ozonator, located in the equipment compartment. DANGER: Place the end of the tubing into the vinegar, making certain that the end of the tubing sits at the bottom of the container. 3. Run the spa until all 16 ounces of the vinegar are gone.
Eventually the soap build-up in the water will be concentrated, resulting in an unclean feeling on the bather’s skin, which is impossible to remedy. When this occurs, it’s time to drain and refill the spa. Depending on the soap input, the water should last about four months before needing to be drained. WATER TERMINOLOGY The following chemical terms are used in this Water Quality and Maintenance section. Understanding their meaning will help you to better understand the water maintenance process.
Operating Instructions Wireless Remote Control Panel (GRANDEE & ENVOY models only) When returned to the dock, all spa functions will be operable but the remote should remain in the dock until fully charged. Under normal conditions a fully drained battery will take 6-8 hours to recharge. Contact your authorized HOT SPRING Dealer for replacement of your Lithium Ion battery.
MEMORY SCREEN Home Screen Features - Continued Music If installed, press this icon to access the first Music screen. Lights Press this icon to access the first Lights screens. Press Press to activate the last saved set of operating functions. Status Indicators This indicator is on whenever the Summer Timer Summer Timer is ON Press to save the current set of operating functions (jets and lights only). Spa/Temp Lock This indicator is on whenever the Spa Lock or Temperature Lock is ON.
TEMPERATURE LOCK TEMPERATURE ºF/ ºC SETTING Press Press on Home screen to display Temperature Lock. The Temperature Lock feature prevents changing the desired water temperature setting. All other control panel functions will operate normally while the Temperature Lock is "ON". on Home screen to display first Settings screen, then press to display Temperature in second Settings screen . Press and hold ON or OFF for approximately 4 seconds to activate or deactivate.
The primary Music screen will display a music player with volume control and a Music Source selection box. Press to start the conversion process. A black reset screen will appear and begin the converting process. The conversion is finished once the Home screen reappears. Press to return to second Settings screen if check mark icon is not pressed. Screen will automatically revert back after 10 seconds of non activity. Press to turn the Music system Off.
LIGHTS CONTROL SCREEN DOCKING TRAY FUNCTION BUTTONS: Press on the Home screen to access the primary Lights screen. NOTE: If lights are off when is pressed on the Home screen, all light zones will turn on to blue. The primary Lights screen is divided into two sections, the MOODS section and the ALL LIGHTS section. MOODS (Preset colors and brightness): Press to turn On Underwater lights (blue color). Press to turn On Underwater (magenta), Bartop Waterfall and Pillow (aqua).
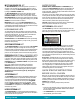
Operating Instructions Standard LCD Control Panel (All models except GRANDEE & ENVOY) The control panel provides a quick visual check of the spa’s status and allows the user to set the temperature, activate the jets & lights, lock the temperature and/or spa functions. Other optional functions may also be available depending on the spa model and accessory equipment that has been installed into the spa. The control panel has eight buttons.
HOME SCREEN The temperature displayed in the center of the Home screen is the actual temperature of the spa water. If the READY icon is lit and solid on the screen, then the actual spa temperature is within 2°F (1°C) of the set temperature. The corner soft button functions are as follows: MEMORY This feature will recall the last active setting for jets and lights prior to pressing the All Off button. IMPORTANT: If the jet pump will not engage, make sure SPA LOCK is deactivated.
SPA LOCK PRODIGY & JETSETTER When activated, the Spa Lock feature disables all functions on the control panel. It prevents others from tampering with the jets, lights and temperature settings on your spa. The control panel will not respond to any hard or soft buttons when pushed in Spa Lock mode. 1st press = jet pump on High 2nd press = jet pump OFF LIGHT CONTROL To activate the Spa Lock: Press the OPTIONS hard button. Press the soft button next to Set-up. Press the soft button next to Spa Lock Off.
spa is off during the hottest part of the day and so that the circulation pump will start up again in the evening when you are ready to enjoy the spa again. IMPORTANT: The Summer timer will not lower the spa’s water temperature below the ambient air temperature. Ambient conditions, including humidity, wind and shading will affect your spa water temperature. To activate the Summer timer, simply follow these steps: • Press the OPTIONS Hard button on the Control panel. • Press the soft button next to Set up.
• Press the soft button next to ▲ or ▼ to change the Treble between -5 and +5. • Press SETUP Tone,Treble soft button to advance to the Tone, Bass screen. • Press the soft button next to ▲ or ▼ to change the Bass between -5 and +5. • Press SETUP Tone,Bass soft button to advance to the BALANCE screen. SPEAKER OPERATION (OPTIONAL EQUIPMENT) Your HOT SPRING spa is designed to accommodate 2 pop-up speakers should you choose to add a wireless audio system.
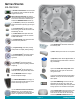
Jet Menu GRANDEE (MODEL GG) JET SYSTEM MENU a c b b c a d e f e d JET PUMP 2-JET SYSTEM 1 JET PUMP 1-JET SYSTEM 1 Left SMARTJET lever in Right SMARTJET lever in position 1 MOTO-MASSAGE DX jet 1 directional hydromassage 1 MOTO-MASSAGE DX jet 4 directional PRECISION jets 1 JETSTREAM jet 3 Jet-Cluster system (2 SOOTHINGSTREAM jets & 1‑directional hydromassage) a) b) c) d) e) f) a b position 8 directional PRECISION jets 2 dual port rotary jets 4 directional PRECISION jets 2 JETSTREAM jets 1 Wa
ENVOY (MODEL KK) JET SYSTEM MENU b a a a d b c f e c d JET PUMP 2-JET SYSTEM 1 JET PUMP 1-JET SYSTEM 1 Left SMARTJET lever in a) b) c) d) e) f) Right SMARTJET lever in position 4 HYDROSTREAM jets 2 SOOTHINGSTREAM jets 1 JetStream jets 1 Water Feature a) b) c) d) 2 rotary PRECISION jets 7 directional PRECISION jets 1 MOTO-MASSAGE DX jet 4 directional PRECISION jets 4 directional PRECISION (calf) jets 2 HYDROSTREAM jets position a a b c b c d f c e d JET PUMP 1-JET SYSTEM 2 JET PUMP
VANGUARD (MODEL VV) JET SYSTEM MENU e b a c c d d JET PUMP 1-JET SYSTEM 1 a) b) c) d) e) 1 MOTO-MASSAGE DX jet 4 directional PRECISION jets 4 directional PRECISION jets 1 JETSTREAM jet 7 directional PRECISION jets a b d c c d a b c e e JET PUMP 2-JET SYSTEM 1 JET PUMP 2-JET SYSTEM 2 a) a) b) c) d) e) SMARTJET lever in b) c) d) e) SMARTJET lever in position 3 Jet-Cluster system (2‑dual port rotary, 1‑directional hydromassage) 4 directional PRECISION jets 4 directional PRECISION jets 1
ARIA (MODEL AR) JET SYSTEM MENU c d a b e JET PUMP 1 a) b) c) d) e) 4 PRECISION jets 4 HYDROSTREAM jets 1 Directional hydromassage 1 MOTO-MASSAGE DX jet 1 FOOTSTREAM jet a b a d e c e c b d JET PUMP 2-JET SYSTEM 1 SMARTJET lever in a) b) c) d) e) JET PUMP 2-JET SYSTEM 2 position SMARTJET lever in 2‑dual port rotary jets 4 PRECISION jets above MOTO-MASSAGE DX 1 Water Feature 2 Directional hydromassage 2 SOOTHING SEVEN jets a) b) c) d) e) Page 26 position 2 Directional hydromassage 1 Wa
SOVEREIGN (MODEL II) JET SYSTEM MENU b c JET SYSTEM 1 a SMARTJET lever in a) b) c) d) e) e d 1 MOTO-MASSAGE DX jet 4 directional PRECISION jets above Moto-Massage jet 10 directional PRECISION jets 1 directional hydromassage jets 4 directional PRECISION (calf) jets b a JET SYSTEM 2 c f e d Jet Menus position Page 27 SMARTJET lever in a) b) c) d) e) f) position 1 MOTO-MASSAGE DX jet 1 directional hydromassage jet 2 SOOTHINGSTREAM jets 3 Jet-Cluster system (2‑dual port rotary, 1‑directional
PRODIGY (MODEL H) JET SYSTEM MENU b a JET SYSTEM 1 SmartJet lever in e c d a) b) c) d) e) position 1 MOTO-MASSAGE DX jet 4 directional PRECISION jets above Moto-Massage jet 1 JETSTREAM jet 2 dual port rotary jets 2 SOOTHINGSTREAM jets b a JET SYSTEM 2 SmartJet lever in a) b) c) position 1 MOTO-MASSAGE DX jet 10 directional PRECISION jets 3 Jet-Cluster system (2‑dual port rotary, 1‑directional hydromassage) c Page 28 Jet Menus
JETSETTER (MODEL JJ) JET SYSTEM MENU a JET SYSTEM 1 SMARTJET lever in a) b) c) d) d position 1 JETSTREAM jet 4 HYDROSTREAM jets 4 directional PRECISION jets 1 MOTO-MASSAGE DX jet c b a JET SYSTEM 2 SMARTJET lever in a) b) c) c b Jet Menus Page 29 position 3 Jet-Cluster system on front right (2‑dual port rotary jets, 1 directional hydromassage jet) 4 HYDROSTREAM jets 1 MOTO-MASSAGE DX jet
Spa Care and Maintenance • Blending warm water with the cold tap water so it exceeds 50° F (10° C) during the refilling process will also achieve the same results if that is an option for you. Your HOT SPRING spa is manufactured from the highest quality, most durable materials available. Even so, the spa care and maintenance program you develop will ultimately determine how long your spa, and its individual components, will last.
b) BELLAFONTANA water feature, if applicable (plug 2 openings and use the shop vac to pull water from the 3rd opening). c) Filter compartment and MOTO-MASSAGE DX niche, if applicable (removal of the faceplate may be necessary). d) Main drain outlet (it may be necessary to cover the drain grate tightly with a rag when vacuuming the main drain and secondary freeze drain outlets to ensure water is drawn completely from the internal plumbing system).
CARE OF THE SPA COVER To remove and replace the spa pillows: WARNING: The cover is a manual safety cover that meets or exceeds all prevailing requirements of ASTM 1346-91 for spa safety covers when installed and used correctly as of the date of manufacture. Non-secured, or improperly secured covers are a hazard. Open the cover to its fully open position before use. 1. Carefully pull and lift on one end of pillow to stretch pillow (longer) until the pillow is released from the plastic retainer.
COVER LIFTER SYSTEM HOW TO CLOSE THE COVER Clearance required behind cover when open: CoverCradle® & CoverCradle II 24” UpRite® 7” Lift ’n Glide® 14” HOW TO OPEN THE VINYL COVER IMPORTANT: Never attempt to open or remove the vinyl cover by grasping or pulling on the skirting or cover lock straps. The skirting will tear, and torn skirting is not covered under the terms of the warranty. Check for ice build-up around the gas springs and pivot points of the retractable cover system.
Electrical Requirements • The subpanel requires a 50 amp, single phase, 230 volt, four wire service (two line, one neutral, one ground). The grounding conductor must not be less than #10 AWG. Refer to local codes and to NEC 250122 (table). • Mount the subpanel in the vicinity of the spa, but not closer than five feet away, in accordance with all local codes. (N.E.C. 680-38 to 41-A-3) Once your spa has been filled with water, turn it on and test all of the circuit breakers.
SOVEREIGN (Model II) 230 volt permanently connected models IMPORTANT! FACTORY WIRED HEATER 230V, 50 Amp, 2-POLE, CIRCUIT BREAKER (NON GFCI) # 8 AWG WHITE, NEUTRAL L1 # 12 AWG BLUE L2 # 12 AWG RED N # 12 AWG WHITE # 10 AWG GREEN, GROUND** # 8 AWG BLUE, L1 # 8 AWG RED, L2 L1 # 10 AWG BLUE L2 # 10 AWG RED MAIN SERVICE ELECTRICAL PANEL H1 1 2 H2 3 4 5 6 7 THE EXACT PHYSICAL LOCATION OF THE TERMINALS ON THE GFCI BREAKER WILL VARY BETWEEN MANUFACTURERS.
bottom of the equipment compartment door. For your safety, when the electrician is installing the 20 amp single electrical outlet and waterproof cover, the outlet should be no closer than 5 feet (1.5 meters) and no farther than 10 feet from the spa [reference National Electrical Code 680-6a(1) and 680-41a]. The Ground Fault Circuit Interrupter (GFCI) is located at the end of the power cord. This device is for your protection. It is very important to protect it from rain and other moisture.
PRODIGY (Model H) & JETSETTER (Model JJ) 230 volt converted model IMPORTANT! The exact physical location of the terminals on the GFCI breaker will vary between manufacturers. Connecting the hot wire to the neutral terminal will cause irreversible damage to the control box. ** Refer to NEC 250-122 (table) NOTE: The wire connections to GFCI breakers are for reference only. Always ensure the white neutral wire is connected to the load neutral of the 20 amp breaker. *AVAILABLE FROM DEALER.
Service Information If the spa is not heating, the red and green lights are blinking, but the pump and light are operating, then the pressure switch may be open. Opening of the pressure switch is normally a result of one or a combination of these problems: 1. A clogged filter cartridge 2. Blockage within the system plumbing 3. Power was not disconnected to the spa before it was drained 4.
DISCLAIMERS • If the pump is shutting down due to excessive heat, make sure the equipment compartment has adequate ventilation. The air gap at the bottom must not be blocked. Should your jet pump continue to shut off after short periods of use, contact a qualified service technician.
GENERAL OPERATION TROUBLESHOOTING GUIDE Problem Probable causes Solutions Entire spa is inoperative • Power failure • GFCI tripped • Heater high-limit thermostat tripped • Check power source • Reset GFCI; call for service if it will not reset • Disconnect power for at least thirty seconds to reset heater high limit. If it will not reset, check for clogged filters. If tripping continues, call for service.
SPA SPECIFICATIONS Spa Model Footprint Dimension Height Effective Filter Area Heater (Watts) Water Capacity Dry Weight Filled Weight* Dead Weight* Electrical Requirements GRANDEE (Model GG) Seats 7 Adults 7'7" x 8'4" 2.31m x 2.54m 38" 325** square feet 4,000 500 gallons 1,060 lbs. 6,455 lbs. 1,893 liters 480 kg 2,928 kg 125 lbs per sq. foot 230 volt, 50 amp Single phase GFCI protected circuit ENVOY (Model KK) Seats 5 Adults 7'9" x 7'7" 2.36m x 2.
LIMITED WARRANTY Watkins Manufacturing Corporation (“Watkins”) warrants to the original consumer purchaser (“you”) the following about your new Highlife® Collection Hot Spring® spa, when purchased from an authorized dealer/service provider (“dealer”). 7 Year Shell Surface Warranty Watkins warrants the acrylic surface material of the HIGHLIFE Collection HOT SPRING portable spa to be free from defects in materials and workmanship for seven years.
This manual contains installation, operating, maintenance and service information for the following 2015 HOT SPRING spa models: USA / CANADIAN MODELS EFFECTIVE DATE GRANDEE (MODEL GG) 03/15 ENVOY (MODEL KK) 03/15 VANGUARD (MODEL VV) 03/15 ARIA (MODEL AR) 03/15 SOVEREIGN (MODEL II) 03/15 PRODIGY (MODEL H) 03/15 JETSETTER (MODEL JJ) 03/15 ©2015 Watkins Manufacturing Corporation All Rights Reserved.