
Owners manual


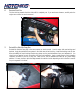


Table Of Contents
- Sport Sway Bar Kit 22109
- Improperly installed or installed by someone other than a qualified, licensed auto mechanic experienced in the installation and removal of suspension products;
- Improperly serviced, misused, or modified, altered or subjected to abuse, negligence, accident or collision;
- Installed in any vehicle that has been modified;
- Installed on any vehicle that has carried loads in excess of automobile manufacturer suggested weight limits; or
- Installed on any vehicle that has been subject to abnormal or excessive use, including rallying, racing, or racing-type activities or off-road use.
- Did you register the product at 0TUwww.hotchkis.netU0T or via the mail-in warranty card within 30 days of purchase?
- Is the product appropriate to your application?
- Did you carefully and thoroughly read the instructions provided along with the product?
- Do you have the original invoice or sales receipt?
- Is the return date within 36 months from the purchase date?
- Are you the original purchaser?
- Was the product properly installed by a qualified, licensed auto mechanic?
- Has the product been installed on the original vehicle on which it was installed at all times?
- Is the product unmodified and clean?
- Is the reason for return a legitimate product defect?

6F Remove Stock Bar
Fish the stock bar towards the driver side until it’s completely out. If you need more clearance, carefully raise the
engine more until the bar can be removed.
7F Reinstall the Hotchkis Sway Bar
Reinstall the Hotchkis Sway Bar in the same manner as stock removal. Your kit comes with new bushings and
brackets. Apply the provided silicone grease in the inside area of each bushing. Install the bushings onto the bar.
When reinstalling the stock bushing bracket nuts, please use the provided washers from your hardware kit. You
should use one washer for each nut totaling 4 for the front installation. Apply a small amount of lock threading
compound (included in your kit) on each nut. Make sure to use the brackets that have the 90° grease fitting
attached. You may choose to point the fitting towards the outside or inside depending on which direction is easiest
for you to regrease in the future.