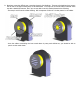
202AA 68-72 GM A-BODY Double Adjustable Trailing Arms Thank you for your purchase from our new line of GM parts. Please call us at (877) 4NO-ROLL if you have any questions regarding the service or installation of your Hotchkis products. Visit us online @ www.hotchkis.net W arning: This installation should be perform ed by a trained professional. Note, pictures in this booklet are from a 77-96 GM B Body. Installation for your 68-72 A-Body is very sim ilar.
. There are various methods for installing your new upper trailing arms. Preferences in methods are mainly based on the way you remove the old rubber Can Bushings from the differential. Some may find it easier to detach the entire differential (rear end) from the car in order to remove the Can Bushings. This makes it easier to get at the Can bushings for removal and replacement. The only problem with this method is that it requires much more to be disconnected e.g.
5. Remove the rear sway bar from the lower trailing arms.
6. Allow the differential to droop as far down as possible. 7. Remove the stock upper trailing arms.
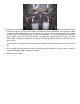
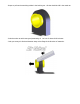
8. Now here comes the difficult part; removing the stock Can Bushings. These are the bushings that connect the aft end of the upper trailing arms to the differential. You may luck out and be able to hammer them out with a dead blow hammer, but if you are not able to use this method please do the following. - First step is to drill out the rubber bushing. Drill a sequence of holes in a circular pattern in the rubber.
- Scrape or pull out the remaining rubber in the bushing can. All that should be left is the metal can - Soak the entire can with some good penetrating oil. Let it sit for about 20-30 minutes. - Grab your trusty air chisel and hammer away at the flange in the direction of extraction.
- If the flange begins to tear or bend then it may necessary to chisel the other end of the can to fold the edge over. This way you have something to chisel onto in the direction of extraction. 9. Next, clean the differential mounts and make sure there are no burrs that will make reinstallation difficult. Soak the holes with penetrating oil to aid re-insertion of new can.
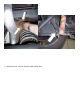
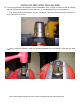
INSTALLING NEW UPPER TRAILING ARMS 10. The new polyurethane can bushings come pre-assembled, but it is easier to install the new can bushing with the polyurethane bushing out of the metal can. So, the bushing will have to be pressed out. - First, set the bushing (flange down) in a vise. See picture. Notice the flange sits on top of the vise. It is not compressed in the vise. - Using a dead blow hammer, smack the bushing downward until the bushing is level with the metal edge.
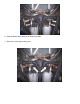
11. Normally with enough room, you can place the bushing can in the differential mount and hammer it in with a flat piece of wood. But, if there isn’t enough room, then you will have to fabricate your own press tool. This is not as hard as it sounds.
Use a ¾” wrench to hold the nut and a ¾” socket to tighten the bolt. The bolt may eventually run out of thread. When this occurs, you can replace the short pipe with the deep pipe. Press the metal can in until it reaches the crease.
Important Note: On 12-bolt differentials, you cannot use the homemade press method. This is because the thrust bushing (see step 13) needs to be installed onto the can just before the can is fully pressed in. The thrust washer also needs to be shaved down in order to clear the differential housing. In this instance, use a dead blow hammer to smack the can into the mount hole. 12. Once both cans are pressed in, lube the polyurethane bushings and push them into the can in the same manner.
13. Install the thrust washer onto the unflanged side of the can. 12. Install your new Hotchkis adjustable upper trailing arms in the same manner as the stock removal. Make sure the grease fittings on the front end are facing downward. Use all new hardware provided in your kit. 14. Reinstall the rear shocks and sway bar. 15. Make sure all hardware is fully tightened.
SETTING PINION ANGLE It may be necessary to set pinion angle after installation of your new Hotchkis upper trailing arms. First of all, what is pinion angle? Pinion angle is basically the angle between the centerline of the differential pinion and the drive shaft centerline. This angle changes during acceleration and braking. If the pinion angle is excessive, then vibration and increased U-joint wear will occur. The Hotchkis double adjustable trailing arms allow you to adjust the pinion angle with ease.
The simplest rule of thumb is: The centerline of the differential pinion should be parallel to the centerline of the engine’s crankshaft without being the same line. FYI… The centerlines should not be the same line because the U-joints would wear in the same areas all the time. Having an angle at the joint itself allows the joint to articulate and wear evenly along the entire bearing race. So, the first thing to do is to find out the angle the engine’s crankshaft is sitting at.
If there is vibration during braking, then the pinion angle is set too low! Fine tune your Hotchkis trailing arms to achieve the perfect setting for your driving style and horsepower.
Hotchkis Performance LLC Return Policy & Limited Warranty Effective December 1, 2010 all Hotchkis products must be registered to qualify for warranty at www.hotchkis.net or via the mail-in warranty card, included with the product, within 30 days of the original purchase date. IMPORTANT: This warranty supersedes all other warranties included with this product. Return Policy We want you to be completely satisfied with your Hotchkis Performance product.
DAMAGES, LOSS OF TIME OR REVENUES, INCONVENIENCE, LOSS OF USE OF THE VEHICLE, DAMAGE TO THE VEHICLE OR COMPONENTS OF THE VEHICLE, ANY OTHER TYPE OF CONSEQUENTIAL DAMAGES, OR OTHER INCIDENTAL OR INDIRECT DAMAGES. HOTCHKIS’ MAXIMUM LIABILITY UNDER THIS WARRANTY SHALL IN NO EVENT EXCEED THE PURCHASE PRICE OF THE PRODUCT.