Instructions for installation and use WASHING MACHINE Contents EN Installation, 2-3 F EN English,1 Français,17 IT Italiano,33 Unpacking and levelling Connecting the electricity and water supplies Technical data Description of the machine, 4-5 Touch control panel NL Nederlands,49 DE Deutsch,65 Auto Dose System, 6-7 Running a wash cycle, 8 Wash cycles and options, 9 Table of wash cycles Wash options Detergents and laundry, 10 AQUALTIS AQLF9D 692 U Detergent Preparing the laundry Washing recomme
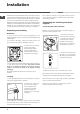
Installation EN ! This instruction manual should be kept in a safe place for future reference. If the washing machine is sold, given away or moved, please ensure the manual is kept with the machine, so that the new owner may benefit from the advice contained within it. ! Read these instructions carefully: they contain vital information relating to the safe installation and operation of the appliance.
Connecting the drain hose Connect the drain hose to drain duct piping or a wall drain located between 65 and 100 cm above the floor, making sure it is not bent at all. ! Do not use extension cords or multiple sockets. EN ! The cable should not be bent or compressed. ! The power supply cable and plug must only be replaced by authorised technicians. Warning! The company shall not be held responsible in the event that these regulations are not respected.
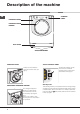
Description of the machine EN CONTROL PANEL PORTHOLE DOOR PORTHOLE DOOR HANDLE KICK STRIP ADJUSTABLE FEET PORTHOLE DOOR TOUCH CONTROL PANEL Always use the handle to open the porthole door (see figure). DETERGENT DISPENSER DRAWER The detergent dispenser drawer is located inside the machine and can be accessed by opening the door. Refer to the chapter “Auto Dose System” for information on operation.
START/PAUSE button Touch control panel SPIN SPEED SOFTENER WASH CYCLE SELECTOR knob button button DETERGENT TEMPERATURE button button with indicator light ECO indicator light EN WASH CYCLE PHASE icons DISPLAY Button with ON/OFF indicator light DETERGENT DILUTION OPTION buttons button Button with ON/OFF indicator light: press this briefly to switch the machine on or off. The green indicator light indicates that the machine is switched on.
Auto Dose System EN Introduction Filling the tanks: This washing machine is equipped with two tanks: one for liquid detergent (either concentrated or diluted) with a capacity of approx. 5.5 l and another for liquid fabric softener (either concentrated or diluted) with a capacity of approx. 3.5 l (see picture). ! Check the detergent/fabric softener box to verify whether it is diluted or concentrated detergent.
Signals for successive refilling: Once, at the end of a cycle, the level of detergent/fabric softener falls below the level required for a successive wash cycle, the display will visualise the relative messages “At end of cycle refill detergent” or “At end of cycle refill softener” or “At end of cycle refill tanks”. If the tanks are not filled, the successive wash cycles in Auto Dose System will be carried out without any intake of detergent.
Running a wash cycle EN WARNING: before you use the washing machine for the first time, run a wash cycle with detergent and no laundry, using the 90° cottons cycle without pre-wash. 1. SWITCH THE MACHINE ON. Press the button. All the indicator lights will illuminate for 1 second and the text AQUALTIS will appear on the display; the indicator light corresponding to the button will then remain lit in a constant manner and the START/PAUSE indicator light will flash. 2. SELECT THE PROGRAMME.
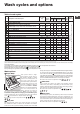
Wash cycles and options Table of wash cycles Icon Description of the wash cycle 90° 1600 - 9 60° (Max.
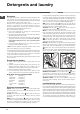
Detergents and laundry EN Detergent The type and quantity of detergent required depend on the type of fabric you are washing (cotton, wool, silk, etc.), as well as its colour, the washing temperature, the level of soiling and the hardness of the water in the area. Whenever the detergent and fabric softener “Auto Dose System” is activated, this washing machine helps to prevent wastage and to protect the environment, besides guaranteeing optimal washing performance.
Precautions and tips ! The machine was designed and constructed in accordance with international safety regulations. The following information is provided for safety reasons and must therefore be read carefully.
Care and maintenance EN Cutting off the water and electricity supplies • Turn off the water tap after every wash cycle. This will limit wear on the hydraulic system in the machine and help to prevent leaks. • Unplug the appliance when cleaning it and during all maintenance work. Cleaning the machine The outer parts and rubber components of the appliance can be cleaned using a soft cloth soaked in lukewarm soapy water. Do not use solvents or abrasives.
Trouble shooting Your washing machine could occasionally fail to work. Before contacting the Technical Assistance Centre (see “Assistance”), make sure that the problem cannot be not solved easily using the following list. Problem: Possible causes / Solutions: The washing machine does not switch on. • The appliance is not plugged into the socket fully, or not enough to make contact. • There is no power in the house. The wash cycle does not start. • • • • The door is not closed properly.
EN Troubleshooting: Possible causes / Solutions: The machine’s washing performance is unsatisfactory. • The tanks have not been loaded correctly (e.g. fabric softener has been added instead of detergent or vice-versa) • Two different types of detergent/fabric softener have mixed. ! NEVER mix two different detergents; always clean out the tanks before adding a new type of detergent.
Assistance Before calling for Assistance: EN • Check whether you can solve the problem by yourself (see “Trouble shooting”); • Restart the wash cycle to check whether the problem has been solved; • If it has not, contact the Authorised Technical Assistance Service. ! If the washing machine has been installed or used incorrectly, you will have to pay for the call-out service. ! Always request the assistance of authorised technicians.
EN 16
Mode d’installation et d’emploi LAVE-LINGE Sommaire FR Installation, 18-19 FR Français Déballage et mise à niveau Raccordements eau et électricité Caractéristiques techniques Description de l’appareil, 20-21 Tableau de bord “touch control” Auto Dose System, 22-23 Comment faire un cycle de lavage, 24 Programmes et options, 25 Tableau des programmes Options de lavage Produits lessiviels et linge, 26 AQUALTIS AQLF9D 692 U Lessive Triage du linge Conseils de lavage Système d’équilibrage de la charge P
Installation FR ! Conserver ce mode d’emploi pour pouvoir le consulter à tout moment. En cas de vente, de cession ou de déménagement, veiller à ce qu’il accompagne toujours le lave-linge. ! Lire attentivement les instructions : elles fournissent des conseils importants sur l’installation, l’utilisation et la sécurité de l’appareil. ! Cette notice, la garantie et les pièces servant à l’installation sont réunies dans un sachet. Déballage et mise à niveau Déballage 1.
Raccordement du tuyau de vidange 65 - 100 cm Raccorder le tuyau de vidange à un conduit d’évacuation ou à une évacuation murale placés à une distance du sol comprise entre 65 et 100 cm en évitant à tout prix de le plier. ! Le câble ne doit être ni plié ni trop écrasé. FR ! Le câble d’alimentation et la fiche ne doivent être remplacés que par des techniciens agréés. Attention! Nous déclinons toute responsabilité en cas de non-respect des normes énumérées ci-dessus.
Description de l’appareil FR TABLEAU DE BORD PORTE HUBLOT POIGNEE PORTE HUBLOT SOCLE PIEDS REGLABLES PORTE HUBLOT Pour ouvrir la porte, se servir de la poignée prévue (voir illustration). Tableau de bord “touch control” Pour modifier les sélections, appuyer légèrement sur l’icône à l’intérieur de la zone sensible (touch control) comme illustré (voir figure). Stand-by TIROIR A PRODUITS LESSIVIELS Le tiroir est situé à l’intérieur de l’appareil et il faut ouvrir la porte pour y accéder.
Tableau de bord “touch control” Touche avec voyant ADOUCISSANT Bouton Touche PROGRAMMES LESSIVE FR START/PAUSE Touche Touche ESSORAGE Touche TEMPÉRATURE Voyant ECO Icônes PHASES DE LAVAGE Écran Bouton avec témoin ON/OFF Touche DILUITION LESSIVE Bouton avec témoin Touches OPTIONS Bouton avec témoin ON/OFF: appuyer brièvement sur la touche pour allumer ou éteindre l’appareil. Le témoin vert indique que l’appareil est sous tension.
Auto Dose System FR Introduction Ce lave-linge est doté de deux réservoirs : un pour la lessive liquide (concentrée ou diluée) d’une capacité de 5,5 l environ, et l’autre pour l’adoucissant liquide (concentré ou dilué) d’une capacité de 3,5 l environ (voir fugure). ! Vérifier sur le récipient contenant la lessive ou l’adoucissant s’il est dilué ou concentré.
Signalement des remplissages successifs: lorsqu’à la fin d’un cycle, le niveau résiduel de produit lessiviel/ adoucissant descend sous la quantité nécessaire au lavage suivant, les messages suivants s’afficheront à l’écran “À la fin du cycle, remettre de la lessive” ou “À la fin du cycle, remettre de l’adoucissant” ou “À la fin du cycle, remplir le réservoirs” (pour les deux).
Comment faire un cycle de lavage FR REMARQUE: lors de la première mise en service du lavelinge, lancer un cycle de lavage à vide mais avec du produit lessiviel en sélectionnant un programme coton 90° sans prélavage. 1. METTRE L’APPAREIL SOUS TENSION. Appuyer sur la touche . Tous les voyants s’allument pendant 1 seconde et AQUALTIS est affiché à l’écran; le voyant de la touche reste allumé et le voyant START/PAUSE se met à clignoter. 2. CHOISIR LE PROGRAMME.
Programmes et options Tableau des programmes Icône Description du Programme Programmes Coton COTON avec PRÉLAVAGE: pour enlever les taches tenaces. (Ajouter le produit lessiviel dans le bac prévu). COTON BLANC (2): Blancs et couleurs délicates très sales.
Produits lessiviels et linge FR Lessive Le choix et la quantité de lessive dépendent du type de textile (coton, laine, soie...), de la couleur, de la température de lavage, du degré de salissure et de la dureté de l’eau. Ce lave-linge est doté du système de dosage automatique du produit lessiviel et de l’adoucissant. Il permet d’éviter le gaspillage et de protéger l’environnement tout en assurant un lavage optimal.
Précautions et conseils ! Cet appareil a été conçu et fabriqué conformément aux normes internationales de sécurité. Ces consignes sont fournies pour des raisons de sécurité, il faut les lire attentivement.
Entretien et soin FR Coupure de l’arrivée d’eau et du courant • Fermer le robinet de l’eau après chaque lavage. Cela réduit l’usure de l’installation hydraulique de l’appareil et évite tout danger de fuites. • Débrancher la fiche de la prise de courant lors de toute opération de nettoyage et de travaux d’entretien. Nettoyage de l’appareil Pour nettoyer l’extérieur et les parties en caoutchouc, utiliser un chiffon imbibé d’eau tiède et de savon. N’utiliser ni solvants ni abrasifs.
Anomalies et remèdes Il peut arriver que l’appareil ne fonctionne pas bien. Avant d’appeler le Service de dépannage (voir “Assistance”), contrôler s’il ne s’agit pas par hasard d’un problème facile à résoudre à l’aide de la liste suivante. Anomalies: L’appareil ne s’allume pas. FR Causes / Solutions possibles: • La fiche n’est pas branchée dans la prise de courant ou mal branchée. • Il y a une panne de courant. Le cycle de lavage ne démarre pas. • • • • La porte hublot n’est pas bien fermée.
FR Anomalies: Causes / Solutions possibles: la machine ne donne pas de bons résultats. • Les réservoirs n’ont pas été bien remplis (assouplissant à la place de la lessive ou vice-versa). • Deux produits (lessive ou assouplissant) différents ont été mélangés. ! Ne JAMAIS mélanger les produits de lessive ou assouplissants, toujours nettoyer le réservoir avant de verser le produit.
Assistance Avant d’appeler le service après-vente: FR • Vérifier si l’anomalie ne peut pas être résolue par soi-même (voir “Anomalie set Remèdes); • Remettre le programme en marche pour contrôler si l’inconvénient a disparu; • Si ce n’est pas le cas, contacter le service d’Assistance technique agréé. ! En cas de problème d’installation ou d’utilisation inadéquate du lave-linge, l’intervention sera payante. ! Ne jamais faire appel à des techniciens non agréés.
FR 32
Istruzioni per l’installazione e l’uso LAVABIANCHERIA Sommario I Italiano I Installazione, 34-35 Disimballo e livellamento Collegamenti idraulici ed elettrici Dati tecnici Descrizione della macchina, 36-37 Pannello comandi touch control Auto Dose System, 38-39 Come effettuare un ciclo di lavaggio, 40 Programmi e opzioni, 41 Tabella Programmi Le opzioni di lavaggio AQUALTIS AQLF9D 692 U Detersivi e biancheria, 42 Detersivo Preparare la biancheria Consigli di lavaggio Sistema bilanciamento del carico
Installazione I ! E’ importante conservare questo libretto per poterlo ! In caso sia posizionata su moquette o tappeti, regolare consultare in ogni momento. In caso di vendita, di cessione o di trasloco, assicurarsi che resti insieme alla lavabiancheria. i piedini in modo da conservare sotto la lavabiancheria lo spazio necessario per la ventilazione. ! Leggere attentamente le istruzioni: ci sono importanti informazioni sull’installazione, sull’uso e sulla sicurezza.
Collegamento del tubo di scarico 65 - 100 cm Collegare il tubo di scarico a una conduttura di scarico o a uno scarico a muro posti tra 65 e 100 cm da terra evitando assolutamente di piegarlo. ! Il cavo non deve subire piegature o compressioni. I ! Il cavo di alimentazione e la spina devono essere sostituiti solo da tecnici autorizzati. Attenzione! L’Azienda declina ogni responsabilità qualora queste norme non vengano rispettate.
Descrizione della macchina I PANNELLO COMANDI TOUCH CONTROL PORTA OBLÒ MANIGLIA PORTA OBLÒ ZOCCOLO PIEDINI REGOLABILI PANNELLO COMANDI TOUCH CONTROL PORTA OBLO’ Per aprire la porta oblò utilizzare sempre l’apposita maniglia (vedi figura). CASSETTO DEI DETERSIVI Si trova all’interno della macchina e vi si accede aprendo la porta. Per l’utilizzo vedi il capitolo “Auto Dose System”.
Pannello comandi touch control Manopola PROGRAMMI AVVIO/ PAUSA Pulsante Pulsante CENTRIFUGA AMMORBIDENTE Pulsante Pulsante TEMPERATURA DETERGENTE I Icone FASI DI LAVAGGIO Spia ECO DISPLAY ON/OFF Pulsante DILUIZIONE DETERGENTE Pulsanti OPZIONI ON/OFF : premere brevemente il pulsante per accendere o spegnere la macchina. La spia verde indica che la macchina è accesa. Per spegnere la lavabiancheria durante il lavaggio è necessario tenere premuto il pulsante più a lungo, circa 3 sec.
Auto Dose System I Introduzione Questa lavabiancheria è provvista di due serbatoi: uno per il detersivo liquido (concentrato o diluito) della capacità di circa 5,5 lt e l’altro per l’ammorbidente liquido (concentrato o diluito) della capacità di circa 3,5 lt (vedi figura). ! Controlla sul contenitore del detersivo/ammorbidente se è diluito o concentrato.
Segnalazione per riempimenti successivi: Quando, al termine di un ciclo, il livello residuo del detersivo/ ammorbidente scende sotto la quantità necessaria per un successivo lavaggio, sul display appariranno i relativi messaggi “Alla fine del ciclo ricarica detergente” oppure “Alla fine del ciclo ricarica ammorbidente” oppure “Alla fine del ciclo ricarica serbatoi” (per entrambi). Se non vengono caricati i serbatoi, i lavaggi successivi in modalità Auto Dose saranno effettuati senza prelevare il detersivo.
Come effettuare un ciclo di lavaggio I NOTA: la prima volta che si utilizza la lavabiancheria, effettuare un ciclo di lavaggio senza biancheria ma con detersivo impostando il programma cotone 90° senza prelavaggio. 1. ACCENDERE LA MACCHINA. Premere il pulsante . Tutte le spie si accenderanno per 1 secondo e sul display comparirà la scritta AQUALTIS; rimarrà poi accesa fissa la spia del pulsante e la spia AVVIO/PAUSA lampeggerà. 2. SCEGLIERE IL PROGRAMMA.
Programmi e opzioni Tabella programmi Icona Descrizione del Programma Velocità Detersivi e additivi Carico max. Durata max. (giri al Prela- Lavag- Ammorbi- Candegciclo (Kg) dente gina minuto) vaggio gio Temp. max. (°C) 1600 - 9 1600 - 9 1600 - 9 Cotone colorati (3) Camicie Jeans Programmi speciali Baby: colori delicati molto sporchi.
Detersivi e biancheria I Detersivo La scelta e la quantità del detersivo dipendono dal tipo di tessuto (cotone, lana, seta...), dal colore, dalla temperatura di lavaggio, dal grado di sporco e dalla durezza dell’acqua. Questa lavabiancheria con il sistema di auto-dosaggio del detergente e ammorbidente, aiuta ad evitare gli sprechi e proteggere l’ambiente oltre a garantire le performance di lavaggio ottimali.
Precauzioni e consigli ! La macchina è stata progettata e costruita in conformità alle norme internazionali di sicurezza. Queste avvertenze sono fornite per ragioni di sicurezza e devono essere lette attentamente.
Manutenzione e cura I Escludere acqua e corrente elettrica • Chiudere il rubinetto dell’acqua dopo ogni lavaggio. Si limita così l’usura dell’impianto idraulico della macchina e si elimina il pericolo di perdite. Per accedere alla precamera: 1 • Staccare la spina della corrente quando si pulisce la macchina e durante i lavori di manutenzione. 2 Pulire la macchina La parte esterna e le parti in gomma possono essere puliti con un panno imbevuto di acqua tiepida e sapone. Non usare solventi o abrasivi.
Anomalie e rimedi Può accadere che la macchina non funzioni. Prima di telefonare all’Assistenza (vedi “Assistenza”), controllare che non si tratti di un problema facilmente risolvibile aiutandosi con il seguente elenco. Anomalie: Possibili cause / Soluzione: La macchinanon si accende. • La spina non è inserita nella presa della corrente, o non abbastanza da fare contatto. • In casa non c’è corrente. Il ciclo di lavaggio non inizia. • • • • La porta oblò non è ben chiusa.
I Anomalie: Possibili cause / Soluzione: La macchina non dà buone performance di lavaggio. • I serbatoi non sono stati caricati correttamente (ammorbidente al posto del detersivo o viceversa). • Si sono mescolati due detersivi/ammorbidenti differenti. ! Non mescolare MAI due detersivi/ammorbidenti differenti; effettuare sempre la pulizia dei serbatoi prima di inserirne altri.
Assistenza Prima di contattare l’Assistenza: • Verificare se l’anomalia può essere risolta autonomamente (vedi “Anomalie e Rimedi); • Riavviare il programma per controllare se l’inconveniente è stato ovviato; • In caso negativo, contattare il Servizio Assistenza Tecnico Autorizzato. I ! In caso di errata installazione o uso non corretto potrete essere chiamati al pagamento dell’intervento. ! Non ricorrere mai a tecnici non autorizzati. Comunicare: • il tipo di anomalia; • il modello della macchina (Mod.
I 48
Instructies voor installatie en gebruik WASAUTOMAAT Inhoud NL Installatie, 50-51 NL Nederlands Uitpakken en waterpas zetten Water en elektrische aansluitingen Technische gegevens Beschrijving van de wasautomaat, 52-53 “Touch-control” bedieningspaneel Auto Dose System, 54-55 Het uitvoeren van een wascyclus, 56 Programma’s en opties, 57 Programmatabel Wasopties Wasmiddelen en wasgoed, 58 AQUALTIS AQLF9D 692 U Wasmiddel Voorbereiden van het wasgoed Wastips Balanceersysteem van de lading Voorzorgsmaa
Installatie NL ! Het is belangrijk dit boekje te bewaren, zodat u het op ieder gewenst moment kunt raadplegen. In het geval u de wasautomaat verkoopt of u verhuist, moet u de handleiding bij het apparaat bewaren. ! Lees de instructies aandachtig door: u vindt er belangrijke informatie betreffende installatie, gebruik en veiligheid. ! In de envelop vindt u samen met deze gebruiksaanwijzing, de garantie en onderdelen die nodig zijn voor de installatie. Uitpakken en waterpas zetten Uitpakken 1.
Aansluiting van de afvoerbuis 65 - 100 cm Ve r b i n d d e a f v o e r b u i s , zonder hem te buigen, aan een afvoerleiding of aan een afvoer in de muur die zich tussen de 65 en 100 cm van de grond af bevindt. ! Gebruik geen verlengsnoeren of dubbelstekkers. NL ! Het snoer mag niet geknikt of samengedrukt worden. ! De voedingskabel en de stekker mogen alleen door een bevoegde installateur worden vervangen.
Beschrijving van de wasautomaat NL BEDIENINGSPANEEL DEUR WASAUTOMAAT HANDVAT DEUR WASAUTOMAAT VOETSTUK STELVOETJES DEUR Om de deur van de wasautomaat te openen dient u altijd het speciale handvat te gebruiken (zie afbeelding). TOUCH CONTROL bedieningspaneel Om de instellingen te wijzigen drukt u zachtjes op het symbool aan de binnenkant van het touch control-deel, zoals op de afbeelding aangegeven.
“Touch-control” bedieningspaneel Knop PROGRAMMA’S Knop Knop CENTRIFUGEREN WASVERZACHTER Knop Knop WASMIDDEL TEMPERATUUR Knop met controlelampje NL START/PAUSE Controlelampje ECO Symbolen WASFASES DISPLAY Knop met controlelampje ON/OFF Knop VERDUNNING WASMIDDEL Knop Knoppen OPTIES Knop met controlelampje TOETSBLOKKERING UITGESTELDE START Controlelampje DEUR GEBLOKKEERD Knop met controlelampje ON/OFF: druk even op de knop om de wasautomaat aan of uit te zetten.
Auto Dose System NL Inleiding Deze wasmachine is uitgerust met twee reservoirs: het ene voor vloeibaar wasmiddel (geconcentreerd of verdund) met een capaciteit van 5,5 l, en het andere voor vloeibare wasverzachter (geconcentreerd of verdund) met een capaciteit van 3,5 l (zie afbeelding). ! Controleer op de verpakking van het wasmiddel/de wasverzachter of dit verdund of geconcentreerd is.
Attenderen op navolgende vullingen: Wanneer aan het eind van een cyclus het resterende niveau van het wasmiddel/de wasverzachter onder de benodigde hoeveelheid voor een volgende was daalt, verschijnen op de display de volgende berichten “Aan het eind van de cyclus wasmiddel bijvullen” of “Aan het eind van de cyclus wasverzachter bijvullen” of “Aan het eind van de cyclus reservoirs bijvullen” (voor beiden).
Het uitvoeren van een wascyclus NL N.B.: voordat u de wasautomaat gaat gebruiken moet u hem met wasmiddel maar zonder wasgoed een wascyclus laten uitvoeren. Kies het programma van 90° zonder voorwas. Om de uitgestelde start te verwijderen drukt u op de knop totdat op het display de tekst OFF verschijnt. Het symbool gaat uit. 1. DE WASAUTOMAAT AANZETTEN. Druk op de toets .
Programma’s en opties Programmatabel Max. Temp. (°C) SymBeschrijving van het Programma bool Max. snel- Wasmiddel en wasversterkers Max. Duurcheid (toeren Voor- Was- Wasver- Bleek- lading yclus per minuut) was middel zachter middel (kg) Programma’s Katoen Katoen met voorwas (Doe het wasmiddel in het speciale vakje). Katoen (1-2): zeer vuil wit en kleurecht bont wasgoed. 90° 1600 - 9 60° (Max.
Wasmiddelen en wasgoed NL Wasmiddel De keuze en de hoeveelheid wasmiddel hangen af van het type stof (katoen, wol, zijde…), van de kleur van het wasgoed, de wastemperatuur, de vuilgraad en de hardheid van het water. Deze wasmachine met het automatisch doseersysteem voor wasmiddel en wasverzachter, helpt verspilling te voorkomen en het milieu te beschremen en garandeert daarnaast optimale wasprestaties.
Voorzorgsmaatregelen en advies ! Deze wasautomaat is ontworpen en uitgevoerd volgens de internationale veiligheidsnormen. Deze aanwijzingen zijn voor uw eigen veiligheid geschreven en moeten aandachtig worden doorgenomen. Voor verdere informatie betreffende het correcte verwijderen van huishoudelijke apparatuur kunnen de gebruikers zich wenden tot de gemeentelijke reinigingsdienst of de verkoper.
Onderhoud en verzorging NL Afsluiten van water en stroom • Sluit na iedere wasbeurt de kraan af. Hiermee beperkt u slijtage van de waterinstallatie van de wasautomaat alsmede lekkagegevaar. Toegang tot het voorvakje: 1 • Sluit altijd eerst de stroom af voordat u de wasautomaat schoonmaakt en gedurende onderhoudswerkzaamheden. Reinigen van de wasautomaat De buitenkant en de rubberen onderdelen kunnen met een spons en een lauw sopje worden schoongemaakt. Gebruik nooit schuurmiddelen of oplosmiddelen.
Storingen en oplossingen Het kan gebeuren dat het apparaat niet werkt. Voor u contact opneemt met de Servicedienst (zie “Service”) moet u controleren of het niet een storing betreft die u zelf makkelijk kunt verhelpen met behulp van de volgende lijst. Storingen: Mogelijke oorzaken / Oplossing: De wasautomaat gaat niet aan. • De stekker zit niet in het stopcontact of niet ver genoeg om contact te maken. • Het hele huis zit zonder stroom. De wascyclus start niet. • • • • De deur is niet goed dicht.
NL Storingen: Mogelijke oorzaken / Oplossing: De machine levert geen goede wasprestaties. • De reservoirs zijn niet op de juiste manier gevuld (wasverzachter in plaats van wasmiddel of omgekeerd). • Er zijn twee soorten wasmiddel/wasverzachter gemengd. ! NOOIT verschillende wasmiddelen/wasverzachter mengen; het reservoir altijd schoonmaken alvorens er een nieuw wasmiddel in te doen.
Service Voordat u de Servicedienst inschakelt: NL • Controleer eerst of u het probleem zelf kunt oplossen (zie “Storingen en oplossingen”); • Start het programma opnieuw om te controleren of de storing is verholpen; • Als dit niet het geval is, kunt u contact opnemen met de erkende Servicedienst. ! In het geval de wasautomaat verkeerd is geïnstalleerd of u hem niet correct heeft gebruikt zal u gevraagd worden de reparatiekosten te betalen. ! Wendt u nooit tot een niet erkende installateur.
NL 64
Installations- und Bedienungsanleitungen WASCHVOLLAUTOMAT INHALTSVERZEICHNIS DE Aufstellung, 66-67 DE Deutsch Auspacken und Aufstellen Wasser- und Elektroanschlüsse Technische Daten Beschreibung Ihres Gerätes, 68-69 Bedienblende “touch control” Auto Dose System, 70-71 Durchführung eines Waschprogramms, 72 Programme und Zusatzfunktionen, 73 Programmtabelle Zusatzfunktionen Waschmittel und Wäsche, 74 AQUALTIS AQLF9D 692 U Waschmittel Vorsortieren der Wäsche Waschhinweise System zur Auswuchtung der W
Aufstellung DE ! Es ist äußerst wichtig, diese Bedienungsanleitung sorgfältig aufzubewahren, um sie jederzeit zu Rate ziehen zu können. Sorgen Sie dafür, dass sie im Falle eines Umzugs oder Übergabe an einen anderen Benutzer das Gerät stets begleitet. ! Lesen Sie bitte folgende Hinweise aufmerksam durch: sie liefern wichtige Informationen hinsichtlich der Installation, des Gebrauchs und der Sicherheit.
Anschluss des Ablaufschlauches 65 - 100 cm Schließen Sie den Ablaufschlauch, ohne ihn dabei zu krümmen, an eine Ablaufleitung, oder an einen in der Wand (in einer Mindesthöhe von 65 – 100 cm) angelegten Ablauf an, ! Die Steckdose sollte nach installiertem Gerät leicht zugänglich sein. ! Verwenden Sie bitte keine Verlängerungen oder Mehrfachstecker. ! Das Netzkabel darf nicht gebogen bzw. eingeklemmt werden. ! Das Versorgungskabel darf nur durch autorisierte Fachkräfte ausgetauscht werden.
Beschreibung Ihres Gerätes DE BEDIENBLENDE GERÄTETÜR GRIFF SOCKEL REGULIERBARE STELLFÜSSE GERÄTETÜR Bedienblende “touch control” Öffnen Sie die Gerätetür bitte stets nur am entsprechenden Griff (siehe Abbildung ). WASCHMITTELBEHÄLTER D e r Wa s c h m i t t e l b e h ä l t e r befindet sich im Innern des Gerätes, um ihn zu erreichen, muss die Gerätetür geöffnet werden. Für die Anwendung siehe Kapitel “Auto Dose System”.
Bedienblende “touch control” Taste mit Kontrollleuchte START/PAUSE Taste WEICHSPÜLER Wählschalter PROGRAMME Taste SCHLEUDERGANG Taste WASCHMITTEL Taste TEMPERATUR Kontrollleuchte ECO DE Symbole PROGRAMMABLAUF DISPLAY Taste mit Kontrollleuchte ON/OFF Taste WASCHMITTEL Konzentrat/ Verdünnt Tasten Taste STARTZEITZUSATZFUNKTIONEN VORWAHL Taste mit Kontrollleuchte ON/OFF: Drücken Sie kurz auf die Taste, um das Gerät ein- bzw. auszuschalten.
Auto Dose System DE Einführung Diese Waschmaschine ist mit Waschmittelbehälter n ausgestattet: einer für Flüssigwaschmittel (konzentriert oder verdünnt) mit einem Fassungsvermögen von etwa 5,5 l und der zweite für Flüssigweichspüler (konzentriert oder verdünnt) mit einem Fassungsvermögen von etwa 3,5 l (siehe Abbildung). ! Prüfen Sie auf dem Behälter, ob Waschmittel/Weichspüler verdünnt oder konzentriert sind.
Anzeige zum Nachfüllen: Wenn am Ende eines Waschgangs die vorhandene Waschmittel-/Weichspülermenge für einen folgenden Waschgang nicht mehr ausreicht, erscheinen auf dem Display die entsprechenden Mitteilungen “Nach Programmende Waschmittel nachfüllen” oder “Nach Programmende Weichspüler nachfüllen” oder “Nach Programmende Behälter nachfüllen”. Werden die Behälter nicht nachgefüllt, dann wird für die nachfolgenden Waschgänge im Modus Auto Dose System kein Waschmittel oder Weichspüler entnommen.
Durchführung eines Waschprogramms DE ANMERKUNG: Lassen Sie vor erstmaligem Gebrauch des Waschvollautomaten erst einen Waschgang ohne Wäsche, jedoch mit Waschmittel durchlaufen. Stellen Sie hierzu das 90°C-Waschprogramm ohne Vorwäsche ein. 1. EINSCHALTEN DES GERÄTES. Drücken Sie die Taste . Alle Kontrolllampen leuchten für 1 Sekunde auf, im Display erscheint der Schriftzug AQUALTIS; im Anschluss schaltet die Kontrollleuchte der Taste auf Dauerlicht und die Kontrollleuchte START/PAUSE auf Blinklicht. 2.
Programme und Zusatzfunktionen Symbole Programmtabelle Beschreibung des Programms Programme Baumwolle Baumwolle mit Vorwäsche (Füllen Sie das Waschpulver in die entsprechende Kammer ein). Waschmittel und Max. Max. Zusätze Schleuder Beladung- ProgramGeschwinsmenge mdauer VorwäWaschWeichBleichdigkeit (kg) sche mittel spüler mittel (U/min) Max. Temp. (°C) 1600 - 9 60° (Max.
Waschmittel und Wäsche DE Waschmittel Die Wahl des Waschmittels und der Waschmittelmenge hängt von der Gewebeart (Baumwolle, Wolle, Seide ...), der Farbe, der Waschtemperatur, der Stärke der Verschmutzung und der Wasserhärte ab. Diese Waschmaschine mit Autodosiersystem für Waschmittel und Weichspüler hilft, Verschwendungen zu vermeiden und somit die Umwelt zu schützen und sichert dabei optimale Waschergebnisse zu.
Vorsichtsmaßregeln und Hinweise ! Der Waschvollautomat wurde nach den strengsten internationalen Sicherheitsvorschriften entworfen und gebaut.
Reinigung und Pflege DE Abstellen der Wasser- und Stromversorgung • Drehen Sie den Wasserhahn nach jedem Waschvorgang zu. Hierdurch wird der Verschleiß der Wasseranlage verringert und Wasseraustritte vermieden. • Ziehen Sie den Netzstecker aus der Steckdose, bevor Sie Ihr Gerät reinigen. Zugang zur Fremdkörperfalle: 1 2 Reinigung des Gerätes Die Gehäuseteile und die Teile aus Gummi können mit einem, mit warmer Spülmittellauge angefeuchteten Tuch gereinigt werden.
Störungen und Abhilfe Bei Funktionsstörung: Bevor Sie sich an den Technischen Kundendienst wenden (siehe „Kundendienst“), vergewissern Sie sich zuerst, ob es sich nicht um eine Kleinigkeit handelt, die Sie selbst beheben können. Ziehen Sie hierzu nachstehendes Verzeichnis zu Rate. Störungen: Mögliche Ursachen / Lösungen: Das Gerät schaltet sich nicht ein. • Der Stecker steckt nicht in der Steckdose, oder nicht so, dass der Kontakt hergestellt wird. • Der Strom ist ausgefallen.
DE Störungen: Mögliche Ursachen / Lösungen: Die Waschergebnisse des Geräts sind nicht zufriedenstellend. • Die Behälter wurden nicht richtig befüllt (Weichspüler an Stelle des Waschmittels oder umgekehrt). • Es wurden zwei unterschiedliche Waschmittel/Weichspüler gemischt. ! Vermischen Sie NIE zwei unterschiedliche Waschmittel/Weichspüler; führen Sie immer erst eine Reinigung der Behälter aus, bevor Sie ein anderes Mittel benutzen.
Kundendienst Bevor Sie den Kundendienst anfordern: DE • Prüfen Sie, ob einige Kontrollen vorab selbst durchgeführt werden (siehe “Störungen und Abhilfe); • Starten Sie daraufhin das Programm erneut, um sicherzustellen, dass die Störung auch wirklich behoben wurde; • Ist dies nicht der Fall, wenden Sie sich bitte an den autorisierten Kundendienst. ! Im Falle einer fehlerhaften Installation oder eines unkorrekten Gebrauchs wird der Einsatz eventuell in Rechnung gestellt.
195093985.