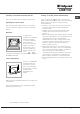
Operating Instructions COOKER AND OVEN GB English, 1 RS FR ÐÓÑÑÊÈÉ,12 Français, 23 Contents Installation, 2-3 Positioning and levelling Electrical connections Technical data Description of the appliance, 4 Overall view Control panel Start-up and use, 5-8 Starting the oven Cooking modes Electronic timer Oven cooking advice table C3VM5R /HA Using the glass ceramic hob, 9 Switching the cooking zones on and off Cooking zones Precautions and tips, 10 General safety Disposal Respecting and conserving
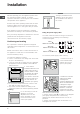
Installation The legs* provided with the appliance fit into the slots on the underside of the base of the cooker. Before operating your new appliance please read this instruction booklet carefully. It contains important information concerning the safe installation and operation of the appliance. Please keep these operating instructions for future reference. Make sure that the instructions are kept with the appliance if it is sold, given away or moved.
5. Fix the power supply cable in place by fastening the cable clamp screw. 6. Close the terminal board cover by tightening the screws V. Connecting the supply cable to the mains Install a standardised plug corresponding to the load indicated on the data plate located on the appliance. The appliance must be directly connected to the mains using an omnipolar circuit-breaker with a minimum contact opening of 3 mm installed between the appliance and the mains.
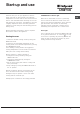
Description of the appliance GB Overall view Glass ceramic hob Control panel GRILL rack DRIPPING PAN Adjustable foot GUIDE RAILS for the sliding racks position 5 position 4 position 3 position 2 position 1 Adjustable foot Control panel SELECTOR knob THERMOSTAT knob THERMOSTAT indicator light ACTIVE HOTPLATE indicator light Electronic timer HALOGEN hotplate knobs TIMER button 4
Start-up and use The first time you use your appliance, heat the empty oven with its door closed at its maximum temperature for at least half an hour. Ensure that the room is well ventilated before switching the oven off and opening the oven door. The appliance may emit a slightly unpleasant odour caused by protective substances used during the manufacturing process burning away. Before operating the product, remove all plastic film from the sides of the appliance. Starting the oven 1.
GB Cooking modes A temperature value can be set for all cooking modes between 50°C and Max, except for the following modes GRILL and DOUBLE GRILL (recommended: set only to MAX power level). FAN-ASSISTED DOUBLE GRILL (recommended: do not exceed 200°C). a STATIC OVEN mode Both the top and bottom heating elements will be activated. When using this traditional cooking mode, it is best to use only one rack at a time, otherwise the heat will not be distributed evenly.
Cancelling a time that has already been set Press the button until the display shows 0:00. Adjusting the buzzer volume After selecting and confirming the clock settings, use the button to adjust the volume of the alarm buzzer. Rotisserie To operate the rotisserie (see diagram) proceed as follows: 1. Place the dripping pan in position 1. 2. Place the rotisserie support in position 4 and insert the spit in the hole provided on the back panel of the oven. 3.
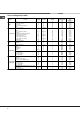
GB Oven cooking advice table Cooking modes Static Fan-assisted Grill Double Grill Fan-assisted Double Grill 8 Foods Duck Roast veal or beef Roast pork Biscuits (shortcrust pastry) Tarts Pizza (on 2 racks) Lasagne Lamb Roast chicken + potatoes Mackerel Sponge cake made with yoghurt Cream puffs (on 2 racks) Biscuits (on 2 racks) Sponge cake (on 1 rack) Sponge cake (on 2 racks) Savoury pies Sole and cuttlefish Squid and prawn kebabs Cod fillet Grilled vegetables Veal steak Cutlets Hamburgers Mackerel T
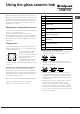
Using the glass ceramic hob The glue applied on the gaskets leaves traces of grease on the glass. Before using the appliance, we recommend you remove these with a special nonabrasive cleaning product. During the first few hours of use there may be a smell of rubber which will disappear very quickly. Switching the cooking zones on and off Pos.
Precautions and tips GB This appliance has been designed and manufactured in compliance with international safety standards. The following warnings are provided for safety reasons and must be read carefully. General safety The glass ceramic hob is resistant to temperature fluctuations and shocks. It is, however, wise to remember that blades or cooking utensils may ruin the surface of the hob.
Care and maintenance Switching the appliance off Disconnect your appliance from the electricity supply before carrying out any work on it. Never use steam cleaners or pressure cleaners on the appliance. Cleaning the oven The stainless steel or enamel-coated external parts and the rubber seals may be cleaned using a sponge that has been soaked in lukewarm water and neutral soap. Use specialised products for the removal of stubborn stains. After cleaning, rinse and dry thoroughly.
Ðóêîâîäñòâî ïî ýêñïëóàòàöèè ÊÓÕÎÍÍÀß ÏËÈÒÀ Ñ ÄÓÕÎÂÛÌ ØÊÀÔÎÌ GB English, 1 RS ÐÓÑÑÊÈÉ,12 FR Français, 23 Ñîäåðæàíèå RS Ìîíòàæ, 13-14 Ðàñïîëîæåíèå è íèâåëèðîâêà Ýëåêòðè÷åñêîå ïîäñîåäèíåíèå Òåõíè÷åñêèå äàííûå Îïèñàíèå èçäåëèÿ, 15 Îáùèè âèä Ïàíåëü óïðàâëåíèÿ Âêëþ÷åíèå è ýêñïëóàòàöèÿ, 16-19 Âêëþ÷åíèå äóõîâîãî øêàôà Ïðîãðàììû ïðèãîòîâëåíèÿ Ýëåêòðîííûè òàèìåð Òàáëèöà ïðèãîòîâëåíèÿ â äóõîâîì øêàôó C3VM5R /HA Ñòåêëîêåðàìè÷åñêàÿ âàðî÷íàÿ ïàíåëü, 20 Âêëþ÷åíèå è âûêëþ÷åíèå íàãðåâàòåëüíûõ çîí Íàãðåâàòåëüíûå ç
Óñòàíîâêà Âàæíî ñîõðàíèòü äàííîå ðóêîâîäñòâî äëÿ åãî ïîñëåäóþùèõ êîíñóëüòàöèè.  ñëó÷àå ïðîäàæè, ïåðåäà÷è èëè ïåðååçäà ïðîâåðüòå, ÷òîáû äàííîå ðóêîâîäñòâî ñîïðîâîæäàëî èçäåëèå. Âûðàâíèâàíèå RS Ïðè íåîáõîäèìîñòè âûðîâíÿòü èçäåëèå âêðóòèòå â ñïåöèàëüíûå îòâåðñòèÿ ïî óãëàì â îñíîâàíèè êóõîííîè ïëèòû ïðèëàãàþùèåñÿ ðåãóëÿöèîííûå íîæêè* ïî (ñì. ðèñóíîê). Âíèìàòåëüíî ïðî÷èòàèòå èíñòðóêöèè: â íèõ ñîäåðæàòñÿ âàæíûå ñâåäåíèÿ îá óñòàíîâêå, ýêñïëóàòàöèè è áåçîïàñíîñòè èçäåëèÿ.
RS ðàñïîëîæåíà â íèæíåè ÷àñòè çàæèìíîè êîðîáêè. 3. ïîäñîåäèíèòå ïðîâîäà N è 6 â ñîîòâåòñòâèè ñî ñõåìîè (ñì. ðèñóíîê) è äî óïîðà çàêðóòèòå âèíòû çàæèìîâ. 4. ïîäñîåäèíèòå îñòàâøèåñÿ ïðîâîäà ê çàæèìàì 1-2-3 è çàêðóòèòå âèíòû. 5. çàêðåïèòå êàáåëü ýëåêòðîïèòàíèÿ â ñïåöèàëüíîì êàáåëüíîì ñàëüíèêå. 6. çàêðîèòå êðûøêó çàæèìíîè êîðîáêè, çàêðóòèâ âèíò V.
Îïèñàíèå èçäåëèÿ Îáùèè âèä RS Ïàíåëü óïðàâëåíèÿ 15
Âêëþ÷åíèå è ýêñïëóàòàöèÿ RS Ïðè ïåðâîì âêëþ÷åíèè äóõîâîãî øêàôà ðåêîìåíäóåì ïðîêàëèòü åãî ïðèìåðíî â òå÷åíèå 30 ìèíóò ïðè ìàêñèìàëüíîè òåìïåðàòóðå ñ çàêðûòîè äâåðöåè. Çàòåì âûêëþ÷èòå äóõîâîè øêàô, îòêðîèòå äâåðöó è ïðîâåòðèòå ïîìåùåíèå. Çàïàõ, êîòîðûè âû ìîæåòå ïî÷óâñòâîâàòü, âûçâàí èñïàðåíèåì âåùåñòâ, èñïîëüçîâàííûõ äëÿ ïðåäîõðàíåíèÿ äóõîâîãî øêàôà. Ïåðåä íà÷àëîì ýêñïëóàòàöèè íåîáõîäèìî ñíÿòü ïëåíêó, íàêëååííóþ ñ áîêîâ èçäåëèÿ. Âêëþ÷åíèå äóõîâîãî øêàôà 1.
Ïðîãðàììû ïðèãîòîâëåíèÿ Äëÿ âñåõ ïðîãðàìì ìîæíî çàäàòü òåìïåðàòóðó îò 50°C äî ÌÀÊÑ êðîìå: ÃÐÈËÜ è ÄÂÎÈÍÎÈ ÃÐÈËÜ (ðåêîìåíäóåòñÿ óñòàíàâëèâàòü òîëüêî ÌÀÊÑ. òåìïåðàòóðó); ÄÂÎÈÍÎÈ ÂÅÍÒÈËÈÐÎÂÀÍÍÛÈ ÃÐÈËÜ (ðåêîìåíäóåòñÿ íå ïðåâûøàòü òåìïåðàòóðó 200°C). a Ïðîãðàììà ÑÒÀÒÈ×ÅÑÊÀß ÄÓÕÎÂÊÀ Âêëþ÷àþòñÿ äâà íàãðåâàòåëüíûõ ýëåìåíòà: íèæíèè è âåðõíèè.
RS Ïîðÿäîê îòìåíû çàäàííîãî âðåìåíè Íàæìèòå êíîïêó âïëîò äî 0:00. Ðåãóëÿöèÿ ãðîìêîñòè çâóêîâîãî ñèãíàëà Ïîñëå îñóùåñòâëåíèÿ è ïîäòâåðæäåíèÿ ðåãóëÿöèè ÷àñîâ ïðè ïîìîùè êíîïêè ìîæíî îòðåãóëèðîâàòü ãðîìêîñòü çâóêîâîãî ñèãíàëà. Âåðòåë Ïîðÿäîê âêëþ÷åíèÿ âåðòåëà (ñì. ðèñóíîê): 1. óñòàíîâèòå ïðîòèâåíü íà 1-ûè óðîâåíü; 2. óñòàíîâèòå äåðæàòåëü âåðòåëà íà 4-ûè óðîâåíü è âñòàâüòå âåðòåë â ñïåöèàëüíîå îòâåðñòèå â çàäíåè ñòåíêå äóõîâîãî øêàôà; 3. âêëþ÷èòå âåðòåë ïðè ïîìîùè ðóêîÿòêè ÏÐÎÃÐÀÌÌÛ 2 o T.
Òàáëèöà ïðèãîòîâëåíèÿ â äóõîâîì øêàôó Ïðîãðàììû Ïðîäóêòû Óòêà Æàðêîå èç òåëÿòèíû èëè ãîâÿäèíû Ñòàòè÷åñêîå Æàðêîå èç ñâèíèíû Ïå÷åíüå (ïåñî÷íîå) Ïåñî÷íûé òîðò ñ íà÷èíêîé Ïèööà (íà 2 óðîâíÿõ) Ëàçàíüÿ Áàðàíèíà Êóðèöà ñ êàðòîøêîé Ñêóìáðèÿ Âåíòèëèðîâàííîå Êåêñ Ýêëåðû (íà 2 óðîâíÿõ) Ïå÷åíüå (íà 2 óðîâíÿõ) Áèñêâèòíûé òîðò (íà 1 óðîâíå) Áèñêâèòíûé òîðò (íà 2 óðîâíÿõ) Íåñëàäêèå òîðòû Êàìáàëà è êàðàêàòèöû Êàëüìàðû è êðåâåòêè íà øàìïóðàõ Ãðèëü Ôèëå òðåñêè Îâîùè-ãðèëü Òåëÿ÷èé áèôøòåêñ Îòáèâíûå Ãàìáóðãåð Ñêóìáðèÿ Äâîéí
Ýëåêòðè÷åñêàÿ âàðî÷íàÿ ïàíåëü RS íà ñòåêëÿííîè ïîâåðõíîñòè âàðî÷íîè ïàíåëè ìîãóò áûòü âèäíû ñàëüíûå ñëåäû îò êëåÿ, íàíåñåííîãî íà ïðîêëàäêè. Ïåðåä íà÷àëîì ýêñïëóàòàöèè èçäåëèÿ ñëåäóåò óäàëèòü ñëåäû êëåÿ ïðè ïîìîùè ñïåöèàëüíîãî íåàáðàçèâíîãî ìîþùåãî ñðåäñòâà.  ïåðâûå ÷àñû ðàáîòû âû ìîæåòå ïî÷óâñòâîâàòü çàïàõ ææåíîè ðåçèíû, êîòîðûè áûñòðî ïðîïàäàåò. Ïîç.
Ïðåäîñòîðîæíîñòè è ðåêîìåíäàöèè Èçäåëèå ñïðîåêòèðîâàíî è èçãîòîâëåíî â ñîîòâåòñòâèè ñ ìåæäóíàðîäíûìè íîðìàòèâàìè ïî áåçîïàñíîñòè. Íåîáõîäèìî âíèìàòåëüíî ïðî÷èòàòü íàñòîÿùèå ïðåäóïðåæäåíèÿ, ñîñòàâëåííûå â öåëÿõ âàøåè áåçîïàñíîñòè. Îáùèå òðåáîâàíèÿ ê áåçîïàñíîñòè Ñòåêëîêåðàìè÷åñêàÿ âàðî÷íàÿ ïàíåëü ÿâëÿåòñÿ óñòîè÷èâîè ê ñêà÷êàì òåìïåðàòóðû è ê óäàðàì. Òåì íå ìåíåå ñëåäóåò ïîìíèòü, ÷òî ëåçâèÿ èëè îñòðûå êóõîííûå ïðèáîðû ìîãóò ïîâðåäèòü ïîâåðõíîñòü âàðî÷íîè ïàíåëè.
Òåõíè÷åñêîå îáñëóæèâàíèå è óõîä RS Îòêëþ÷åíèå ýëåêòðîïèòàíèÿ Ïåðåä íà÷àëîì êàêîè-ëèáî îïåðàöèè ïî îáñëóæèâàíèþ èëè ÷èñòêå îòñîåäèíèòå èçäåëèå îò ñåòè ýëåêòðîïèòàíèÿ. Íèêîãäà íå èñïîëüçóéòå ïàðîâûå ÷èñòÿùèå àãðåãàòû èëè àãðåãàòû ïîä âûñîêèì äàâëåíèåì äëÿ ÷èñòêè èçäåëèÿ. ×èñòêà äóõîâîãî øêàôà Íàðóæíûå ýìàëèðîâàííûå ýëåìåíòû èëè äåòàëè èç íåðæàâåþùåè ñòàëè, à òàêæå ðåçèíîâûå óïëîòíåíèÿ ìîæíî ïðîòèðàòü ãóáêîè, ñìî÷åííîè â òåïëîè âîäå èëè â ðàñòâîðå íåèòðàëüíîãî ìîþùåãî ñðåäñòâà.
Mode demploi CUISINIERE GB English, 1 RS ÐÓÑÑÊÈÉ,12 FR Français, 23 Sommaire Installation, 24-25 Positionnement et nivellement Raccordement électrique Caractéristiques techniques Description de lappareil, 26 Vue densemble Tableau de bord Utilisation du four, 27-30 Mise en marche du four Programmes de cuisson Minuteur électronique Tableau de cuisson C3VM5R /HA Utilisation du plan vitrocéramique, 31 Allumer et éteindre les foyers Les foyers Précautions et conseils, 32 Sécurité générale Mise au r
Installation Montage des pieds* fournis avec lappareil par encastrement sous la base. Conservez ce mode demploi pour pouvoir le consulter à tout moment. En cas de vente, de cession ou de déménagement, veillez à ce quil suive lappareil.
5. fixez le câble dalimentation dans le serre-câble prévu. 6. fermez le couvercle du bornier et vissez la vis V. Branchement du câble dalimentation au réseau électrique Montez sur le câble une fiche normalisée adaptée à la charge indiquée sur létiquette des caractéristiques collée sur lappareil.
Description de lappareil FR Vue densemble Plan de cuisson vitrocéramique GLISSIERES de coulissement niveau 5 niveau 4 niveau 3 niveau 2 niveau 1 Tableau de bord Support GRILLE Support LECHEFRITE Pied de réglage Pied de réglage Tableau de bord Bouton PROGRAMMES Bouton THERMOSTAT Voyant THERMOSTAT Voyant FONCTIONNEMENT FOYERS Minuteur électronique Bouton foyer HALOGENE Touche MINUTEUR 26
Utilisation du four Lors de son premier allumage, faites fonctionner le four à vide, porte fermée, pendant au moins une heure en réglant la température à son maximum. Puis éteignez-le, ouvrez la porte et aérez la pièce. Lodeur qui se dégage est due à lévaporation des produits utilisés pour protéger le four. Avant toute utilisation, vous devez impérativement enlever les films plastiques situés sur les côtés de lappareil Mise en marche du four 1.
FR Programmes de cuisson Pour tous les programmes, vous pouvez sélectionner une température comprise entre 50°C et MAX., sauf pour : uniforme de la chaleur dans lenceinte du four. Plus de risques de brûler vos aliments en surface et plus grande pénétration de la chaleur. Très utile pour des grillades rapides ou pour griller de grosses pièces de viande sans utiliser le tournebroche. GRIL et DOUBLE GRIL (il est conseillé dans ce cas de sélectionner MAX.
Pour annuler une durée déjà sélectionnée. Appuyez sur la touche jusqu'à 0:00. Réglage de volume du signal sonore. Après avoir choisi et confirmé les sélections de l'horloge, vous pouvez régler le volume du signal acoustique à l'aide de la touche . Tournebroche* Pour actionner le tournebroche, procédez comme suit : 1. placez la lèchefrite au gradin 1; 2. placez le berceau au gradin 4 et encastrez le bout arrière de la broche dans le trou situé au fond de lenceinte (voir figure); 3.
FR Tableau de cuisson Programmes Statique Ventilé Gril Double Gril Double Gril Ventilé 30 Aliments Canard Roast-beef Rôti de porc Biscuits Tartes Pizza (sur 2 niveaux) Lasagnes Agneau Poulet rôti + pommes de terre Maquereaux Cake aux fruits Choux (sur 2 niveaux) Biscuits (sur 2 niveaux) Génoise (sur 1 niveau) Génoise (sur 2 niveaux) Tartes salées Soles et seiches Brochettes de calmars et crevettes Tranches de colin Légumes grillés Steaks de veau Côtelettes Hamburgers Maquereaux Croque-monsieur Avec
Utilisation du plan de cuisson vitrocéramique La colle utilisée pour les joints laisse des traces de graisse sur le verre. Nous vous conseillons de les éliminer avant dutiliser lappareil, à laide dun produit dentretien non abrasif. Une odeur de caoutchouc peut se dégager au cours des premières heures dutilisation, elle disparaîtra très vite. Allumer et éteindre les foyers Pour allumer un foyer, tournez le bouton correspondant dans le sens des aiguilles dune montre.
Précautions et conseils FR Cet appareil a été conçu et fabriqué conformément aux normes internationales de sécurité. Ces conseils sont fournis pour des raisons de sécurité et doivent être lus attentivement. Sécurité générale Le plan de cuisson vitrocéramique résiste aux sautes de température et aux chocs. N'oubliez toutefois pas que des lames ou des ustensiles de cuisine pointus peuvent casser la surface du plan de cuisson.
Nettoyage et entretien Mise hors tension Avant toute opération de nettoyage ou dentretien coupez lalimentation électrique de lappareil. Ne nettoyez jamais lappareil avec des nettoyeurs vapeur ou haute pression. Nettoyage du four Nettoyez lextérieur émaillé ou inox et les joints en caoutchouc à laide dune éponge imbibée deau tiède additionnée de savon neutre. Si les taches sont difficiles à enlever, utilisez des produits spéciaux.
FR 34
FR 35
04/2007 - 195061827.