LS 245 I Lavastoviglie Istruzioni per linstallazione e luso GB Dishwasher Instructions for installation and use F Lave-vasseille Instructions pour linstallation et lemploi D Geschirrspuler Informationen für Installation und Gebrauch Vaatwasser Gebruiksaanwijzingen voor de plaatsing en gebruik NL E Lavavajillas Instrucciones para la instalación y el uso P Máquina de lavar louça Instruções para a instalação e a utilização
Guida rapida per la lavastoviglie L AVASTOVIGLIE Questo manuale ti racconta in maniera piacevole tutto quello che può offrirti il tuo nuovo elettrodomestico. In più, scoprirai curiosità e piccole astuzie per lavare meglio con la tua lavastoviglie e farla durare di più. 1. Installazione e trasloco (p. 8) L'installazione, dopo la consegna o un trasloco, è l'operazione più importante per il buon funzionamento della tua lavastoviglie. Verifica sempre: 1. Che l'impianto elettrico sia a norma; 2.
L AVASTOVIGLIE Apriamo insieme Come è fatta? la tua lavastoviglie E Imparare a conoscere le parti da cui è composta la lavastoviglie ti aiuterà ad usarla meglio. E. Cestello superiore I. Irroratore inferiore F. Irroratore superiore J. Tappo contenitore sale G. Regolazione altezza cestello K. Filtro lavaggio H. Cestello inferiore G F L. Contenitore detersivo e brillantante H J K L I Quadro comandi ai tuoi ordini A. Pulsante On-Off Premi questo pulsante per mettere la macchina sotto tensione.
L AVASTOVIGLIE Come si caricano le stoviglie? Prima di lavare, piccoli gesti possono aiutarti a lavare meglio e a conservare più a lungo la tua lavastoviglie. Asporta i residui più grossi di cibo, metti a bagno le pentole e le padelle più incrostate. Dopo avere caricato le stoviglie controlla che le pale dellirroratore girino bene. Non sovrapporre bicchieri e tazze, controlla che i piatti non si tocchino. Prima di tutto.
L AVASTOVIGLIE Avviare la lavastoviglie Pronti, via! Hai caricato la lavastoviglie e ora devi impostare il programma di lavaggio. Bastano pochi minuti per imparare Prima di tutto. Apri completamente il rubinetto dellacqua e premi il pulsante ONOFF A: senti un breve segnale acustico e la spia B si illumina. Ora la macchina è accesa, e puoi programmarla. Scegliere il programma.
L AVASTOVIGLIE Detersivo e brillantante Usa solamente detersivo specifico per lavastoviglie. Versa il detersivo nel distributore che trovi allinterno della porta. Prima dellinizio del ciclo di lavaggio! Il detersivo Caricamento del detersivo Per aprire il coperchio A, premi il pulsante B. Il detersivo va inserito nelle due vaschette C e D fino al bordo. Ora puoi chiudere il coperchio: premi finché senti lo scatto.
L AVASTOVIGLIE Scegli il programma giusto Ogni sporco ha il suo programma Sale, brillantante, la giusta dose di detersivo e il giusto programma: ecco la formula per ottenere i risultati migliori e conservare bene la tua lavastoviglie 3URJUDPPD ,QWHQVLYR 1RUPDOH 5DSLGR ,QGLFD]LRQL SHU OD VFHOWD GHL SURJUDPPL 6WRYLJOLH H SHQWROH PROWR VSRUFKH GD QRQ XVDUH SHU SH]]L GHOLFDWL 6WRYLJOLH H SHQWROH QRUPDOHPHQWH VSRUFKH &LFOR VWDQGDUG JLRUQDOLHUR $PPROOR &ULVWDOOL &LFOR HFRQRPLFR H YHORFH GD XWLOL]]DUH S
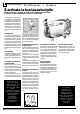
L AVASTOVIGLIE Mai senza sale La durezza dellacqua varia a seconda delle località. Se lacqua di casa tua è dura, senza decalcificazione si formerebbero incrostazioni sulle stoviglie. La tua lavastoviglie ha un decalcificatore che utilizza sale speciale ed elimina il calcare dallacqua. Caricamento del sale. Utilizza sempre sale specifico per lavastoviglie. Il serbatoio del sale è sotto il cestello inferiore, riempilo così: 1. Estrai il cesto inferiore, svita e togli il tappo del serbatoio 2.
L AVASTOVIGLIE Installazione e trasloco È arrivata la tua lavastoviglie Appena acquistata o spostata in unaltra casa, linstallazione fatta bene ti assicura il buon funzionamento della tua lavastoviglie Scegli il punto dove sistemare la tua lavastoviglie, puoi farla aderire con i fianchi o con lo schienale ai mobili adiacenti o alla parete.
Problemi e soluzioni Se hai un problema, leggi qui L AVASTOVIGLIE Può accadere che la lavastoviglie non funzioni o funzioni male. In molti casi si tratta di problemi che puoi risolvere senza dover chiamare il tecnico. Prima di telefonare allassistenza, leggi sempre questi punti.
L AVASTOVIGLIE Cura e manutenzione Pulizia e manutenzione particolari Il gruppo filtrante Se vuoi avere sempre buoni risultati di lavaggio, è necessario pulire il gruppo filtrante. Lacqua di lavaggio viene pulita dai residui di cibo e rimessa in circolo perfettamente filtrata. Per questo, dopo ogni lavaggio, è meglio rimuovere i residui più grossi che trovi trattenuti dal bicchiere C e dal filtro semicircolare A; per estrarli tira il manico del bicchere verso lalto.
L AVASTOVIGLIE Ariston ti è vicina anche dopo lacquisto Grazie per averci scelto, ma vogliamo rimanere sempre vicino a te e al tuo elettrodomestico Registra il tuo acquisto Partecipa al concorso Rispondi e vinci inviando il questionario che troverai in allegato alla documentazione del tuo elettrodomestico, potrai usufruire di una serie di servizi riservati ai clienti Ariston. Aderisci subito ai servizi speciali Da cliente speciale a cliente privilegiato.
D ISHWASHER Quick guide to your dishwasher This manual explains pleasantly all your new electric household appliance has to offer. In addition, you will discover a world of useful hints and handy tips to help you get a better wash from your dishwasher and to make it last longer. 1. Installation and moving (p. 19) Installation, after delivery or your moving house, is the most important procedure for the correct operation of your dishwasher. Always check: 1.
D ISHWASHER Let's open up your dishwasher together E How is it made? G Learn to get to know the parts which make up your dishwasher, you will use it better for it. E. F. G. H. I. Upper rack Top sprayer arm Rack height adjuster Lower rack Bottom sprayer arm F J. Salt container cap K. Washing filter L. Detergent and rinse aid dispenser H J K L I Control panel at your orders A. ON-OFF Button Press this button to switch the appliance on. B.
D ISHWASHER How to load your dishes Before washing, a few small steps can help you get a better wash and keep your dishwasher for longer. Remove the largest scraps of food left over on your plates, soak saucepans and frying pans with tough incrustations. After loading your dishes, make sure the blades on the sprayer arm turn well First of all.
Starting the dishwasher Ready, steady, go! You have loaded your dishes and you now have to set the wash cycle. It takes just one minute to learn how First of all. You've left out a dish? Turn on the water tap completely Well, it happens to everyone. Interand press ON-OFF button "A": a rupt the wash cycle by pressing the short beep will sound and indicator ON-OFF button, insert the dish you light "B" will come on. Now the had forgotten and press the ONappliance is on and ready to be pro- OFF button again.
D ISHWASHER Detergent and rinse aid Only use specific dishwasher detergents. Pour the detergent into the dispenser on the inside of the door. Before the wash cycle starts! The detergent Loading the detergent To open lid A, press button B. The detergent should be poured into the two containers C and D up to the rim. Now you can close the lid: press it down until you hear it click. If you prefer to use the detergent in tablets, place one of these in container "D".
D ISHWASHER Select the right wash cycle A wash cycle for every degree of soil Select the right wash cycle for your dishes. Selecting the most suitable wash cycle for the load ensures clean dishes and a more convenient use of water and electricity.
D ISHWASHER Never without salt Water in your home Water hardness varies according to where you live. If the water in your home is hard, without water softening, incrustations would form on your dishes. Your dishwasher is fitted with a water softener which uses special salt to get rid of limescale in the water. Loading the salt. Always use salt which is intended for dishwasher use. The salt container is situated underneath the lower rack, fill it up as follows: 1.
Installation and moving Your dishwasher has arrived D ISHWASHER After having bought or moved your dishwasher to another home, a correct installation ensures that your dishwasher will operate smoothly and efficiently. Choose where you want to install your dishwasher, you can even place it so that its sides or back panel are side by side with furniture or up against the wall.
D ISHWASHER Troubleshooting If you have a problem, read this Your dishwasher may not work or not function properly. In many cases, these are problems which can be solved without having to call for a technician. Before calling the service centre, always check the points below.
Care and maintenance D ISHWASHER Cleaning and special maintenance The filter assembly If you want consistent good results from your dishwasher, you need to clean the filter assembly. The food particles are removed from the wash water, allowing it to be recirculated during the cycle, filtered perfectly. For this reason, it is a good idea to remove the larger food particles trapped inside the cup C and the semi-circular filter A after each wash; pull the cup handle upwards to remove them.
D ISHWASHER Stay in touch THANK YOU for choosing an Ariston appliance. We are confident you have made a good choice and that your new appliance will give many years of excellent service. And we're there when you need us. Register your purchase now This will confirm your entitlement to free spare parts for five years, and you could also be lucky enough to recover the cost of your purchase in our quarterly prize draw.
L AVE-VAISSELLE Un guide rapide pour tout savoir sur votre lave-vaisselle Ce manuel a une façon plaisante de vous énumérer tout ce que votre nouvel électroménager peut vous offrir. Vous découvrirez, en plus, un tas de curiosités et de petites astuces pour mieux laver votre vaisselle et prolonger la durée de votre machine. 1.
L AVE-VAISSELLEOuvrons ensemble votre lave-vaisselle Qu'est-ce qu'il contient? E Apprenez à bien connaître les parties qui composent votre lave-vaisselle pour mieux vous en servir E. Panier supérieur I. Gicleur inférieur F. Gicleur supérieur J. Bouchon réservoir à sel G. Réglage hauteur panier K . Filtre lavage H . Panier inférieur G F H J L . Distributeur produits de lavage et de rinçage K L I Tableau de bord à vos ordres A.
L AVE-VAISSELLE Comment s'y prendre pour charger la vaisselle? Avant de laver, prenez de bonnes habitudes, vous obtiendrez de meilleurs résultats et augmenterez la longévité de votre lave-vaisselle. Eliminez les déchets les plus gros, mettez tremper vos casseroles et vos poêles particulièrement sales. Une fois que vous avez chargé votre vaisselle, contrôlez que les bras du gicleur tournent bien. Ne superposez pas vos verres et vos tasses, veillez à ce que les assiettes ne se touchent pas. Tout d'abord.
L AVE-VAISSELLE Démarrage du lave-vaisselle Allons-y! Vous avez chargé votre lave-vaisselle, il faut à présent choisir un programme de lavage. Une minute suffit pour apprendre Tout d'abord. Vous avez oublié d'introOuvrez à fond le robinet de l'eau et duire de la vaisselle ? appuyez sur la touche ON-OFF "A": Cela peut arriver à tout le monde. vousentendrezunbrefsignalacous- Appuyez sur la touche ON-OFF tique et le voyant "B" s'allumera.
Produit de lavage et de rinçage N'utilisez que du produit de lavage spécial lave-vaisselle. Versez le produit de lavage dans le distributeur situé à l'intérieur de la porte. Avant de démarrer le cycle de lavage, bien sûr! Le produit de lavage Chargement du produit de lavage Pour ouvrir le couvercle A, appuyez sur la touche B. Remplissez de produit de lavage les deux bacs C et D jusqu'au bord. Fermez le couvercle en appuyant jusqu'au déclic.
L AVE-VAISSELLE Choisissez le bon programme A chaque besoin son programme Sel, produit de rinçage, une juste dose de produit de lavage et le programme qu'il faut: voilà la formule idéale pour obtenir de meilleurs résultats et bien entretenir votre lave-vaisselle.
L AVE-VAISSELLE Jamais sans sel Votre eau La dureté de l'eau varie d'un endroit à l'autre. Si votre eau est dure et qu'aucun adoucisseur n'est installé, des incrustations pourraient se former sur votre vaisselle. Or, votre lave-vaisselle dispose d'un adoucisseur qui utilise du sel spécial et élimine le calcaire de l'eau. Chargement du sel. Utilisez du sel spécial lave-vaisselle. Le réservoir à sel est situé sous le panier inférieur, remplissez-le comme suit: 1.
L AVE-VAISSELLE Installation et déménagement Votre lave-vaisselle est arrivé A son achat ou après un déménagement, le bon fonctionnement de votre lave-vaisselle dépend en grande partie de son installation. Choisissez l'endroit où installer votre lave-vaisselle, vous pouvez le placer côte à côte avec des meubles ou contre le mur. Le lave-vaisselle est équipé de tuyaux pour l'arrivée et l'évacuation de l'eau, ils peuvent être orientés vers la droite ou vers la gauche en vue d'une meilleure installation.
Problèmes et solutions L AVE-VAISSELLE Au moindre problème, lisez ce qui suit Il peut arriver que le lave-vaisselle fonctionne mal ou pas du tout. La plupart du temps, vous pouvez résoudre ces problèmes vous-même. Avant de téléphoner au service après-vente, lisez ces quelques lignes.
L AVE-VAISSELLE Soin et entretien Nettoyage et entretien particuliers Le groupe filtrant Si vous voulez toujours avoir dexcellents résultats de lavage, nettoyez le groupe filtrant. Leau de lavage est débarrassée des déchets daliments et remise en circulation parfaitement filtrée.
G ESCHIRRSPÜLER Express-Nachschlagebuch für Ihren Geschirrspüler Dieses Handbuch erklärt Ihnen auf angenehme Weise, was Ihnen Ihr neues Haushaltsgerät alles bieten kann. Außerdem werden Sie so manche interessante Kuriositäten erfahren und zum Abschluss bieten wir Ihnen noch einige kleine Tips und Tricks, damit Ihnen Ihr Gerät die bestmöglichen Spülergebnisse liefert und Sie möglichst lange Ihre Freude daran haben. 1.
ESCHIRRSPÜLER G Öffnen wir doch Ihren gemeinsam Geschirrspüler E Wie ist er gebaut? G Lernen Sie die Bestandteile kennen, aus denen Ihr Geschirrspüler gebaut ist: dies wird Ihnen helfen, besser damit umzugehen. E. Oberer Korb F. Oberer Sprüharm G. Vorrichtung zur Höhenverstellung des Korbes H. Unterer Korb I. J. K. L. Unterer Sprüharm Salzbehälterdeckel Filtersieb Dosierkammer für Geschirrspülmittel und Klarspüler F H J K L I Schalttafel und Bestandteile A.
G ESCHIRRSPÜLER So füllen Sie Ihren Geschirrspüler richtig Mit einigen kleinen Handgriffen können Sie Ihr Geschirr besser reinigen und die Lebensdauer Ihres Geschirrspülers verlängern. Befreien Sie das Geschirr von größeren Essensresten, bevor Sie es in den Geschirrspüler geben, und weichen Sie angebrannte Töpfe und Pfannen ein. Nachdem Sie das Gerät gefüllt haben, vergewissern Sie sich, dass der Sprüharm sich gut drehen kann.
G ESCHIRRSPÜLER So starten Sie Ihren Geschirrspüler Auf die Plätze, fertig, los! Nachdem Sie den Geschirrspüler gefüllt haben, stellen Sie das passende Spülprogramm ein. Wie das geschieht, lernen Sie in einer Minute. Erster Schritt Öffnen Sie den Wasserhahn vollständig und drücken Sie die EIN/AUS-Taste (ON-OFF) "A". Sie vernehmen einen kurzen Signalton und die Anzeigeleuchte "B" leuchtet auf. Das Gerät ist eingeschaltet und kann nun programmiert werden. Programmauswahl erst in Gang gesetzt wurde.
G ESCHIRRSPÜLER Geschirrspülmittel und Klarspüler Verwenden Sie nur Klarspüler für Geschirrspüler. Geben Sie das Geschirrspülmittel - vor Beginn des Spülganges! - in die Dosierkammer, die sich auf der Innenseite der Gerätetür befindet. Geschirrspülmittel So wird das Geschirrspülmittel eingefüllt ÖffnenSiedieKlappeAdurchDrükken des Knopfes B. Füllen Sie die beidenDosierkammernCundDbis zum Rand mit dem Reiniger. Schließen Sie nun die Klappe, indem Sie sie bis zum Anschlag hinunter drücken.
G ESCHIRRSPÜLER Wählen Sie das passende Reinigungsprogramm aus Für jeden Verschmutzungsgrad gibt es ein ideales Programm Regeneriersalz, Klarspüler, die richtige Menge an Reinigungsmittel: das ist die Geheimformel, um die bestmöglichenErgebnissezuerzielenundIhrenGeschirrspülerzuschonen.
G ESCHIRRSPÜLER Nie ohne Salz Ihr Wasser Der Härtegrad des Wassers ändert sich von einem Ort zum anderen. Wenn das Wasser Ihres Haushaltes hart ist, würde es ohne Regenerierungsmittel zu Kalkablagerungen im Geschirrspüler kommen. Ihr Gerät verfügt über eine Entkalkungsanlage, die mit einem Spezialsalz das Wasser entkalkt. So wird das Salz eingefüllt Verwenden Sie ausschließlich Spezialsalz für Geschirrspülmaschinen.
G ESCHIRRSPÜLER Installation und Umzug Ihr Geschirrspüler ist da Egal ob Sie ihn neu gekauft haben oder damit umgezogen sind, eine korrekt durchgeführte Installation gewährleistet Ihnen in jedem Fall eine einwandfreie Funktion Ihres Geschirrspülers. Bestimmen Sie, wo Sie den Geschirrspüler anschließen wollen; das Gerät kann sowohl mit der Seitenwand als auch mit der Rückwand an die anliegenden Möbel oder an die Wand gestellt werden.
Probleme und Lösungen G ESCHIRRSPÜLER Wenn Sie irgendein Problem haben, lesen Sie sich diese Seite durch Es kann passieren, dass der Geschirrspüler nicht oder nicht richtig funktioniert. In vielen Fällen handelt es sich dabei um Probleme, die Sie ohne weiteres selbst lösen können, ohne den Techniker anzufordern. Überprüfen Sie demnach zuerst die folgenden Punkte.
G ESCHIRRSPÜLER Pflege und Wartung Reinigung und Instandhaltung Die Siebkomposition Wenn Sie jederzeit ein gutes Reinigungsergebnis wünschen, müssen Sie die Siebkomposition sauber halten. Anhand des Siebes wird das Spülwasser von Speiseresten gereinigt und perfekt gefiltert in Umlauf gebracht. Es ist daher empfehlenswert, nach jedem Spülgang die gröberen Essensreste, die Sie im Grobsieb C und im halbrunden Sieb A finden, zu entfernen.
G ESCHIRRSPÜLER Ariston steht Ihnen auch nach dem Kauf jederzeit zur Seite Wir danken Ihnen für den Kauf unseres Produkts. Unser Wunsch ist es, Ihnen auch weiterhin zur Seite zu stehen. Nutzen Sie alle Sonderleistungen, die nur den Ariston-Kunden vorbehalten sind. Machen Sie sich unseren Sonderservice unverzüglich zu Nutze Vom Sonderkunden zum Vorzugskunden. Jahr für Jahr eine Garantie absoluter Sicherheit und Ruhe für Ihre neuen Hausgeräte. Die Beitritts-Modalitäten finden Sie anbei.
V AATWASSER Snelle gids voor de vaatwasser Deze gebruiksaanwijzing legt uit wat uw nieuwe vaatwasser te bieden heeft. U zult ook kleine tips vinden voor het beste gebruik van uw vaatwasser en voor het bevorderen van de duurzaamheid hiervan. 1. Installeren en verhuizen (blz.51) Nadat de vaatwasser is bezorgd of na een verhuis is het installeren het allerbelangrijkste element voor het goed functioneren. Controleer altijd: 1. of de elektrische installatie voldoet aan de normen; 2.
V AATWASSER Laen we samen de vaatwasser openen E Hoe zit hij in elkaar? G Kennis van de onderdelen waaruit hij bestaat helpt u bij het gebruik. E. Bovenkorf I. Onderste sproeiarmen F. Bovenste sproeiarmen J. Deksel zoutbak G. Regelen hoogte korf K. Filter H. Onderkorf L. Bakje afwasmiddel en glansmiddel F H J K L I Bedieningspaneel tot uw beschikking A. ON-OFF knop Met deze knop schakelt u de machine in. B. Controlelampje ON-OFF Dit geeft aan dat de vaatwasser is ingeschakeld. C.
V AATWASSER Het laden van de vaatwasser Kleine dingen kunnen u helpen beter te wassen en de vaatwasser langer goed te houden. Spoel het vaatwerk af voordat u het inlaadt, zet aangekoekte pannen en bakpannen in de week. Controleer na het inladen of de sproeiarmen zich vrijelijk kunnen bewegen. Allereerst Voordat u het vaatwerk in de korven plaatst moeten voedselresten eraf gespoeld worden zodat de filter niet verstopt raakt.
Het staren van de machine Bent u klaar? V AATWASSER De machine is ingeladen en nu moet het afwasprogramma gekozen worden. Dit is in één minuut geleerd. Allereerst Open de waterkraan en druk op de ON-OFF knop "A": u hoort een kort geluidssignaal en het controlelampje "B" gaat aan. De machine is nu ingeschakeld en u kunt programmeren.
V AATWASSER Afwasmiddel en glansmiddel Nuttige wenken Gebruik alleen speciaal afwasmiddel voor vaatwassers. Giet het in het bakje in de deur. Voor het begin van de afwascycle Het afwasmiddel Het opvullen van afwasmiddel Druk op knop B voor het openen van het dekseltje A . Het afwasmiddel wordt in de twee bakjes C en D gegoten, tot aan de rand. Nu kan het dekseltje dicht worden gedrukt. Als u er de voorkeur aan geeft blokjes te gebruiken, dan plaatst u er een in het bakje "D".
Kies het juise programma Ieder soort vuil heeft zijn eigen programma Zout, glansmiddel, de juiste dosis afwasmiddel en het juiste programma: dit is de formule voor het beste resultaat en behoud van uw vaatwasser. 3URJUDPPD $DQZLM]LQJHQ YRRU SURJUDPPD NHX]H %HVFKULMYLQJ YDQ GH F\FOH V AATWASSER Kies het juiste programma voor uw vaatwerk Het kiezen van het juiste programma voor uw lading garandeert schoon vaatwerk en energiebesparing.
V AATWASSER Nooit zonder zout Uw waterleiding De hardheid van het water variëert van plaats tot plaats. Als uw water hard is kan zich kalkafzetting op het vaatwerk voorkomen. Uw vaatwasser is voorzien van een ontkalker die speciaal zout gebruikt en de kalk uit het water verwijdert. Het opvullen met zout Gebruik altijd speciaal zout voor vaatwassers. Het zoutreservoir bevindt zich onder de onderkorf en wordt als volgt gevuld: 1. Trek de onderkorf eruit, schroef de deksel van het zoutreservoir los. 2.
Installeren en verhuizen Uw vaatwasser is gearriveerd V AATWASSER Het installeren, na aankomst of verhuis, moet op de juiste wijze worden uitgevoerd voor het goed functioneren van uw vaatwasser. Kies de plek waar uw vaatwasser moet komen te staan; hij kan met de zijkanten of met de achterkant tegen andere keukenmeubelen of de muur staan. De aan- en afvoerbuizen van het water kunnen naar rechts of naar links worden gericht.
V AATWASSER Problemen en oplossingen Als u een probleem heeft, lees dan hier Als de vaatwasser niet of slecht functioneert kan de storing in vele gevallen worden opgelost zonder dat u er de installateur bij hoeft te roepen. Voordat u de installateur telefoneert, lees eerst deze punten.
Zorg en onderhoud V AATWASSER Schoonmaken en speciaal onderhoud De filter-unit Voor goede resultaten van de afwas moet de filter-unit worden schoon gemaakt. Het afwaswater wordt gereinigd van etensresten en perfect gefilterd weer in circulatie gebracht. Het is daarom noodzakelijk de grootste stukjes die in de beker C en in de filter A zijn achtergebleven te verwijderen: trek de beker aan zijn handvat naar boven. Spoel onder stromend water.
V AATWASSER Ariston: ook de service staat voor kwaliteit In deze handleiding staan een aantal tips om eenvoudige storingen zelf te verhelpen. Mocht u niet in staat zijn de storing te verhelpen,dan kunt u gebruik maken van de fabrieksservice van Merloni Huishoudapparaten b.v. Merloni huishoudapparaten b.v.heeft Nederland opgedeeld in verschillende service regio's.Elke regio is postcodegebonden. Binnen elke regio is een Merloni Service Partner verantwoordelijk voor de fabrieksservice.
Guía rápida para el lavavajilla L AVAVAJILLA Este manual le cuenta, de manera agradable, todo lo que puede ofrecerle su nuevo electrodoméstico. Además, descubrirá curiosidades y pequeños detalles para lavar mejor con su lavavajilla y hacerlo durar más tiempo. 1. Instalación y traslado (p. 62) La instalación, después de la entrega o de un traslado, es la operación más importante para el buen funcionamiento de su lavavajilla. Verifique siempre: 1. Que la instalación eléctrica esté dentro de las normas; 2.
L AVAVAJILLA Abramos juntos su lavavajilla ¿Cómo está compuesto? E Aprender a conocer las partes que componen el lavavajilla le ayudará a usarlo mejor E. Cesto superior F. Rociador superior G. Regulación de la altura del cesto H. Cesto inferior I. Rociador inferior J. Tapón recipiente de sal K. Filtro de lavado L. Recipiente para detergente y abrillantador G F H J K L Cuadro de mandos a tus órdenes S. A. Botón ON-OFF Pulse este botón para encender la máquina. B.
L AVAVAJILLA ¿Cómo se carga la vajilla? Antes de lavar, estos pequeños detalles pueden ayudarle a lavar mejor y a conservar durante más tiempo su lavavajilla. Quite los residuos más grandes de comida, ponga en remojo las ollas y las sartenes con residuos muy pegados. Después de haber cargado la vajilla controle que giren bien las palas del rociador. Antes que nada.
L AVAVAJILLA Poner en marcha el lavavajilla ¿Listos?, ¡ya! Ha cargado el lavavajilla y ahora debe seleccionar el programa de lavado. Basta un minuto para aprender Antes que nada. alcanzar la posición Reset, después de pocos segundos escuchará 4 sonidos y se apagará la luz testigo "G": significa que todas las selecciones fueron anuladas. Ahora puede volver a seleccionar el programa adecuado. Elija el programa.
L AVAVAJILLA Detergente y abrillantador Use solamente detergente específico para lavavajilla. Vierta el detergente en el distribuidor que se encuentra en la parte interna de la puerta. ¡Hágalo antes de que comience el ciclo de lavado! El detergente Carga del detergente Para abrir la tapa A, pulse el botón B. El detergente se introduce en las dos cubetas C y D hasta el borde. Ahora puede cerrar la tapa: presione hasta que sienta el disparo del cierre.
L AVAVAJILLA Elija el programa adecuado Cada tipo de suciedad tiene su programa Sal, abrillantador, la justa dosis de detergente y el programa adecuado: he aquí la fórmula para obtener los mejores resultados y conservar bien su lavavajilla 3URJUDPD ,QGLFDFLRQHV SDUD OD VHOHFFLyQ GH SURJUDPDV 'HVFULSFLyQ GHO FLFOR Elija el programa adecuado para su vajilla.
L AVAVAJILLA Nunca sin sal Agua de su casa La dureza del agua varía según las localidades. Si el agua de su casa es dura, sin decalcificación se formarían incrustaciones en la vajilla. Su lavavajilla posee un decalcificador que utiliza sal especial y elimina la caliza del agua. Carga de la sal. Utilice siempre sal específica para lavavajilla. El depósito de sal está debajo del cesto inferior, llénelo de la siguiente manera: 1. Extraiga el cesto inferior, desenrosque y quite la tapa del depósito 2.
L AVAVAJILLA Instalación y traslado Llegó su lavavajilla Apenas adquirido o trasladado a otra casa, una instalación bien hecha, le asegura el buen funcionamiento de su lavavajilla Elija el lugar donde va a colocar su lavavajilla, puede hacerlo adherir, con los costados o con la parte posterior, a los muebles adyacentes o a la pared. El lavavajilla posee tubos para la alimentación y la descarga del agua que se pueden orientar hacia la derecha o hacia la izquierda para permitir una buena instalación.
Problemas y soluciones Si tiene un problema, lea aquí L AVAVAJILLA Puede suceder que el lavavajilla no funcione o funcione mal. En muchos casos, se trata de problemas que Ud. puede resolver sin tener que llamar al técnico. Antes de llamar a la asistencia, lea siempre estos puntos.
L AVAVAJILLA Cuidados y manteimiento Limpieza y cuidados especiales El grupo filtrante Si desea obtener siempre buenos resultados de lavado, es necesario limpiar el grupo filtrante. Se eliminan los residuos de comida del agua de lavado y se vuelve a poner en circulación perfectamente filtrada. Por ello, después de cada lavado, es mejor eliminar los residuos más grandes que encuentre retenidos en el cartucho C y en el filtro semicircular A; para extraerlos tire del mango del cartucho hacia arriba.
L AVAVAJILLA Ariston sigue a su lado después de la compra Gracias por habernos elegido. Déjenos seguir cercanos a usted y a su electrodoméstico. Regístrese ahora mismo Envíe por correo la hoja de garantía que encontrará en la documentación de su electrodoméstico. Adhiérase rápido a nuestros servicios De cliente especial a cliente privilegiado. Benefíciese de todas las ofertas e informaciones que en los años venideros vamos a crear para usted. Permanezcamos en contacto.
M ÁQUINA DE LAVAR LOUÇA Guia rápida para a máquina de lavar louça Este manual explica de maneira agradável tudo que lhe pode ser proporcionado por este novo electrodoméstico. Além disso, descobrirá nele curiosidades e pequenos truques para lavar melhor com esta máquina de lavar louça e fazê-la durar mais. 1. Instalação e mudança (p. 73) A instalação, depois da entrega ou depois de uma mudança, é a operação mais importante para o bom funcionamento da máquina de lavar louça. Verifique sempre: 1.
M ÁQUINA DE LAVAR LOUÇA Vamos juntos abrir a máquina de lavar louça Como é feita? E Conheça as partes que constituem a máquina de lavar louça para usá-la melhor. E. Cesto superior F. Distribuidor superior G. Regulação da altura do cesto H. Cesto inferior I. Distribuidor inferior J. Tampinha do recipiente de sal K. Filtro de lavagem L. Recipiente para detergente e para aditivo para brilho G F H J Quadro de comandos às suas ordens A. Botão ON-OFF Carregue neste botão para colocar a máquina sob tensão.
M ÁQUINA DE LAVAR LOUÇA Como se carrega a louça e as panelas? Antes da lavagem, pequenas acções podem ajudar a lavar melhor e a preservar mais tempo a máquina de lavar louça. Tire os restos maiores de comida, coloque em banho as panelas e frigideiras que tiverem restos grudados. Depois de ter carregado a máquina, controle se as pás do distribuidor rodam bem. Antes de mais nada.
M ÁQUINA DE LAVAR LOUÇA Ligar amáquina de lavar louça Pronto, vamos! A máquina de lavar louça foi carregada e agora é necessário regular o programa de lavagem. Basta um minuto para aprender Antes de mais nada. Abra inteiramente a torneira d'água e carregue no botão ON-OFF "A": ouvirá um breve sinal acústico e o indicador luminoso "B" acende-se. Agora a máquina estará ligada e será possível programá-la. Selecção do programa.
M ÁQUINA DE LAVAR LOUÇA Detergente e aditivo para brilho Use somente detergente específico para máquina de lavar louça. Deite o detergente no recipiente que se encontra no interior da porta. Antes de começar o ciclo de lavagem! O detergente Carregamento do detergente Para abrir a tampa A, carregue no botão B. O detergente deve ser deitado nos dois recipientes C e D até a beira. Em seguida é possível fechar a tampa: aperte até encaixar-se.
M ÁQUINA DE LAVAR LOUÇA Escolha o programa adequado Cada grau de sujidade tem um próprio programa Sal, aditivo para brilho, a dose adequada de detergente e o adequado programa: é esta a fórmula para obter resultados melhores e preservar bem a máquina de lavar louça. 3URJUDPD ,QGLFDo}HV SDUD HVFROKD GH SURJUDPDV Escolha o programa apropriado para cada lavagem.
M ÁQUINA DE LAVAR LOUÇA Nunca sem sal A água de sua casa A dureza da água varia segundo os locais. Se a água de sua casa for dura, se não a descalcificar, formar-se-ão crostas nas peças lavadas. Esta máquina de lavar louça tem um dispositivo para descalcificar, que utiliza sal especial e elimina o calcário da água. Carregamento do sal. Utilize sempre sal específico para máquina de lavar louça. O recipiente do sal encontra-se embaixo do cesto inferior, enchao da seguinte maneira: 1.
Instalação e mudança M ÁQUINA DE LAVAR LOUÇA Chegou a sua nova máquina de lavar louça Assim que comprá-la ou para mudá-la para outra moradia, uma instalação bem feita assegura um bom funcionamento da máquina de lavar louça. Escolha onde deseja colocar a máquina de lavar louça, é possível prende-la dos lados ou atrás nos móveis vizinhos ou na parede.
M ÁQUINA DE LAVAR LOUÇA Problemas e soluções Se houver um problema, leia aqui Pode acontecer que a máquina de lavar louça non funcione ou funcione mal. Em muitos casos tratam-se de problemas fáceis de resolver sem precisar chamar um técnico. Antes de telefonar para a assistência técnica, controle sempre estes pontos.
Cuidados e manutenção M ÁQUINA DE LAVAR LOUÇA Limpeza e manutenção das peças O conjunto de filtros Se desejar sempre bons resultados na lavagem, precisa limpar o grupo de filtração. A água de lavagem é limpa tirando os resíduos de comida e colocada novamente em circulação perfeitamente filtrada. Por isto, depois de cada lavagem, é melhor tirar os resíduos mais grandes que ficarem no copo C e do filtro semi circular A; para tirá-los, puxe a pega do copo para cima.
M ÁQUINA DE LAVAR LOUÇA Ariston está sempre próxima de si Estamos gratos por nos ter escolhido . Queremos permanecer sempre próximo de si e do seu electrodoméstico. Adira à Garantia Total Ariston Por 5900$oo, garanta o seu Electrodoméstico por 5 anos.
Xerox Business Services - DocuTech Viale Aristide Merloni 47 - 60044 Fabriano (Italy) Tel +39 0732 6611 Fax +39 0732 662501 www.merloni.com 07/2002 - 195034980.