
User Manual


GB
16
! The position of the corresponding gas burner or
electric hotplate* is shown on every knob.
Gas burners
Each burner can be adjusted to one of the following
settings using the corresponding control knob:
• Off
Maximum
Minimum
To turn on one of the burners, place a lighted match
or lighter near the burner, press the knob all the way
in and turn it anti-clockwise to the "High" setting.
The knob must be pressed in for about 6 seconds
until the device that keeps the flame lit warms up.
Some models are equipped with an ignition button
incorporated into the control knob. If this is the case,
the ignitor is present. To light a burner, simply press
the corresponding knob all the way in and then turn
it anti-clockwise to the "High" setting, keeping it
pressed in until the burner lights.
! If a flame is accidentally extinguished, turn off the
control knob and wait for at least 1 minute before
trying to relight it.
To switch off the burner, turn the knob in a clockwise
direction until it stops (when reaches the “•” position).
Start-up and use
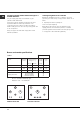
Practical advice on using the burners
To ensure the burners operate efficiently:
• Use appropriate cookware for each burner (see
table) so that the flames do not extend beyond
the bottom of the cookware.
• Always use cookware with a flat base and a cover.
• When the contents of the pan reach boiling point,
turn the knob to minimum.
Burner
Fast (R)
Semi Fast (S)
Auxiliary (A)
Ø Cookware Diameter (cm)
24 - 26
16 - 20
10 - 14
To identify the type of burner, refer to the designs in
the section entitled, "Burner and Nozzle
Specifications".
Electrical
connections
DATA PLATE
see data plate
This appliance conforms to the following
European Economic Community directives:
- 2006/95/EEC dated 12/12/06 (Low
Voltage) and subsequent amendments
- 2004/108/EEC dated 15/12/04
(Electromagnetic Compatibility) and
subsequent amendments
- 93/68/EEC dated 22/07/93 and
subsequent amendments.
- 2009/142/EEC dated 30/11/09 (Gas) and
subsequent amendments.
- 2002/96/EC and subsequent
amendments.