
Operation Manual


7
GB
Maintenance and Care
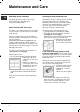
Water container
Heat pump
filter unit cover
Clips
Filter
Heat pump
filter unit
Cleaning the dryer
●
External parts in metal or plastic and rubber parts
can be cleaned with a damp cloth.
●
Periodically (every 6 months) vacuum the front air
intake grille and vents at the rear of the dryer, to
remove any build up of fluff, lint or dust. Also to
remove accumulation of fluff from the front of the
heat pump and filter areas, clean occasionally with
a vacuum cleaner.
! Do not use solvents or abrasives.
! Have your dryer checked regularly by authorised
technicians to ensure electrical and mechanical safety
(see Service).
Quick Tips
●
Remember to clean the door filter and
heat pump filter after each load.
●
Remember to empty the water container
after each load.
! Doing BOTH the above will keep your
appliance working at its BEST.
Empty the water container after each
cycle
Pull the container out of the dryer
and remove either the small or
large cap and empty it into a
sink or other suitable drain.
Refit the cap and replace the
container securely.
! Always check and empty the container before you
start a new drying programme.
! Failure to empty the water container may cause
the following:
- The dryer will stop heating (so the load may still
be damp at the end of the drying cycle).
●
Priming the water collection system
When your dryer is new, the water container will not
collect water until the system is primed.
This will take 1 or 2 drying cycles. Once primed it will
collect water during every drying cycle.
Check the drum after each cycle
Turn the drum manually in order to remove small items
(handkerchiefs) that could have been left behind.
Cleaning the drum
! Do not use abrasives, steel wool or stainless steel
cleaning agents to clean the drum.
A coloured film may start to appear on the stainless
steel drum, this may be caused by a combination of
water and, or cleaning agents such as fabric conditioner
from the wash. This coloured film will not affect the
dryer performance.