Instructions for installation and use ! EN English,1 WASHER DRYER EN This symbol reminds you to read this instruction manual.
Installation EN ! This instruction manual should be kept in a safe place for future reference. If the washer dryer is sold, given away or moved, please ensure the manual is kept with the machine, so that the new owner may benefit from the advice contained within it. ! Read these instructions carefully: they contain vital information relating to the safe installation and operation of the appliance.
Connecting the drain hose 65 - 100 cm Where it connects to the waste water pipe cut end off spigot or remove the blanking cap • the supply voltage is included within the values i ndicated on the Technical details table (see page 5); Connect the drain hose, without bending it, to a draining duct or a wall drain situated between 65 and 100 cm from the floor; The drain hose may be connected to an under-sink trap.
EN As the colours of the wires in the lead may not correspond with the coloured markings identifyng the terminals in your plug, proceed as follows: Connect Green & Yellow wire to terminal marked E or or coloured Green or Green & Yellow. Connect Brown wire to terminal marked L or coloured Red. Connect Blue wire to terminal marked N or coloured Black. If a 13 amp plug (BS 1363) is used it must be fitted with a 13 amp fuse, either in the plug or adaptor or at the distribution board.
EN Technical data Model AQM8F 49 U Dimensions width 59.5 cm height 85 cm depth 64.5 cm Capacity from 1 to 8 kg for the wash programme from 1 to 6 kg for the drying programme Electrical connections please refer to the technical data plate fixed to the machine Water connections maximum pressure 1 MPa (10 bar) minimum pressure 0.05 MPa (0.5 bar) drum capacity 62 litres Spin speed up to 1400 rotations per minute Energy rated Wash: programme ; temperature 60°C; using a load of 8 kg.
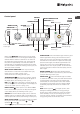
Description of the machine EN CONTROL PANEL PORTHOLE DOOR PORTHOLE DOOR HANDLE KICK STRIP ADJUSTABLE FEET PORTHOLE DOOR Always use the handle to open the porthole door (see figure). DETERGENT DISPENSER DRAWER The detergent dispenser drawer is located inside the machine and can be accessed by opening the door. For more information on detergent measures, please refer to the chapter entitled “Detergents and laundry”. 6 1 2 1. pre-wash compartment: use powder detergent. 2.
Control panel DRYING display TEMPERATURE EN DELAY TIMER/CYCLE DURATION display ECO display WASH CYCLE SELECTOR knob Button with ON/OFF indicator light OPTION OPTION buttons with indicator lights TEMPERATURE indicator light buttons with indicator lights DELAY TIMER button DRY button WASH CYCLE PHASE icons START/PAUSE button with indicator light CHILD LOCK DOOR LOCKED button with indicator light indicator light button Button with ON/OFF indicator light: press this briefly to switch th
Running a wash cycle EN WARNING: before you use the washer dryer for the first time, run a wash cycle with detergent and no laundry, using the 90° cottons cycle without pre-wash. 1. SWITCH THE MACHINE ON. Press the button. All the indicator lights will illuminate for 1 second; the indicator light corresponding to the button will then remain lit in a fixed manner and the START/PAUSE indicator light will flash slowly. 2. LOAD THE LAUNDRY. Open the porthole door.
7. START THE PROGRAMME. Press the START/PAUSE button. The corresponding indicator light remains lit in a fixed manner and the porthole door locks (the DOOR LOCKED indicator light illuminates). The icons corresponding to the wash cycle phases will light up during the cycle to indicate which phase is currently in progress. To change a wash cycle once it has already started, pause the washer dryer by pressing the START/ PAUSE button; then select the desired cycle and press the START/PAUSE button again.
Wash cycles and options EN Table of wash cycles Detergent and additives Max. Max. Max. temp. Cycle speed Drying Fabric load duration (°C) Prewash Wash (rpm) softener (kg) Icon Description of the wash cycle 90° 1400 60° 1400 (Max. 90°C) 40° 1400 Cotton (1): heavily soiled whites and resistant colours. Cotton (2): heavily soiled whites and delicate colours.
Detergents and laundry Detergent The type and quantity of detergent required depend on the type of fabric you are washing (cotton, wool, silk, etc.), as well as its colour, the washing temperature, the level of soiling and the hardness of the water in the area. Measuring out the detergent carefully will avoid wastage and help to protect the environment: although they are biodegradable, detergents still contain ingredients which alter the balance of nature.
Precautions and tips EN ! The machine was designed and constructed in accordance with international safety regulations. The following information is provided for safety reasons and must therefore be read carefully. • Do not use the appliance to dry foam rubber or similar elastomers. • Make sure that the water tap is turned on during the drying cycles. General safety Disposal • This appliance was designed for domestic use only.
Care and maintenance Cutting off the water and electricity supplies • Turn off the water tap after every wash cycle. This will limit wear on the hydraulic system in the machine and help to prevent leaks. • Unplug the appliance when cleaning it and during all maintenance work. Cleaning the machine The outer parts and rubber components of the appliance can be cleaned using a soft cloth soaked in lukewarm soapy water. Do not use solvents or abrasives.
Trouble shooting EN Your washer dryer could occasionally fail to work. Before contacting the Technical Assistance Centre (see “Assistance”), make sure that the problem cannot be not solved easily using the following list. Problem: Possible causes / Solutions: The machine does not switch on. • The appliance is not plugged into the socket fully, or not enough to make contact. • There is no power to the socket, or the fuse has blown in the mains plug. The wash cycle does not start.
The machine wont spin properly. • Out of Balance detected when attempting to go into a spin cycle - If this happens the machine will continue to try to repeat the distribution of the load required before the machine will go into higher spin speeds - This will increase the programme time accordingly. This is a safety feature to prevent damage. Out of Balance can be caused by washing a single heavy item (eg duvet, quilt, etc). - Try the programme again using a different load.
Assistance Guarantee EN 12 Months Parts and Labour Guarantee Your appliance has the benefit of our manufacturer’s guarantee, which covers the cost of breakdown repairs for twelve months from the date of purchase. This gives you the reassurance that if, within that time, your appliance is proven to be defective because of either workmanship or materials, we will, at our discretion, either repair or replace the appliance at no cost to you.
After Sales Service EN No one is better placed to care for your Hotpoint appliance during the course of its working life than us - the manufacturer. Essential Contact Information Hotpoint Service We are the largest service team in Europe offering you access to 400 skilled telephone advisors and 1000 fully qualified engineers on call to ensure you receive fast, reliable, local service. UK: 08448 224 224 Republic of Ireland: 0818 313 413 www.hotpointservice.co.
EN 18
EN 19
195075248.