Instruction booklet DISHWASHER EN English, 1 Contents Installation, 2-5 Positioning and levelling Technical data Electrical connection Connecting the water supply Description of the appliance, 6 Overall view Control panel Loading the racks, 7 Lower rack Cutlery basket Upper rack Start-up and use, BFI 670 8 Starting the dishwasher Loading the detergent Washing options Wash cycles, 9 Wash cycle table Rinse aid and refined salt, 10 Loading the rinse aid Loading the refined salt Care and maintenan
Installation EN Keep this instruction manual in a safe place for future reference. If the appliance is sold, given away or moved, please ensure the manual is kept with the machine, so that the new owner may benefit from the advice contained within it. Please read this instruction manual carefully: it contains important information regarding the safe installation, use and maintenance of the appliance.
The dishwasher meets the requirements set out by the regulations in force concerning safety and electrical equipment. Any technical checks should be conducted exclusively by a trained and authorised technician: Repairs carried out by unaithorised persons will invalidate the guarantee, as well as posing a potential hazard to the user.
EN Connecting the water supplies Connection to the water and electricity supplies should only be performed by a qualified technician. Ensure that the new hose supplied is connected and the old hose is disposed of safely. The dishwasher should not stand on top of the water hoses or the electricity supply cable. Ensure the fill hose is only fitted to the cold water supply. DO NOT overtighten the hose connector, hand tight is sufficient.
Sink Waste System Anti-flooding protection* For under sink drainage: To ensure floods do not occur, the dishwasher: • before connecting the drain hose, remove any internal restrictions; this will prevent a build up of debris which could cause a blockage • remove any restrictions from the waste spigot and ensure that the sealing bung is removed • the hose should be routed, such that it is raised to a minimum height of 800mm (31/2”).
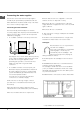
Description of the appliance EN Overall view 1 3 2 4 1. 2. 3. 4. 5. 6. 7. 8. 9. 10. 11.
Loading the racks Before loading the rack, remove all food residue from the crockery, leave saucepans and frying pans with burnt-on residue to soak in water only and empty all remaining liquid from cups and glasses. After loading the appliance, check that the sprayer arms can rotate freely. If the rack is equipped with the click clack handles* (see figure), pull them upwards or downwards to adjust the height.
Start-up and use EN Starting the dishwasher 1. Turn the water tap on. 2. Open the door and press the ON/OFF button: the indicator light will illuminate. 3. Measure out the detergent (see below). 4. Load the racks (see Loading the racks). 5. Select the programme by pressing the WASH CYCLE SELECT button; the corresponding indicator light will illuminate. 6. Select the wash options (see below). 7. Start the wash cycle by shutting the door: the machine will emit a confirmation beep. 8.
Wash cycles Wash cycle table EN Ariston dishwashers are fitted with an automatic filter cleaning system that may increase the cycle duration. AUTO WASH CYCLES: This model of dishwasher is equipped with a special sensor which can be used to assess the level of soiling and automatically select the most efficient and economic wash cycle accordingly. The duration of the auto wash cycles may vary due to the operation of the sensor.
Rinse aid and refined salt EN Only use products that have been specifically designed for dishwashers. Do not use table salt or industrial salt. If using a multi-functional product (2-in-1, 3-in-1, 4-in-1, etc.) it is not necessary to add rinse aid; however, we recommend that you add salt, especially if you live in an area where the water is hard or very hard. If you do not add salt or rinse aid, the LOW SALT* and LOW RINSE AID* indicator lights will flash continuously.
Care and maintenance Shutting off the water and electricity supplies • Turn off the water tap after every wash cycle to avoid leaks. Cleaning the filters EN The filters remove food residue from the water used in the wash cycle: to obtain the best results from each wash, they should be cleaned. • Remove the plug from the socket when cleaning the machine and when carrying out maintenance work. Clean the filters regularly.
Precautions and advice EN The appliance was designed and manufactured in compliance with current international safety standards. The following information has been provided for safety reasons and should therefore be read carefully. General safety • The appliance was designed for domestic use inside the home and is not intended for commercial or industrial use. • The appliance must be used by adults only, to wash domestic crockery according to the instructions in this manual.
Phosphate-free and chlorine-free detergents containing enzymes EN • We strongly recommend that you use detergents that do not contain phosphates or chlorine, as these products are harmful to the environment. • Enzymes provide a particularly effective action at temperatures around 50°C, and as a result detergents containing enzymes can be used in conjunction with low-temperature wash cycles in order to achieve the same results as a normal 65°C wash cycle.
Troubleshooting EN Whenever the appliance fails to work, check for a solution from the following list before calling for Assistance (see Assistance). Malfunction: The dishwasher does not start. No water enters the dishwasher. No water drains out from the dishwasher. The dishwasher makes excessive noise. The dishes and glasses are covered in a white film or limescale deposits. The dishes and glasses are streaked or have a bluish tinge. The crockery has not been dried properly. The dishes are not clean.
INFORMATION FOR TEST LABS Load for 12 Standard Settings tests (upper rack at top position) 1 lower basket 12 8 Lower basket C Upper basket Type Item Diameter Volum (approximately) Type A B soupe plate 23 cm. dinner plate 26 cm. dessert plate oval platter 19 cm. g 32 cm. h k B A Item Diameter/Volum (approximately) e cup 0,20 l. f serving bowl glass 19 cm. 1 1 C D C 1 C D 9 A EN 250 ml. saucer 14 cm. serving bowl serving bowl 13 cm.
After Sales Service EN After Sales Service Appliance Registration No one is better placed to care for your Hotpoint appliance during the course of its working life than us - the manufacturer. We want to give you additional benefits of Hotpoint ownership. To activate your free 5 year parts guarantee you must register your appliance with us.
Guarantee 12 Months Parts and Labour Guarantee Your appliance has the benefit of our manufacturer’s guarantee, which covers the cost of breakdown repairs for twelve months from the date of purchase. This gives you the reassurance that if, within that time, your appliance is proven to be defective because of either workmanship or materials, we will, at our discretion, either repair or replace the appliance at no cost to you. 5 Year Parts Guarantee Hotpoint also offers you a free 5 year parts guarantee.
Notes EN 18
Notes EN 19
195058373.00 06/2006- Xerox Business Services EN Retention of this Instruction Book This Instruction Book must be kept handy for reference as it contains important details on the safe and proper use of the appliance. If you sell or pass the appliance to someone else, or move house and leave it behind, make sure this Book is also provided so the new owner can become familiar with the appliance and safety warnings. If the Book is lost or damaged a copy may be obtained from: Indesit Company UK Ltd.