kitchen think Instructions for Installation and Use Electric Oven Model BS43 Model BS53 To the Installer Before installation fill in the product details on the back cover this book. The information can be found on the rating plate. To the User You must read the instructions prior to installing and using the appliance and then retain them for future reference.
CONTENTS Introduction For Your Safety Know your Oven The Controls Electronic Programmer Cooking Advice Cooking Chart Care and Cleaning Installation Electrical Connection After Sales Service Hotpoint Guarantee Key Contacts 4 5 6 6 7 8 9 10 11 12 14 15 Back Cover Retention of this Instruction Book This Instruction Book must be kept handy for reference as it contains important details on the safe and proper use of the appliance.
Introduction Your new electric oven is guaranteed* and will give lasting service. This guarantee is only applicable if the appliance has been installed in accordance with the installation instructions detailed in this booklet. To help make best use of your cooking equipment, please read this booklet carefully. The oven is designed specifically for domestic use and responsibility will not be accepted for use in any other installation.
For Your Safety When used properly your appliance is completely safe but as with any electrical product there are certain precautions that must be observed. PLEASE READ THE BELOW PRECAUTIONS BEFORE USING YOUR APPLIANCE. To maintain the efficiency and safety of this appliance, we recommend you do the following: - only call the Service Centres authorised by the manufacturer. - always use genuine spare parts.
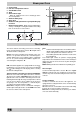
Know your Oven A. B. C. D. E. F. G. H. I. Control Panel Function / Temperature selector Variable Grill control Timer Oven indicator light - When lit, it indicates the oven is heating up to the chosen temperature. Grill Pan / Baking Tray Oven Shelf Guides for sliding the shelves or grill pan/baking tray in and out Electronic programmer - Allows you to programme the oven by selecting the cooking time and the end cooking time. It can also be used as a timer.
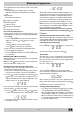
Electronic Programmer ? The programmer makes it possible to preset the oven and the grill in terms of: • delay start with a preset length of time for cooking; • immediate start with a preset length of time for cooking; • timer. Button functions: When “auto” is lighted, it indicates that the length and end cooking time have been preset to operate in automatic mode. At this point, the oven will turn on automatically at 12:30 in order to finish the cooking session within 30 minutes.
Cooking Advice When Using the Grill Use the “Grill” mode, place the food in the centre of the grill pan, situated on the 3rd or 4th shelf from the bottom. When cooking in the oven, use only one baking tray or shelf at a time. Select an upper or lower shelf position based on whether the dish needs more or less heat from the top.
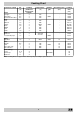
Cooking Chart Food to be cooked Wt. (wt) Cooking position of shelves from bottom 3 3 3 Temperature (°C) Variable grill Pasta Lasagne 2.5 210 Cannelloni 2.5 210 MAX Oven-baked noodles 2.5 210 Meat Veal 1.7 3 230 Chicken 1.5 3 220 Turkey 3.0 3 MAX MAX Duck 1.8 3 230 Rabbit 2 3 230 Pork 2.1 3 230 Lamb 1.8 3 230 Fish Mackerel 1.1 3 210-230 210-230 1.0 33 Trout baked in paper Dentex 1.5 210-230 MAX Trout baked in paper 1.0 3 210-230 Pizza Napolitan 1.0 3 MAX MAX Cake Biscuits 0.5 3 180 Tarts 1.
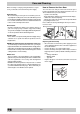
Care and Cleaning How to Remove the Oven Door Before cleaning or carrying out any maintenace on your oven, you must disconnect it from the power supply. Inside the oven We recommend you clean your oven each time you use it, especially after cooking roasts. In fact, it is advisable to prevent food residue from building up during cooking: the residue would be re-cooked each time the oven is used and would char and release smoke and unpleasant odours.
Installation The appliance must be installed only by a qualified person in compliance with the instructions provided. The manufacturer declines all responsibility for improper installation which may harm persons and animals and damage property. Important: The power supply to the appliance must be cut off before any adjustments or maintenance work is done on it. The panels of the adjacent cabinets must be made of heatresistant material.
Electrical Connection Using the appliance without correct earthing is highly dangerous. Electrical connection The electrical connection to the mains must be made on the appliance. The power voltage and frequency are as indicated on the rating plate. WARNING: THIS APPLIANCE MUST BE EARTHED. IMPORTANT: After connecting the appliance to the flexible cable, tighten all the screws on the terminal board.
Notes 13
After Sales Service "No company is better positioned to offer an after sales service on a Hotpoint appliance than us - the manufacturer" As part of our commitment to you, all Hotpoint appliances have the added benefit of a fully inclusive parts and labour guarantee for the first 12 months. In addition to this you also have the advantage of free replacement parts for the first 5 years when fitted by a Hotpoint engineer.
Guarantee "Satisfaction guaranteed or your money back" We give you a unique 'satisfaction guaranteed' promise - valid for 90 days - after you have purchased your Hotpoint appliance. If there is a technical problem simply call Hotpoint Repair service or visit our web-site at www.theservicecentre.co.uk and where necessary, we will arrange for an engineer to call. If the technical problem is not resolved under this guarantee, we will replace your machine or, if you prefer, give you your money back.
Key Contacts After Sales Service Over 1200 trained specialists, directly employed by us, ensure that you can have complete confidence in both the appliances and services we offer. Repair Service and Information Desk UK: 08709 066 066 (Open 8 to 8 Mon - Fri, 8 to 6 Sat, 10 to 4 Sun & Bank Holidays) www.theservicecentre.co.