Instructions for Installation and Use Slot-in gas cooker C150 X153 L153 To the Installer: Before installation, fill in the product details on the back cover of this book. The information can be found on the rating plate. To the User: You must read the instructions prior to installing and using the appliance and then retain them for future reference.
Contents Introduction 3 For Your Safety 4 Hotplate 6 Grill 7 Oven 9 Oven Cooking Charts 11 The “Slow Cook” Setting 13 Care and Cleaning / Battery Replacement 14 Something Wrong with your cooker? 16 Installation Instructions 17 Guarantee Information 23 Key Contacts Back Cover The cooker must be installed in accordance with the regulations in force and only used in a well ventilated space.
Introduction To help you make the best use of your cooker, PLEASE READ THIS BOOKLET CAREFULLY. Your new cooker is guaranteed and will give lasting service. The guarantee is only applicable if the cooker has been installed in accordance with the installation instructions. The cooker is designed specifically for domestic use and responsibility will not be accepted for use in any other installation. Alkaline AA When first using the cooker ensure that the room is well ventilated (eg.
For Your Safety PLEASE READ THE PRECAUTIONS BELOW BEFORE USING YOUR COOKER. Always ● Always make sure you understand the controls before using the cooker. ● Always check all controls on the cooker are turned off after use. ● Always stand back when opening the oven door to allow heat to disperse. ● Always use dry good quality oven gloves when removing items from the ovens. ● Always keep the oven and grill doors closed when the cooker is not in use.
For Your Safety Never ● Never leave children unsupervised where the cooker is installed as all surfaces will be hot during and after its use. ● Never allow anyone to sit or stand on any part of the cooker. ● Never store items that children may attempt to reach above the cooker. ● Never heat up unopened food containers as pressure can build up causing the container to burst.
Hotplate The hotplate has one large high speed burner, two normal simmering burners and one small simmering burner which will accommodate pans between 100mm (4”) and 200mm (8”) diameter. All pans should be positioned centrally over the burners. The pan supports should be fitted on the hotplate such that the indents along one side of each pan support are inner-most. Those models fitted with a hotplate lid have a safety device which cuts off the gas supply to the hotplate unless the lid is fully open.
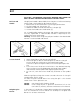
Grill CAUTION – ACCESSIBLE PARTS MAY BECOME HOT WHEN THE GRILL IS USED. YOUNG CHILDREN SHOULD BE KEPT AWAY. Grill Pan and Handle The grill pan handle is detachable from the pan to facilitate cleaning and storage. The handle can be fixed as follows : 1. Remove the screw and washer from the grill pan bracket. 2. Tilt the handle over the recess. (A) 3. Slide the handle towards the centre of the pan. (B) 4. Locate the handle over the bracket.
Grill Grilling can be started from cold but for best results preheat for approximately two minutes. Most cooking is done with the heat on full, but it may be necessary after sealing the food to reduce the heat as required. For au gratin dishes eg. Macaroni Cheese and meringue toppings eg. Baked Alaska, place the dish on the floor of the grill compartment. The base of the grill pan can be used for warming fruit garnishes on the reduced setting.
Oven The oven is fitted with a safety device that will cut off the gas supply to the burner if the flame is extinguished for any reason. Each time that the oven is used the safety device has to be activated by pushing and holding in the control knob for 3 seconds after the gas has lit. The oven has different heat zones – the thermostat settings refer to the temperature on the middle shelf; above this shelf it is hotter and below it is cooler. Two shelves enable full use of the temperatures inside the oven.
Oven Cold Start Cooking Anything requiring long slow cooking such as casseroles and rich fruit cakes can be put into a cold oven. Satisfactory results can also be obtained with creamed mixture, rich pastries or yeast mixtures, but for perfection we recommend preheating the oven for about 15 minutes. Roasting of Large Poultry The maximum weight of poultry that can be accommodated is 8 kg (18 lbs) of suitable shape.
Oven Cooking Chart The following times and setting are for guidance only. You may wish to alter the setting to give a result more to your satisfaction. When a different setting to that shown below is given in a recipe, the recipe instructions should be followed. Allow 15 minutes preheat for best results. Always turn the thermostat knob to Mark 9 before selecting the appropriate Gas Mark. Shelf position 1 is the highest. Gas Mark Shelf Position 3 or 4 4 25-60 mins.
Oven Cooking Chart Gas Mark Shelf Positions 5 1 and 3 17 - 25 mins. 5 2 18 - 22 mins. Victoria sandwich (2 x 180mm / 7”) 4 1 and 3 20 - 30 mins Swiss Roll (3 egg quantity) 5 2 20 - 25 mins. Christmas cake (1 x 205mm / 8”) 2 3 Time depending on recipe Madeira cake (1 x 180mm / 7”) 4 4 11/4 - 11/2 hrs. Rich Fruit cake (1 x 180mm / 7”) 2 4 Time depending on recipe Scones - 16 per tray 7 1 and 3 10 - 20 mins. Shortbread (1 x 180mm / 7”) 2 3 55 - 65 mins.
The ‘Slow Cook’ Setting The ‘Slow Cook’ setting on the oven thermostat is used for slow cooking, keeping food warm and warming plates for short periods. Using the ‘Slow Cook’ Setting for Slow Cooking 1. All dishes cooked by the ‘Slow Cook’ setting should be cooked for a minimum 6 hours. They will ‘hold’ at this setting for a further hour but marked deterioration in appearance will be noticed in some cases. 2. Joints of meat and poultry should be cooked at Mk.
Care and Cleaning Clean the cooker regularly and wipe up spills soon after they occur to prevent them from becoming burnt on. Never use biological washing powder, caustic cleaners, harsh abrasives, scouring pads, aerosol cleaners or oven chemical cleaners of any kind. To move the cooker forward, open the grill door and with both hands positioned under the roof of the compartment, lift and pull forward. Replace by pushing the cooker backwards. Check that the cooker is level.
Care and Cleaning COOKER FINISH CLEANING METHOD Vitreous Enamel Cloth wrung out in warm soapy water. Stubborn stains can be removed with a cream paste, liquid cleaner or by rubbing with fine steel wool soap pads. Check that the cleaning agent is approved by the Vitreous Enamel Development Council. Hotplate, Burner caps, Grill pan, Oven base and rear, Inside of grill compartment, Inside of doors, Control panel. Paint Plinth, Fascia bottom trim, Side panels, Door fronts (C150).
Something Wrong With Your Cooker Before calling a Service Engineer, please check through the following lists. THERE MAY BE NOTHING WRONG. Problem Slight odour or small amount of smoke when grill / oven used first time Oven cooks too fast or too slow This is normal and should cease after a short period. Ignition does not work.
Installation Instructions Prior to installation, ensure that the local distributions (nature of the gas and gas pressure) and the adjustment conditions are compatible. The adjustment conditions for this appliance are stated on the data badge which is fitted below the oven door on the plinth panel. This appliance is not designed to be connected to a combustion products evacuation device. It must be installed and connected in accordance with current installation regulations.
Installation Instructions Technical Data Dimension Height Width Depth 900mm 500mm 600mm (excluding door handles) General Gas connection Pressure test point Gas rate adjustment Aeration adjustment Battery Rp 1/2 (1/2” BSP female) Grill injector None None 1.5V Alkaline AA Natural Gas BURNER HEAT INPUT INJECTOR HEAT INPUT INJECTOR HOTPLATE Front left 3.0 kW 128 2.8 kW (205g/h) 82 HOTPLATE 2.0 kW 102 1.8 kW (130g/h) 65 HOTPLATE Rear right 1.0 kW 72 1.
Installation Instructions The cooker can be close fitted below hotplate level. This requires a minimum distance of 503mm between cupboard units of hotplate height. When installing next to a tall cupboard, partition or wall, for a minimum distance of 400mm above hotplate level, allow a side clearance of at least 65mm. The diagram below illustrates the minimum clearance between the cooker and adjacent walls, cupboards etc.
Installation Instructions Unpacking the Cooker Unpack the components from inside the grill and oven. Check that the following parts are present: Grill pan and grid Pan supports (2) Enamelled discs (4) Literature Grill pan handle Oven shelves (2) Aluminium burner bodies (4) Battery 1.5V Levelling Four skid feet are fitted which can be adjusted up or down to level the cooker. Caution: Some soft floor coverings may get damaged if the cooker is not moved carefully.
Installation Instructions Operational Checks After installation, check for gas soundness. The supply pressure can be checked at the grill injector. Access to the injector is by first removing the baffle at the front of the grill fastened by two screws. Then remove the fastening screw on the right hand side of the burner and slide the burner off the injector. Ensure that the grill burner is correctly located under the fixing screw on reassembly. Fit the battery.
Guarantee 12 months Parts and Labour Guarantee Your appliance has the benefit of our manufacturer’s guarantee, which covers the cost of breakdown repairs for twelve months from the date of purchase. This gives you the reassurance that if, within that time, your appliance is proven to be defective because of either workmanship or materials, we will, at our discretion, either repair or replace the appliance at no cost to you.
After Sales Service No one is better placed to care for your Hotpoint appliance during the course of its working life than us - the manufacturer. Essential Contact Information Hotpoint Service We are the largest service team in the country offering you access to 400 skilled telephone advisors and 1100 fully qualified engineers on call to ensure you receive fast, reliable, local service. UK: 08709 066 066 Republic of Ireland: 0818 313 413 www.hotpointservice.co.