Operating Instructions OVEN Contents GB English,1 GB Installation, 2-3 Positioning Electrical connection Data plate Description of the appliance, 4 Overall view Control panel Start-up and use, 5-6 Modes, 7-10 Manual cooking modes Automatic cooking modes Programming cooking Practical cooking advice Cooking advice table Precautions and tips, 11 General safety Disposal Respecting and conserving the environment Care and maintenance, 12-13 Switching the appliance off Cleaning the appliance Cleaning the ov
Installation ! Please keep this instruction booklet in a safe place for future reference. If the appliance is sold, given away or moved, please make sure the booklet is also passed on to the new owners so that they may benefit from the advice contained within it. ! Please read this instruction manual carefully: it contains important information concerning the safe operation, installation and maintenance of the appliance.
Electrical connection Power cable supply connection to the electrical mains: The electrical connection to the mains must be made on the appliance. The power voltage and frequency are as indicated on the rating plate. ! THIS APPLIANCE MUST BE EARTHED. GB We recommend you use a power supply cable which is long enough to allow you to take the oven out of its recess in the event of maintenance operations (only use HAR - H 05 - RRF quality cables fitted with a plug conforming to the regulations in force.
Description of the appliance GB Overall view GUIDES for the sliding racks Control panel position 5 position 4 position 3 position 2 position 1 GRILL DRIPPING PAN Control panel TEMPERATURE display MANUAL COOKING MODE icons CONTROL PANEL POWER BUTTON TEMPERATURE icon DURATION icon TIME display TIME / TEMPERATURE ADJUSTMENT icons AUTOMATIC/ ECO COOKING MODE icons PREHEATING / RESIDUAL HEAT icons END OF COOKING icon CONTROL PANEL LOCK icon LIGHT icon START / STOP CLOCK icon MINUTE MINDER icon
Start-up and use ! The first time you use your appliance, heat the empty oven with its door closed at its maximum temperature for at least half an hour. Make sure that the room is well ventilated before switching the oven off and opening the oven door. The appliance may emit a slightly unpleasant odour caused by protective substances used during the manufacturing process burning away.
GB - set the duration of a cooking mode (see Cooking Modes); - press the button to stop cooking. In this case the appliance stores the temperature modified previously in its memory (manual modes only); - switch off the oven by pressing the button for 3 seconds. 7.
Modes ! In order to guarantee wonderfully soft and crunchy foodstuffs, the oven releases – in the form of water vapour - the humidity naturally withheld in the food itself. In this way, optimal cooking results can be achieved for all types of food. ! Every time the oven is switched on, it suggests the first manual cooking mode. Manual cooking modes ! All cooking modes have a default cooking temperature which may be adjusted manually to a value between 30°C and 250°C as desired.
GB indicates when the dish is cooked. You may start cooking whether the oven has been preheated or not not. The cooking duration can be customised according to personal tastes, modifying it by ±5/20 minutes depending on the selected programme. If the value is modified before cooking begins, it is stored in the appliance memory and suggested again when that cooking mode is next used.
Programming cooking To cancel programming press the button. ! A cooking mode must be selected before programming can take place. Practical cooking advice ! Once a cooking mode has been selected, the ! Do not place racks in position 1 and 5 during fanassisted cooking. This is because excessive direct heat can burn temperature sensitive foods. button is activated; it will then be possible to program a duration.
GB Cooking advice table Modes Foods Weight (in kg) Standard guide rails Manual Multilevel* 1+1 1 1 1 Grill* Rack position Preheating Sliding guide rails 1 and 3 2 and 4 1 and 3 2 and 4 1 and 3 2 and 4 1 and 3 1 and 2/3 1 2 1 1 or 2 1 2 1 and 3 and 5 1 and 2 and 4 1 and 3 and 5 1 and 2 and 4 1 and 3 2 and 4 1 and 3 1 and 3 yes yes yes yes yes yes yes yes yes yes yes Recommended Temperature (°C) Cooking duration (minutes) 220-230 180 170 200-210 190-200 180 190-200 190 190 210 200 20-25 30-35 2
Precautions and tips ! This appliance has been designed and manufactured in compliance with international safety standards. The following warnings are provided for safety reasons and must be read carefully. General safety • The appliance was designed for domestic use inside the home and is not intended for commercial or industrial use. • The appliance must not be installed outdoors, even in covered areas. It is extremely dangerous to leave the appliance exposed to rain and storms.
Care and maintenance GB Switching the appliance off Disconnect your appliance from the electricity supply before carrying out any work on it. F Cleaning the appliance • Slight differences in colour on the front of the oven are due to the different materials used, i.e. glass, plastic or metal. • Any shady areas resembling grooves on the oven door glass are caused by reflections from the oven light. • The enamel is branded at very high temperatures. This process may cause colour variations.
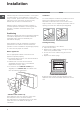
Left guide rail Right guide rail B C D of irec ex tio tra n ct io n D 2. Choose which shelf to use with the sliding rack. Paying attention to the direction in which the sliding rack is to be extracted, position joint B and then joint C on the frame. GB 3. Secure the two frames with the guide rails using the holes provided on the oven walls (see diagram). The holes for the left frame are situated at the top, while the holes for the right frame are at the bottom. 4.
Troubleshooting GB Problem Possible cause The “Clock button” and the digits on the display flash. The appliance has just been Set the clock. connected to the electricity mains or there has been a blackou There has been a blackout. Reprogram the cooking mode. Solution A programmed cooking mode does not start. Only the high luminosity The appliance is in standby mode Press any button to exit “Clock button” is lit. standby mode.
After Sales Service GB No one is better placed to care for your Hotpoint appliance during the course of its working life than us – the manufacturer. Essential Contact Information Hotpoint Service We are the largest service team in the country offering you access to 400 skilled telephone advisors and 1000 fully qualified engineers on call to ensure you receive fast, reliable, local service. UK: 08448 224 224 Republic of Ireland: 0818 313 413 www.hotpointservice.co.
09/2011 - 195087020.01 XEROX FABRIANO Guarantee GB 12 months Parts and Labour Guarantee Your appliance has the benefit of our manufacturer’s guarantee, which covers the cost of breakdown repairs for twelve months from the date of purchase. This gives you the reassurance that if, within that time, your appliance is proven to be defective because of either workmanship or materials, we will, at our discretion, either repair or replace the appliance at no cost to you.