Operating Instructions COOKER AND OVEN GB Contents GB Installation, 2-5 English,2 Room ventilation Disposing of combustion fumes Positioning and levelling Electrical connection Gas connection Table of burner and nozzle specifications Table of characteristics Description of the appliance, 6 Overall view Control panel Start-up and use, 7-13 EG902GX Using the hob Setting the time Using the oven Cooking modes for Multi-function (1rst Oven) Cooking modes for conventional-function (2nd Oven) Practical cooki
Installation GB ! Before operating your new appliance please read this instruction booklet carefully. It contains important information concerning the safe installation and operation of the appliance. ! Please keep these operating instructions for future reference. Make sure that the instructions are kept with the appliance if it is sold, given away or moved.
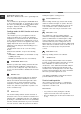
420 mm. 900 mm. Min. Min. 420 mm. Min. min. 650 mm. with hood min. 700 mm. without hood HOOD • Do not position blinds behind the cooker or less than 200 mm away from its sides. • Any hoods must be installed according to the instructions listed in the relevant operating manual. Levelling If it is necessary to level the appliance, screw the adjustable feet into the places provided on each corner of the base of the cooker (see figure).
GB must measure: 8 mm for liquid gas supply; 13 mm for methane gas supply. Once the connection has been performed, make sure that the hose: • Does not come into contact with any parts that reach temperatures of over 50°C. • Is not subject to any pulling or twisting forces and that it is not kinked or bent. • Does not come into contact with blades, sharp corners or moving parts and that it is not compressed. • Is easy to inspect along its whole length so that its condition may be checked.
Table of burner and nozzle specifications GB Table 1 Burner Liquid Gas Diameter (mm) Thermal Power kW (p.c.s.*) By-Pass Nozzle 1/100 1/100 Natural Gas Flow* g/h Nozzle 1/100 Nominal Reduced (mm) (mm) *** ** (mm) Flow* l/h Fast (Large)(R) 100 3,00 0,7 40 86 218 214 116 286 Semi Fast (Medium)(S) 75 1,65 0,4 30 64 120 118 96 157 Auxiliary (Small)(A) 55 1,00 0,4 30 50 73 71 71 95 Triple Ring (TC) 130 3.25 1.
Description of the appliance Overall view GB GAS BURNERS Top Grate Control Knobs for GAS BURNERS Adjustable Feet or Legs SAFETY DEVICES Ignition for GAS BURNERS Control panel THERMOSTAT Knob (2nd. OVEN) THERMOSTAT Indicator light(1st. OVEN) THERMOSTAT Indicator light (2nd. OVEN) THERMOSTAT knob (1st. OVEN) 50 50 MAX MAX 100 200 100 150 BURNERS Control knob TIMER knob • GAS BURNERS differ in size and power. Use the diameter of the cookware to choose the most appropriate burner to cook with.
Start-up and use Using the hob Using the oven Lighting the burners For each BURNER knob there is a complete ring showing the strength of the flame for the relevant burner. To light one of the burners on the hob: 1. Bring a flame or gas lighter close to the burner. 2. Press the BURNER knob and turn it in an anticlockwise direction so that it is pointing to the maximum flame setting . 3. Adjust the intensity of the flame to the desired level by turning the BURNER knob in an anticlockwise direction.
GB OPERATION indicator light When this is illuminated, the oven is generating heat. halfway through the cooking process. MULTI-COOKING mode Oven light This is switched on by turning the SELECTOR knob to any position other than “0”. It remains lit as long as the oven is operating. By selecting 8 with the knob, the light is switched on without any of the heating elements being activated. All the heating elements (top, bottom and circular) switch on and the fan begins to operate.
GRILL • When using the GRILL cooking mode, place the rack in position 2 or 3 and the dripping pan in position 1 to collect cooking residues (fat and/or grease). When using the GRATIN cooking mode, place the rack in position 2 or 3 and the dripping pan in position 1 to collect cooking residues. • We recommend that the power level is set to maximum. The top heating element is regulated by a thermostat and may not always operate constantly. SELECTOR knob.
GB makes it possible to brown the surface of meats and roasts while locking in the juices to keep them tender. The grill is also highly recommended for dishes that require a high temperature on the surface: beef steaks, veal, rib steak, filets, hamburgers etc... Some grilling examples are included in the “Practical Cooking Advice” paragraph. MAXI GRILL The top heating element comes on. This mode can be used to brown food at the end of cooking.
TIMER (ELECTRIC OVEN) GB The programmer makes it possible to preset the oven and the grill in terms of: • delay start with a preset length of time for cooking; • immediate start with a preset length of time for cooking; • timer. Button functions: : Timer with hour and minutes; : Length of cooking time; : End cooking time; Release the button, and within 4 seconds, the current time will reappear with the symbol and "auto." 3. Press the button, and then use the - and + buttons to set the end cooking time.
Multi funcituon Oven cooking advice table (1rst Oven) GB Cooking modes Foods Duck Roast veal or beef Pork roast Biscuits (short pastry) Tarts Tarts Fruit cakes Plum cake Sponge cake Stuffed pancakes (on 2 racks) Baking Mode Small cakes (on 2 racks) Cheese puffs (on 2 racks) Cream puffs (on 3 racks) Biscuits (on 3 racks) Meringues (on 3 racks) Pizza Pizza Mode Roast veal or beef Chicken Pizza (on 2 racks) Lasagne Lamb Roast chicken + potatoes Mackerel MultiPlum cake Cream puffs (on 2 racks) cooking Biscuit
GB Conventional Oven cooking advice table (2nd Oven) Cooking modes Traditional PASTRY OVEN Mini Grill Maxi Grill Foods Lasagne Cannelloni Baked pasta Veal Chicken Duck Rabbit Pork Lamb Mackerel Mackerel Trout baked in foil Neapolitan-style pizza Biscuits and small cakes Sweet unleavened flans and desserts Savoury pies Leavened cakes Fruit cakes Perfecting cooking Sole and cuttlefish Squid and prawn kebabs Cod fillet Grilled vegetables Veal steak Chops Hamburgers Mackerel Toast With the rotisserie spit
Precautions and tips GB ! This appliance has been designed and manufactured in compliance with international safety standards. The following warnings are provided for safety reasons and must be read carefully. General safety • The appliance was designed for domestic use inside the home and is not intended for commercial or industrial use. • The appliance must not be installed outdoors, even in covered areas. It is extremely dangerous to leave the appliance exposed to rain and storms.
Care and maintenance Switching the appliance off Inspecting the oven seals GB Disconnect your appliance from the electricity supply before carrying out any work on it. Cleaning the appliance Check the door seals around the oven regularly. If the seals are damaged, please contact your nearest Authorised After-sales Service Centre. We recommend that the oven is not used until the seals have been replaced. ! Never use steam cleaners or pressure cleaners on the appliance.
12/2006 - 195060220.