Instructions for Installation and Use 7kg Condenser Dryer Aquarius CTD00 To the Installer: Before installation, fill in the product details on the back cover of this book. The information can be found on the rating plate. To the User: You must read these instructions prior to installing and using the appliance and then retain them for future reference.
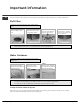
Important Information GB For your Condenser dryer to operate efficiently, you must follow the regular maintenance schedule shown below: Fluff filter... ! You MUST clean the fluff filter after EVERY drying cycle. STEP 1. Open the door of your dryer. STEP 2. Pull out the filter (using the two finger grips). STEP 3. Clean any fluff deposits from the filter mesh. STEP 4. Refit the filter - NEVER run the dryer without the filter in position.
Important Information Condenser Unit... GB STEP 2. Remove the condenser by rotating the 3 clips then pulling the condenser towards you. (There may be some water in the tubes, this is normal). STEP 3. Flush the condenser, from the rear with water, to remove any fluff deposits. STEP 4. Refit the condenser unit - ensure that the unit is pushed in fully, all 3 clips are re-secured and the positiong arrows on the front of the condenser are pointing upwards. Installation STEP 1.
Instruction booklet TUMBLE DRYER GB GB English Contents Installation, 5 Where to put your dryer Ventilation Door reversal instructions Water drain Electrical connection Before you start using your dryer Dryer description, 6 To open the door The features Control panel Start and programmes, 7 Choosing a programme CTD00 Laundry, 8-9 Sorting your laundry Wash care labels Special clothing items Drying times Warnings and Suggestions, 10 General safety Disposal Saving energy and respecting the environment
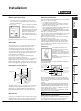
Installation Where to put your dryer Electrical connections Place your dryer at a distance from gas ranges, stoves, heaters, or cook tops because flames can damage the appliance. ● If you are going to install the Minimum gap 10mm appliance under a work counter, be sure to leave a 10mm space between the top and any other objects on or Minimum gaps 15mm above the machine and a 15mm space between the sides and lateral furnishings or walls. This is to ensure proper air circulation.
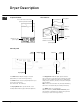
Dryer Description GB To open the door The features Water container Press and release the front panel in position shoiwn Rating plate Model & Serial numbers Condenser Unit (cover open) Air intake grille Condenser cover Condenser cover handle (Pull to open) Filter Control panel HEAT Button Drying Guide The START button begins drying a selected programme (see Start and Programmes). The HEAT button selects drying temperature (see Start and Programmes). OUT: HIGH heat. IN: LOW heat.
Start and Programmes Choosing a programme 2. Sort your laundry according to fabric type (see Laundry). 3. Open the door make sure the filter is clean and in place and the water container is empty and in place (see Maintenance). 4. Load the machine and make sure items are not in the way of the door seal. Close the door. 5. 8. Open the door, take the laundry out, clean the filter and replace it. Empty the water container and replace it (see Maintenance). 9. Unplug the dryer.
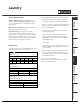
Laundry GB Sorting your laundry Wash Care Labels Check symbols on clothing labels to make sure that the articles can be tumble dried. ● Sort laundry by fabric type. ● Empty pockets and check buttons. ● Close zippers and hooks and tie loose belts and strings. ● Wring out each item in order to eliminate as much excess water as possible. ! Do not load dripping wet clothes into the dryer. Look at the labels on your garments, especially when tumble drying for the first time.
Laundry Amount of water retained in clothes after spin cycle: towels and delicates retain a lot of water. ● Fabrics: items that are the same type of fabric but different textures and thicknesses may not have the same drying time. ● Quantity of laundry: single items or small loads may take longer to dry. ● Dryness: If you are going to iron some of your clothes, they can be taken out while still a bit damp. Others can be left longer if you need them to be completely dry. ● Heat setting.
Warnings and Suggestions GB ! The appliance has been designed and built according to international safety standards. These warnings are given for safety reasons and must be followed carefully.
Maintenance and Care Switching off the electricity Empty the water container after each cycle Clean the filter after each cycle Cleaning the condenser unit Periodically (every month) remove the condenser unit and clean any build up of fluff from between the plates by rinsing it under the tap with cold water. This should be done with cold water from the rear of the condenser. Removing the condenser: 1. Unplug the dryer and open the door. 2. Pull open the condenser cover (see diagram).
Troubleshooting GB One day your dryer seems not to be working. Before you call your Service Centre (see Service), go through the following troubleshooting suggestions: Problem: Possible causes / Solution: The tumble dryer won’t start. ● ● ● ● ● ● ● Its taking a long time to dry. ● ● ● ● ● ● ● ● 12 The plug is not plugged into the socket, or not making contact. There has been a power failure. The fuse has blown. Try to plug another appliance into the socket.
Service Before calling the Service Centre: ● This dryer is a complex machine. Repairing it yourself or having a non-authorised person try to repair it could cause harm to one or more persons, could damage the machine and could invalidate the spare parts warranty. Call an authorised technician if you experience problems while using the machine. The spare parts have been designed exclusively for this appliance and not for other uses.
195042605.05 W 05/2007 - SIMLEX . Four Ashes, Wolverhampton Key Contacts After Sales Service Over 1100 trained specialists, directly employed by us, ensure that you can have complete confidence in both the appliances and services we offer. Repair Service and Information Help Desk UK: 08709 066 066 Monday to Friday, 8am to 7.30pm Saturday, 8.30am to 5.30pm Sunday, 9.30am to 3.30pm www.hotpointservice.co.