USER & INSTALLATION INSTRUCTIONS for MODELS DF56 DF55
Contents... Electricity Supply / Safety Information......... 3 Safety............................................................................4 What Can I Wash.................................................. 16 Loading your Dishwasher...............................17-18 Installation:.........................................................5-6 Care & Maintenance.........................................19-20 Getting to Know your Appliance.......................7 The Controls............................
Electrical Supply... WARNING: This appliance must be earthed. Fuses Your appliance comes fitted with a plug and a 13A fuse. If you need to replace the fuse, only those rated at 13A and ASTA approved to BS1362 should be used. If you lose the fuse cover, a replacement may be obtained from your local authorised Service Centre or Electricity company. Correct replacement is identified by colour coding or the marking on base of plug. WARNING: Do not use plug unless fuse cover is fitted. Safety Information...
Safety... This manual forms an integral part of the appliance. It must always be kept handy for reference. Read through all the instructions contained in this manual before using the dishwasher. The dishwasher is intended for use by adults. DO NOT allow children to come near or play with the controls. Installation must be performed by a qualified technician, in compliance with the regulations in force, including the prevention and elimination of radio frequency interference.
Installation... CONNECT TO A DRAINAGE SYSTEM... WARNING ● Connect your dishwasher drain hose to pipes which connect to the foul drain system, and not to surface water drains. IMPORTANT NOTES For the correct operation of your dishwasher, it is essential to comply with the following information. Standpipe Sink Waste System For under sink drainage: Before connecting the drain hose, remove any internal restrictions - This will prevent a build up of debris which could cause a blockage.
Installation... CONNECT TO THE WATER SUPPLY... CHECKLIST... ● For your machine to operate correctly it requires water pressures in the range of 6-150 psi (100-1000 KPa). Most cold water supplies will be in this range. NOTE: Low water pressure will lead to excessively long fill times or no fill. ● Ensure that the new hose supplied is connected and the old hose is disposed of safely. ● Before connecting hose to the cold water supply ensure the filter gauze is fitted in the filler hose connector.
Getting to Know your Appliance... Interior... 1 2 10 3 9 4 5 6 8 7 1. 2. 3. 4. 5. Upper Basket Upper Spray Arm. Filters. Lower Basket. Cutlery Rack. 6. 7. 8. 9. 10. Detergent Compartment. Rating Plate. Rinse Aid Container. Lower Spray Arm. Salt Container, with level indicator.
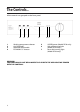
The Controls... All the controls are grouped on the front panel. 5 1 2 3 4 4 2 Washing programme selector On/Off button Recessed door handle ECONOMY 55˚ button 3 6 7 5 6 7 1 SUPER button (Model DF56 only) Salt refill warning light (Model DF56 only) Rinse Aid warning light (Model DF56 only) WARNING: CHILDREN SHOULD NOT BE ALLOWED TO PLAY WITH THE APPLIANCE OR TAMPER WITH THE CONTROLS.
Programme Guide... Before starting a wash programme, make sure that: ● The water supply tap is open. ● The correct amount of detergent has been added to the dispenser. ● The baskets have been loaded correctly. ● The spray arms can rotate freely and without obstruction. ● The dishwasher door is securely closed.
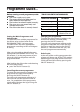
✓ - C D QUICK WASH (*) Reference programme as EN 50242 standard - - - - - ✓ - - ECONOMY NORMAL (*) SUPER (DF56 only) ✓ C - B NORMAL WASH - B B - A 55˚C ELECTABLE OPTION ECONOMY HEAVY WASH HEAVY WASH INTENSIVE WASH PRE WASH PROGRAMME PROGRAMME SELECTOR POSITION - LIGHTLY SOILED PANS AND DISHES 45˚ 55˚ 65˚ COLD RINSE 1 1 1 1 1 2 - 65˚ 65˚ 65˚ 65˚ 65˚ 65˚ - HOT RINSE YES YES YES YES YES YES - - Not present (button position ✓Present (button position
Programme Guide... To save on energy... ● Always try to run the dishwasher fully loaded. ● Do not wash the dishes in running water. ● Use the washing programme that is most appropriate for each type of load. To cut down on detergent consumption... The phosphates contained in dishwasher detergents are harmful to the environment.
Before Using your Appliance... Before using your Dishwasher you must carry out the following steps to ensure you obtain the best possible wash performance from your appliance. Follow these 4 steps: - Adjust the Water Softener. - Fill the Salt Container. - Fill the Rinse Aid Container. - Add detergent. SETTING WATER HARDNESS N. 1 NO SALT 0 - 4˚dH (0 - 7˚dF) N. 1 5 - 9˚dH (8 - 15˚dF) N. 2 10 - 22˚dH (16 - 37˚dF) N. 3 23 - 29˚dH (38 - 50˚dF) N. 4 30 - 35˚dH (51 - 60˚dF) N.
FILLING THE SPECIAL SALT CONTAINER... The container is situated at the bottom of the dishwasher. You will need to remove the lower basket for access. ● You should fill just before starting the programme. ● Unscrew the lid of the salt container, turning it anti-clockwise to remove. Before using the dishwasher for the first time, pour approximately 1 litre of water into the salt container. ● Use the supplied funnel to fill salt to the top of the container.
The detergent and rinse aid dispensers are situated on the inner part of the door: the detergent dispenser is on the left and the rinse aid dispenser is on the right. the required position. Replace the cap securely turning clockwise. FILLING THE RINSE AID CONTAINER... The purpose of Rinse Aid is to help the dishes dry faster and to prevent formation of water marks on tableware and utensils, and to ensure that glasses are clean and sparkling.
Adding the detergent... With the exception of the Prewash programme, you will need to add detergent before every washing cycle. To open the detergent dispenser lid, lightly press button ‘P’. Add the detergent and close the lid carefully. Sparkling Results The built-in Glist rinse agent ensures the dishes are free from water marks and smears and even the glasses will come out glistening. If you have any questions regarding Glist 3 in 1, please contact the hotline on 0800 216 730.
What can I Wash... Items not suitable for the dishwasher: ● Cutlery and tableware made from wood or part wood-They become faded and unsightly in appearance. ● Avoid washing horn-handled and bronze cutlery in the machine. ● Delicate/decorative glassware and vases, special antique or irreplaceable china - the decorative patterns printed on these objects will not be dishwasher proof. ● Plastic objects that are not resistant to hot water. ● Copper and Pewter utensils. ● Aluminium and silver objects.
Loading your Dishwasher... Your dishwasher is designed to take 12 standard place settings. There is no one correct method for loading the dishwasher. The upper and lower baskets are designed to give the maximum flexibility possible to cope with the variety of cups, glasses, dishware, pots, pans and utensils - not to mention your oven fittings or teapot, which might be put into the dishwasher. Loading ● First remove all coarse food remains which could block the filter or damage the wash pump.
Loading your Dishwasher... ADJUSTING THE UPPER BASKET... CUTLERY BASKET... The upper basket can be adjusted in two positions, according to your needs and to allow for the height of dishes in the lower basket. The cutlery should be arranged in an orderly manner inside the cutlery basket - with handles pointing downwards. Take care during loading to avoid injury from the knife blades. The basket is suitable for all types of cutlery, except those long enough to interfere with the upper spray arm.
Care and Maintenance... Before carrying out any work, always disconnect the dishwasher from the electrical power supply. Regular inspection and maintenance helps to prevent problems from occurring. You should therefore carefully inspect the inside of your dishwasher from time to time. - - Separate the two parts which make up the plastic filter by pressing the body of the filter in the position shown by the arrows. Remove the centre filter by lifting it upwards. Overall condition of appliance.
Care and Maintenance... Spray arms. The spray arms can be easily removed for periodic cleaning of the nozzles, to prevent possible blockage. To remove the upper spray arm, unscrew locking ring ‘R’. - To remove the lower spray arm, hold centrally and simply lift it up. - Clean both spray arms under running water. Re-fit the spray arms. Check that spray arms turn freely.
Troubleshooting... Caution - Do not forget that repairs should only be carried out by a qualified specialist. Improper repairs can lead to considerable equipment damage as well as danger to the user. - The dishwasher must first be disconnected from the electricity supply before any repairs or other work can be carried out. Switch off at the mains socket and water supply and remove the plug. Resolving minor problems yourself.
Important Information... Going Away: If the appliance is not going to be used for some time carry out the following: ● Run the pre wash programme, twice in succession. ● Switch of at the electrical socket and unplug. ● Turn off the water supply tap, disconnect the intake hose and allow to drain. ● Fill the rinse aid dispenser. ● Leave the door open, to prevent any unpleasant odours inside the dishwasher. Before using the dishwasher after a long break, plug in and switch on at the electrical socket.
Notes...
Notes...
Notes...
Guarantee “Satisfaction guaranteed or your money back” We give you a unique ‘satisfaction guaranteed’ promise - valid for 90 days - after you have purchased your product. If there is a technical problem simply call Repair service or visit our web-site at www.theservicecentre.co.uk and where necessary, we will arrange for an engineer to call. If the technical problem is not resolved under this guarantee, we will replace your machine or, if you prefer, give you your money back.
After Sales Service “No company is better positioned to offer an after sales service on our appliance than us - the manufacturer” As part of our commitment to you, all appliances have the added benefit of a fully inclusive parts and labour guarantee for the first 12 months. In addition to this you also have the advantage of free replacement parts for the first 5 years when fitted by our engineer.
Key Contacts After Sales Service Over 1200 trained specialists, directly employed by us, ensure that you can have complete confidence in both the appliances and services we offer. Repair Service and Information Desk UK: 08709 066 066 (Open 8 to 8 Mon - Fri, 8 to 6 Sat and 10 to 4 Sun & Bank Holidays) www.theservicecentre.co.