Instructions for Installation and Use Built-under double oven
SAFETY INSTRUCTIONS IMPORTANT TO BE READ AND OBSERVED Before using the appliance, read these safety instructions. Keep them nearby for future reference. These instructions and the appliance itself provide important safety warnings, to be observed at all times. The manufacturer declines any liability for failure to observe these safety instructions, for inappropriate use of the appliance or incorrect setting of controls. Very young children (0-3 years) should be kept away from the appliance.
if the supply cord is damaged, it must be DISPOSAL OF PACKAGING MATERIALS The packaging material is 100% recyclable and is marked with the replaced with an identical one by the manufacturer, recycle symbol . The various parts of the packaging must therefore its service agent or similarly qualified persons in be disposed of responsibly and in full compliance with local authority regulations governing waste disposal. order to avoid a hazard - risk of electrical shock.
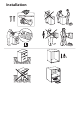
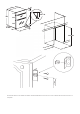
Installation 90°C
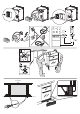
25 550 720 115 705 570 140-170 243 345 550 595 860-890 570mm to top of plinth 600 A minimum distance of 25mm should be maintained between the front face of the cabinet side and the front face of the plinth.
Top View Wall 40 mm Fixing Bracket Cooker Cabinet Doors
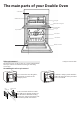
The main parts of your Double Oven Control Panel Grill Element Oven Light* Grill Pan & Food Support* Top Oven Door Inner Door Glass Oven Light Oven Shelves Door Switch* Bottom Oven Door Inner Door Glass Telescopic runners * * Only in some models The bottom oven on this cooker can comes equipped with telescopic runners to facilitate inserting or removing accessories. Assembling the telescopic runners* 1. To remove the two side grilles, unscrew the screws from the catalytic panels.
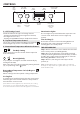
CONTROLS GRILL PILOT LIGHT A Top Oven Grill Setting Control Increase timer button Decrease timer button TOP OVEN PILOT LIGHT B Top Oven Temperature Control BOTTOM OVEN PILOT LIGHT C Set timer button A - Grill Setting Control This knob indicates two types of heating element: - Turning towards LEFT activates single broil element, choosing from level 1 to 4; - Turning towards RIGHT activates double broil element.
THE ELECTRONIC PROGRAMMER DISPLAY END OF COOKING icon DURATION icon •• •• DECREASE TIME button CLOCK icon TIMER icon INCREASE TIME button SET TIME button The Top Oven and Bottom Oven can be controlled by the automatic timer. When the timer control has been set for one oven, it is possible to use the other oven only during the same automatic cooking programme.
GRILL PAN AND HANDLE The grill pan handle is detachable from the pan to facilitate cleaning and storage. Fix the pan handle securely before use: Fit the handle to the grill pan so that the external ‘hooks’ embrace the edge of the pan (fig. 1) Make sure that the middle part of the handle fits exactly the protruding support of the pan (fig .2) and holds the pan from the bottom. The food must be placed on the rack in the grill pan. Position the grill pan on top of the oven rack.
BOTTOM OVEN - FAN OVEN Important: The oven is heated by elements at the rear of the oven. A fan at the rear of the oven operates to circulate heated air within the oven. Operating procedure: 1. Ensure Oven Timer is set to Manual (pressing the central button of the programmer). 2. Turn the selector switch to the fan oven position, then turn the oven thermostat control to the required temperature setting (see oven temperature charts). 3. The oven light will remain on.
To prepare meat and poultry for Roasting in your Fan Oven (f ) Meat and poultry wrapped in, or covered with a tent of aluminium foil will be juicy and tender. Roasting bags offer the same advantages. Always follow the (a) Wipe the meat or poultry, dry well and weigh it.
OVEN TEMPERATURE CHARTS BAKING To Oven - Conventional Food Preheat time Shelf position from the base Temperature °C Approximate cooking time Pan to be used Scones Yes 2 or 3 200-220 10 - 20 min grid with pan Victoria sandwich Yes 1 or 2 160-170 20 - 35 min grid with pan Sponge Sandwich (Fatless) Yes 1 or 2 160-170 20 - 35 min grid with pan Swiss Roll Yes 2 180 -200 10 - 20 min baking tray Semi- rich fruit cakes Yes 1 or 2 140-160 60 - 75 min grid with pan Rich Fruit cake
BOTTOM OVEN - FAN COOKING Food Preheat time Shelf position Approximate Temperature °C from the base cooking time pan to be used Scones yes 2 or 3 200-220 5 -15 min grid with pan Small cakes yes 2 or 3 160 - 170 30 - 45 min baking tray yes 2 or 3 160 -180 20 - 35 min grid with pan yes 2 or 3 160 -180 20 - 35 min grid with pan Victoria sandwich Sponge Sandwich (Fatless) Swiss Roll yes 2 or 3 180 -200 10 -15 min baking tray Semi- rich fruit cakes yes 2 or 3 140-160 60 - 80
OVEN TEMPERATURE CHARTS - MEAT Top Oven - Conventional Cooking Meat Pre-heat Temperature °C Time (approx.) Position in Oven Beef/ Lamb (slow roasting) Yes 170/180 35 mins per 450g (1lb) + 35 mins over.
Care and Cleaning Do not use steam cleaning equipment. Use protective gloves during all operations. Do not use wire wool, abrasive scourers or abrasive/ corrosive cleaning agents, as these could damage the surfaces of the appliance. Carry out the required operations with the oven cold. Disconnect the appliance from the power supply. EXTERIOR SURFACES • Clean the surfaces with a damp microfibre cloth. If they are very dirty, add a few drops of pH-neutral detergent. Finish off with a dry cloth.
Care and Cleaning 5HPRYH WKH ,QQHU *ODVV DV )ROORZV 5HPRYH WKH VFUHZV IURP ERWK VLGHV RI WKH GRRU 1. Open the door fully and unscrew the two screws securing the glass panel so that the securing brackets can be turned. There is no need to remove the screws completely. 2. Turn the brackets so that the glass can be removed and cleaned at the sink (Fig. 1.). *HQWO\ HDVH WKH WRS WULP DZD\ IURP WKH GRRU %H FDUHIXO QRW WR ORVH WKH PHWDO EUDFNHWV DQG UXEEHU EXIIHUV LI ILWWHG 3.
Troubleshooting Before calling a Service Engineer, please check through the following lists. THERE MAY BE NOTHING WRONG. Problem Check Slight odour or small amount of smoke when grill / oven used for first time This is normal and should cease after a short period. Nothing works If you find that the timer display is blank, then it is likely that there is no electricity supply to your oven.
Troubleshooting Any problems that arise or faults that occur can often be resolved easily. Before contacting the After-sales Service, check the following table to see whether you can resolve the problem yourself. If the problem persists, contact your nearest After-sales Service Centre. Read the safety instructions carefully before carrying out any of the following work AFTER-SALES SERVICE BEFORE CONTACTING OUR AFTER-SALES SERVICE 1.