
Instruction for Use


8
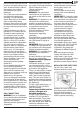
REMOVE THE LATERAL GRILLES
To remove the side grilles, press down the grilles and
lift them up as shown. Then, extract the grilles from
their seats.
To ret the grilles, insert the top support, then slide
them to be tted close to the cavity and push them
up to x in their original position.
b
a
HEAT THE OVEN
A new oven may release odours that have been left
behind during manufacturing: this is completely
normal. Before starting to cook food, we therefore
recommend heating the oven with it empty in order
to remove any possible odours. Remove any protec-
tive cardboard or transparent lm from the oven and
remove any accessories from inside it. Heat the oven
to the maximum temperature for about 20 minutes.
The oven must be empty during this time.
Follow the instructions for setting the function cor-
rectly.
Please note: It is advisable to air the room after using the
appliance for the rst time.
BEFORE USE
START THE GAS OVEN
Gently press the thermostat knob and turn it anti-
clockwise to the
position: To light the burner
hold the knob pressed in for 5-10 seconds. After that,
turn the thermostat knob to the desired temperature
(The
position corresponds to an oven tempera-
ture of 130° C, the
to an oven temperature of
250° C).
The thermostat knob must not be pressed and
held for more than 15 seconds.
When the oven is in operation the gas oven indica-
tor light switches on. To interrupt the cooking at any
time, switching the oven o, turn the thermostat
knob to the
position.
If the oven fails to switch on or it switches o acci-
dentally, turn the thermostat knob back to the
position, open the oven door and wait at least one
minute before attempting to switch the oven on
again.
USING THE ELECTRIC GRILL
Use the grill for grilling or browning foods.
The heat intensity of the grill can be set from 1 to
using the relative control knob. When the grill is in op-
eration, the grill indicator light and the oven interior
light will be switched on.
While using the wire shelf, always place the tray with
some drinking water under the food.
It is suggested to turn over the food about halfway
through the cooking.
Please note: The grill will not operate when the gas oven is on.
USING THE TURNSPIT (if present)
Some ovens may be equipped with an electric motor,
spit and skewers for roasting poultry or meat. Skewer
the meat and secure it in place using the two forks.
Put turnspit rod into the drive unit (A) and the groove
into the bend (B).
Turn the plastic handle (C) anticlockwise. Slide the
shelf into the oven runners ensuring that the rod slots
into hole.
The turnspit shelf must always be tted in the middle
of the oven (second position from bottom).
Place the tray to collect the cooking juices: Position it
on the bottom level, adding some drinking water.
To operate the turnspit, turn the relative knob to the
icon: You will feel a “click”. After that, turn the knob
to the desired grill power position as indicated in
paragraph above.
To switch o the turnspit turn back the relative knob
to the
icon, then turn it to the position. We
suggest to preheat the oven for 5 minutes. At the end
of cooking take the turnspit out of the oven only by
using its handle and oven gloves.
A
B
C
DAILY USE