Instructions H250E
For more information on our exciting product range ring Creda Answer Centre 08701 546474 OR Visit us on the NET at http:/www.creda.co.uk Our site invites you to make use of our interactive cookbook and product selector. Feel free to browse our product range to see what’s bubbling away at the moment or to ask for help on our products and services Merloni Elettrodomestici UK Ltd., Morley Way Peterborough PE2 9JB Creda Answer Centre 08701 54 64 74 Web http://www.creda.co.
Contents Introduction 4 Installation 5 For Your Safety - Always 6 For Your Safety - Never 7 Features 8 Control Panel 9 Hotplate General Information Notes 10-11 Temperature Conversion chart 12 Grill 13 Guide to Grilling 14 Oven Timer Operation 15 Know Your Timer 16 Clock & Automatic Timer Operation 17-20 Top Oven Cookery Notes 21-23 Main Oven Cookery Notes 24-27 Care & Cleaning 28-29 Cooking Results not Satisfactory 30 Something Wrong? 31 Service Back Cover You must read
Introduction Your new appliance is guaranteed* and will give lasting service. This guarantee is only applicable if the appliance has been installed in accordance with the installation instructions detailed in this booklet. To help make best use of your cooking equipment, please read this booklet carefully. The cooker is designed specifically for domestic use and responsibility will not be accepted for use in any other installation.
Installation WARNING – THIS APPLIANCE MUST BE EARTHED. MAINS CONNECTION Your cooker should have been checked to ensure that the voltage corresponds with your supply voltage, this is stated on the rating plate, which is situated on the rear panel.
Safety Information When used properly your appliance is completely safe but as with any electrical product there are certain precautions that must be observed. PLEASE READ THE PRECAUTIONS BELOW BEFORE USING YOUR APPLIANCE. Always ● Remove all packing from the appliance before switching on for the first time. ● Understand the controls prior to using the appliance. ● Keep children away from the appliance when cooking as the surfaces will get extremely hot during and after use.
Safety Information Never ● Never stare at Halogen heating units ● Never leave children unsupervised where a cooking appliance is installed as all surfaces will be hot during and after its use. ● Never allow anyone to sit or stand on any part of the appliance. ● Never store items above the appliance that children may attempt to reach. ● Never leave anything on the hob surface when unattended and not in use. ● Never remove the oven shelves whilst the oven is hot.
Features RATING PLATE (ON REAR PANEL) CONTROL PANEL LEFT REAR HOTPLATE 1100W RIGHT REAR HOTPLATE 1800W HOTPLATE BEZEL (REMOVABLE) LEFT FRONT HOTPLATE 1800W RIGHT FRONT HOTPLATE 1100W GRILL TOP OVEN CREDACLEAN SIDE PANEL GRILL PAN TOP OVEN REMOVEABLE ROOF TOP OVEN/GRILL ROD SHELF MAIN OVEN CREDACLEAN SIDE PANEL MAIN OVEN ROD SHELF MODEL/SERIAL NO.
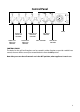
Control Panel TIMER REAR LEFT HOTPLATE CONTROL FRONT LEFT HOTPLATE CONTROL FRONT RIGHT HOTPLATE CONTROL REAR RIGHT HOTPLATE CONTROL TOP OVEN CONTROL GRILL CONTROL MAIN OVEN CONTROL CONTROL KNOBS The knobs for the grill and hotplates can be rotated in either direction to provide variable heat control, the oven knobs can only be rotated clockwise from the Off position. Note Always ensure that all controls are in the OFF position, when appliance is not in use.
Hotplates General Information Notes USE OF HOTPLATES Under no circumstances should the hob be used with aluminium foil in contact with the hob surface. Turn the control to H for fast cooking. To cook more slowly or simmer, turn the control to a lower setting according to the size of the saucepan and the amount of liquid. The two small Hotplates are specially for smaller pans, low temperature cooking and simmering.
Hob General Information CHOICE OF UTENSILS Every Electric Hob deserves the right choice of utensils. We recommend for optimum performance the use of good quality utensils. PANS SHOULD NOT Be concave (bowed in) Always ✓ Never ✗ ● Use good quality flat-based cookware on all electric heat sources. ● Use gauze, metal pan diffusers, asbestos mats and stands e.g. Wok stands – they can cause overheating. ● Ensure pans have clean, dry bases before use. ● Ensure pans match size of heating area.
Temperature Conversion Chart 12 Gas Mark ˚F Main Convection Oven Top Convection Oven Main Fan Oven 1/2 250 120 110 100 1 275 140 130 120 2 300 150 140 130 3 325 160 150 140 4 350 180 170 160 5 375 190 180 170 6 400 200 190 180 7 425 220 210 200 8 450 – 220 210 9 475 – – 220
Grill Setting the Grill Door in grilling position Grill pan handle CAUTION – ACCESSIBLE PARTS WILL BECOME HOT WHEN THE GRILL IS IN USE. CHILDREN SHOULD BE KEPT AWAY. GRILLING SHOULD NOT BE UNDERTAKEN WITH THE GRILL DOOR CLOSED. Never line the grill pan with aluminium foil. The grill control is designed to provide variable heat control of the grill element. Please note that the grill will not operate unless the top oven control is in the OFF position.
Guide To Grilling Pre-heat the grill for 5 minutes on maximum control setting before grilling. GRILL CHART Setting Shelf Position from base of oven Toasting of Bread Products High 2 3-10 mins depending on type of food Small cuts of meat, sausages, bacon Med 2 15-20 mins Chops, etc.
Oven Timer Operation The oven timer offers you the following features: 1. 2. Time of Day Automatic Cooking AUTOMATIC COOKING The Top Oven and Main Oven can be controlled by the automatic timer. When the timer control has been set for one oven it is possible to use the other oven only on the same automatic cooking programme. NEVER OPERATE THE GRILL WHEN THE OVENS ARE SET TO COOK AUTOMATICALLY. HINTS ON AUTOMATIC COOKING 1.
Know Your Timer COOK PERIOD START TIME TIMER FUNCTIONS Time of Day Main Clockface Ensure correct time of day is always set. AUTO COOKING PROGRAMME Start Time The time of day at which you want an “Auto Cooking” programme to start. Cook Period (Up to 180 minutes) The Cook period in minutes will be shown in the display window. Cook Period is the actual length of time for which, the timer will switch the oven(s) on as part of an “Auto Cooking” programme. (e.g.
Clock & Automatic Oven Timer Operation TO SET & RE-SET THE TIME OF DAY Step 1 Make sure all oven controls are turned Off. Step 2 Check the electricity supply to the cooker is switched on. Step 3 Push and turn knob (B) anti-clockwise until the correct time of day is shown. Note: For normal "Manual" operation of the oven(s) the timer should always be set at , the position in the display window (as shown). See Below.
Clock & Automatic Oven Timer Operation AUTO COOKING PROGRAMMES There are two Auto Cooking programmes that can be selected using your timer:– (a) To set the Timer to switch the oven(s) ON immediately and OFF at a preset time - Up to 180 minutes. (b) To set the Timer to switch the oven(s) ON and OFF Automatically. a) TO SET THE TIMER TO SWITCH THE OVEN(S) ON IMMEDIATELY AND OFF AT A PRE-SET TIME – UP TO 180 MINUTES.
Clock & Automatic Oven Timer Operation b) TO SET THE TIMER TO SWITCH THE OVEN(S) ON AND OFF AUTOMATICALLY Step 1 Check that the correct time of day is set, if not follow instructions for setting the time of day. Step 2 Place food onto the correct shelf position in the oven and close the oven door(s). Step 3 Set the “Start Time” by pushing and turning knob (A) anti-clockwise, until the required start time is set. This allows the auto function to be set.
Clock & Automatic Oven Timer Operation TO CANCEL AN AUTO COOKING PROGRAMME Step 1 Turn the oven control(s) to their OFF position. Step 2 Turn knob (B) anti-clockwise until the display window.
Top Oven - Cookery Notes TOP OVEN COOKING The Top Oven is used in exactly the same way as the main oven to cook all types of food. It can either be used alone, to cook small quantities of food, or in conjunction with the main oven to provide additional cooking space, so often necessary when entertaining. There are two cooking positions, the shelf placed directly on the floor of the oven, or one runner from the floor of the oven.
Top Oven Temperature Chart - Baking Food Preheat Temperature and Time Position in oven Scones Yes 200˚C 9-12 mins Runner 1 from bottom of oven Small Cakes Yes 180˚C approx. 15-20 mins Runner 1 from bottom of oven Victoria Sandwich Yes 170˚C 61/2" tins approx. 20 mins Sponge Sandwich (Fatless) Yes 180/190˚C approx.
Top Oven Temperature Chart - Meat Food Beef / Lamb (slow roasting) Beef / Lamb (foil covered) Pork (slow roasting) Pork (foil covered) Veal (slow roasting) Veal (foil covered) Poultry / Game (slow roasting) Poultry / Game (foil covered) Casseroles cooking Preheat Temperature and Time Yes 170/180˚C approx. 35 mins per 450g (1lb) + 35 mins over Yes 190/200˚C approx. 35-40 mins per 450g Yes 170/180˚C approx.
Oven Oven Control With the oven door closed, heating of the oven is achieved by turning the control clockwise to the required ‘oven temperature’ scale on the control panel, as recommended in the temperature charts. The pilot light will immediately come on and go off during cooking as the thermostat maintains the correct temperature. Note: At the end of the cooking period there may be a momentary puff of steam when the oven door is opened.
Oven Cookery Notes Temperature and Time The secret of succulent, tender meat, is not to roast quickly at too high a temperature. Best results are obtained when roasting is carried out at low temperatures. When a lower temperature is used, the joint loses less weight, is more tender (too high a temperature causes meat to be tough and dry), and the splashing of fat onto oven interior is reduced.
Main Oven Temperature Chart - Baking Temperature and Time Position in oven from bottom Food Preheat Scones Yes 220/230˚C approx. 10-15 mins Runners 1 and 4 Small Cakes Yes 190/200˚C approx. 20-25 mins Runners 1 and 4 Victoria Sandwich Yes 180/190˚C 61/2 - 7" tins approx. 20mins 8 - 81/2" tins approx. 30mins Runners 1 and 4 Sponge Sandwich (Fatless) Yes 190/200˚C 7"tins 15-20 mins Runners 1 and 4 Swiss Roll Yes 200/210˚C approx.
Main Oven Temperature Chart - Meat Food Preheat Beef Yes Lamb Yes Pork Yes Veal Yes Poultry / Game Yes Turkey Yes Temperature and Time 190/200˚C approx. 25-30 mins per 450g (1lb) + 25 mins extra 190/200˚C approx. 25-30 mins per 450g (1lb) + 25 mins extra 190/200˚C approx. 30-35 mins per 450g (1lb) + 30 mins extra 190/200˚C approx. 25-35 mins per 450g (1lb) + 30 mins extra 180/190˚C approx. 18-20 mins per 450g (1lb) + 20 mins extra up to 5.5kg (12lb) allow 22 mins per 450g (1lb) at190˚C eg.
Care and Cleaning WARNING Turn off the main switch before cleaning. Before switching on again, ensure that all controls are in the off position. Never use biological washing powder, harsh abrasives, scouring pads, aerosols cleaners or oven chemical cleaners of any kind. CONTROL PANEL Wipe with a damp cloth wrung out in warm soapy water and polish with a dry cloth. Stubborn stains can be removed with a cream, paste or liquid cleaner.
Care and Cleaning HOW ‘CREDACLEAN’ WORKS The surface of the ‘Credaclean’ oven liners are treated on the mottled face with a special vitreous enamel which absorbs cooking soils. At temperatures of 220˚C (425˚F) or above, the special surface enables these soils to be slowly destroyed. The higher the temperature the more effective it is. In most cases normal cooking operation at this temperature will permit this cleaning operation to proceed during cooking.
Cooking Results Not Satisfactory GRILL Uneven cooking front to back Ensure that the grill pan is positioned centrally below the grill element. Fat splattering Ensure that the grill pan is not lined with foil. Ensure that the grill setting control is not set too high. If solarplus grill - use anti-splash tray supplied under the food support. (Not all models). BAKING GENERAL Uneven rising of cakes Ensure that the oven shelves are level. Sinking of cakes The following may cause cakes to sink: 1.
Something Wrong ? Before calling a Service Engineer, please check through the following lists. THERE MAY BE NOTHING WRONG. Problem Nothing works. Check If you find :No change in time of day for 5 minutes. Then it is likely that there is no electricity supply to your oven. Check: Clock is working but has lost time. (i) That the main cooker wall switch is turned on. (ii) Check other appliances to see if you have a power cut. (iii) Check the main circuit breaker for the property.
Key Contacts Service We have the largest appliance manufacturer’s service team in Europe, trained specialists directly employed by us to ensure your complete confidence. Repair Service UK: 08709 066 066 Republic of Ireland: 1850 302 200 You will be asked for the following information:Name, address and postcode.