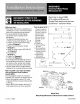
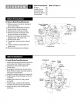
WD26X10013 (IE CE TTT Mechanism Kit DISCONNECT POWER TO THE a. Tas, " aR Shaded Pole motors with the new WILES IE) QuietPower™ Induction Motor. Before you start... Parts Included in Kit: 1 «Read these instructions completely and 1. Power Connector Go carefully for correct removal and installer 2. Power Connector o elation of the motor/pump mechanism. 3. Power Connector i » You must identify the motor/pump 4. Ground Lead BE TTT mechanism that is installed in the 5. Ground Lead dishwasher. 6.
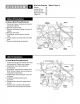
New Parts Required (Refer to Figure 1) Hanger 8) Hanger Screw {7} Ground Screw (6) Plastic Tie {10} Direct Replacement — Before and Fig aah cl Ent To Remove Motor/Pump Mechanism: 1. Disconnect power connectors to motor and drain solenoid. 2. Remove ground screw. 3. Remove mechanism hanger screw and hanger. 4. Remove drain hose. 5. If equipped, remove power shower hose. 6. Loosen clamps to pump inlet and outlet ports, 7. Remove motor/pump mechanism. Power Connector Install Motor/Pump Mechanism: 1.
New Parts Required (Refer to Figure 1) Hanger (8) Hanger Screw (7) Ground Screw (6) Power Connector (2) Plastic Tie (10) Before Kit Installation To Remove Motor/Pump Mechanism: Power 1. Disconnect power connectors ta motor Connector and drain solenoid. 2. Remove ground screw. 3. Remove mechanism hanger screw and hanger. 4. Remove drain hose. 5. If equipped, remove power shower hose. 6. Loosen clamps to pump inlet and outlet ports. 7. Remove motor/pump mechanism.
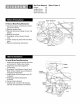
New Parts Required {Refer to Figure 1} Hanger (9 Hanger Screw {7) Ground Screw {6} Power Connector {2} [EOE OLE cE HT Power Connector Sen Remove Motor/Pump Mechanism: Disconnect power connectors to motor and drain solenoid. 2. Remove ground screw. 3. Remove mechanism hanger screw and hanger. 4. Remove drain hose. 5. If equipped, remove power shower hose. 6. Loosen clamps to pump inlet and outlet ports, 7. Remove motor/pump mechanism. BY Ground Screw FUE GLE ET] To Install Motor/Pump Mechanism: 1.
New Parts Required Hanger (8) Hanger Screw (7) Ground Screw (8) Power Connector {1} Ground Lead (5) {Refer to Figure 1) Before Kit Installation To Remove Motor/Pump Mechanism: 1. Disconnect power connectors to motor and drain solenoid. 2. Remove ground screw. 3. Remove mechanism hanger screw and hanger. 4. Remove drain hose. 5. If equipped, remove power shower hose. 6. Loosen clamps to pump inlet and outlet ports. 7. Remove motor/pump mechanism.
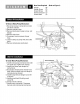
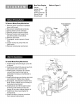
New Parts Required (Refer to Figure 1) Hanger (8 Hanger Screw {7 Ground Screw (6 Power Connector (3 Ground Lead [1] AGRA Before Kit Installation To Remove Motor/Pump Mechanism: 1. Remove power connector insulators {save, will reuse). 2. Disconnect male/female terminals. 3. Unplug leads to drain solenoid. 4. Remove ground screw and lead. 5. Remove racket and hanger from bracket located on tub bottom. 6. Remove two rubber bushings from hanger (save, will reuse one). 7. Remove drain hose. 8.
New Parts Require Hanger {9 Hanger Screw {7 Plastic Tie Power Connector { Ground Screw { Ground Lead { {Refer to Figure 1) Before Kit Installation To Remove Motor/Pump Mechanism: 1. Remove power connector insulators (save, will reuse). 2, Disconnect male/female terminals. 3. Unplug leads to drain solenoid. 4, Remove ground screws and lead. 5. Remove bracket and hanger from bracket located on tub bottom. 6. Remove drain hose. 7. If equipped, remove power shower hose. 8.
New Parts Required (Refer to Figure 1) Hanger (9) Hanger Screw (7) Ground Screw {6} 3) } Power Connector {; Plastic Tie (10, Before Kit Installation To Remove Motor/Pump Mechanism: Rawer 1. Remove power connector insulators Connector insulators {save, will reuse}. 2. Disconnect male/female terminals. 3. Unplug leads to drain solenoid. 4. Remove ground screw and lead. 5. Remove bracket and hanger from bracket located on tub bottom. 6. Remove drain hose. 7. If equipped, remove power shower hose. 8.