— the\;T;;iEYOUr 3 Dishwasher Conkn@ Air Gap Appliance Registration 11 2 Care and Cleaning China, Crystil, S[erling 11 10 Cycle Features Consumer Services 4 15 Detergent, Detergent Guide 6,7 DisDenser CUDS 7 -- Door Latch Energy-Saving Tips 0 11 8,9 Model and Serial Numbers Operating Guide 2 4,5 Soil Level Plate Warmer 6 Winter Storage 11 5 4 7 4,5 12-14 6 Water Temperature 4 2 Front Panel Color Change Loading Cycle Selection Drying Options Use and Care of built-in model Safetv I
If You Need Semice Help us help you... Before usiqyourdishwasher, read this book carefuUy. Save time and money. Before you d for service... It is intended to help you operate and maintain your new dishwasher properly. Check the Problem Solver (pages 12-14). It lists causes of minor operating problems that you can correct yourself. Keep it handy for answers to your questions.
IMPORTANT SAFETY INSTRUCTIONS Read all instructions before using this appliance. w W~~G–When using this appliance, always exercise basic safety precautions, including the following: . Use this appliance only fOr its intended purpose, as you W fmd deseribed in this Use and Care Book. ● This dishwasher must be properly installed and located in awordance tith the Instigation Instructions before it is used.
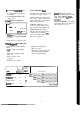
How to opemte your Whmsher Door Latch (Locked) Cycle Indicator Dial (Turn tq Start) I II \ STEP 1. Load your dishwasher with dishes, silverware, pots, pans, bowls, etc. according to instructions on pages 8 and 9. STEP 2. Add detergent to the detergent dispenser. Mde sure the Cycle Indicator Dial is at OFF position before adding detergent. (See pages 6 and 7.) Use rinse aid agent to help prevent spotting. (See page 6.) STEP 3. Select DRYING HEAT option.
c For PLATE W-R cycle: Cycle selection hinfi a. Load clean plates and dishes to be warmed. b. Select DRYING HEAT–ON drying option. c, Mve the door unlatched. It is important to follow the loading instructions on pages 8 and 9. LIGHT WASH ● ON ● OFF b ● DRYING ● RINSE & HOLO ● ORVIPLATE WARMER d. Slowly turn Cycle Indicator Dial clockwise to PLATE WARMER position. e. Latch the door to start the cycle. POTS & PANS—For items such as pots, pans, cookware, dishes and glasses with heavy soil.
God dkhwashing star~ with H~ water. To get dishes clean and dry, you need hot water. To help you get water of the proper temperature, your dishwasher automatically heats the water in the wash cycle. For good washing and drying, the entering water must beat least 120°F. To prevent dish damage, inlet water should not exceed 150°F. How to test water temperature: Check the water temperature inside your dishwasher with a candy or meat thermometer.
How to prepare the dishes for washi~ You’ll find two detergent dispensers on the inside door of your dishwasher. Two, because some cycles use two washes. See “Detergent Usage Guide” below. (Be sure the Cycle Indicator Dial is at OFFposition before adding detergent. Otherwise, the dete~ent cup will not close and latch properly.) If this is your first dishwasher, or if you’re replacing a much older model, you may wonder how much pre-preparation your dishes need. Actually very little.
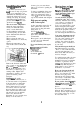
How to load your dishwasher How to load the ~PMCK The top rack is best for glasses, cups and saucers. Cups and glasses fit best along the sides. This is the place for dishwasher-safe plastics, too. Make sure small plastic items are lodged in tightly so they can’t fall onto the Calrod@ heating unit. Arrange stemware so that it cannot move easily. Don’t let the glasses touch each other. This is a random mixed load, the most common type you will have.
How to load the B~~M WCK I Fit plates and saucers between the pins. Place items so that water and detergent from wash arm can reach soiled surfaces. Heavily soiled pots, pans and casseroles MUST be loaded in the bottom rack, facing down. Prop broiler pans and racks along the edge. Put flatware in the removable basket with handles up to protect your hands. Mix knives, forks and spoons so thev don’t nest together. Distribute evenly.
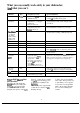
What you can usually wash safely in your dishwasher. hd what you can’t. Material Aluminum Usually Safe YES China/ Stoneware YES Exceptions (not safe) Some colored anodiz~ aluminum can fade. Antique, metal-trimmed, hand-painted or over-the-glaze patterns fade. Special Instructions Some darkening or spotting possible. Remove by scouring with soap-filled steel wool pads. If in doubt, check with the manufacturer. Or test wash one piece daily for at least a month. Compare with the rest of the set.
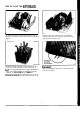
Care and Cleatiq USER M~ENANCE ~STRUCTIONS Btit-in dishwashers often use an air gap. =p it clean. An air gap is a plumbing device. It protects your dishwasher against water backing up into it if a drain clogs. The air gap is not a part of the dishwasher and you may not even have one. Not dl plumbing codes require air gaps. —— If you have an air gap, check it at least once a month. THE AIR GAP IS N~ PART OF YOUR DISHWASHER. IT IS N~ COVERED IN YOUR WARRANTY. The air gap is easy to clean.
m ~ Questions? ~ ~ Use This fioblem Solver PROBLEM POSSIBLE CAUSE AND REMEDY DIS~ASHER WON’T RUN A fuse in your home maybe blown, or the circuit breaker trippd. Replace fise or reset circuit breaker. Remove any other appliances from the circuit. UNUSUAL NOISE Utensils may not be secure on rack pins. Or something small may have dropped from the rack. Water is causing utensils to rattle. Make sure everything is securely placed in dishwasher.
PROBLEM POSSIBLE CAUSE AND REMEDY DETERGENTCUP WON’T LA~H A~ER ADDING DETERGENT Cycle Indicator dial must be in OFF position for cup to latch properly. If you unlatch the door and open it to dry your dishes, the Cycle Indicator does not advance to OFF by itself. S~ AND FILMING ON GLASSES AND FLATWARE Spotting can be caused by all these things: . Extremely hard water. (See page 6.) ● Low inlet water temperature. (To test, see page 6.) c Overloading the dishwasher. ● Improper loading. (Seepages 8 and 9.
The Problem Solver (continued) PROBLEM POSSIBLE CAUSE AND REMEDY CHIPPING OF CHINA Rough handling can cause chipping. Load with care. Make sure glassware and china are secure and can’t jar loose. (See pages 8 & 9 for correct way to load glassware,) Make sure Ml glasses and stemware will clear the top of tie tub when you push the rack into the dishwasher. Always use the top rack for delicate items.
Wdll Be There With tie purchase of your new Hotpoint appliance, receive - the assurance that if you ever need information or assistice, we’ll be there. Al you have to do is cdl—toll-free! GEAnswer Center@ In-Home Repak Service 880-GE-CARES Our consumer service professionals will provide expert repair service on your Hotpoint appliance, scheduled at a time that’s convenient for you. Many GE Consumer Service companyoperated locations offer you service today or tomorrow, or at your convenience (7:00 a.m.
YOUR H~POINT DISHWASHER WARRAN~ Save proof of original purchase date such as your sales slip or cancelled check to establish warranty period. WHAT IS COVERED FULL ONE-YEAR WARRANTY For one year from date of original purchase, we will provide, free of charge, parts and service labor in your home to repair or replace any pan of the dishwasher that fails because of a manufacturing defect. WHAT IS N~ COVERED ● se~icetriPstOYOurhOmetO teach you how to use the product. Read your Use and Care material.