Washers www.Hotpoint.com SAFETY INSTRUCTIONS . . . . . . . . .2 OPERATING INSTRUCTIONS Controls . . . . . . . . . . . . . . . . . . . . . . . . . . . . 4 Loading . . . . . . . . . . . . . . . . . . . . . . . . . . . . . .6 Features . . . . . . . . . . . . . . . . . . . . . . . . . . . . . .7 CARE AND CLEANING . . . . . . . . . . .7 OWNER’S MANUAL & INSTALLATION INSTRUCTIONS HTW200 ENGLISH/ESPAÑOL INSTALLATION INSTRUCTIONS . . . . . . . . . . . . . . . . . . .8 TROUBLESHOOTING TIPS. . . . . .
IMPORTANT SAFETY INFORMATION. READ ALL INSTRUCTIONS BEFORE USING. This is the safety alert symbol. This symbol alerts you to potential hazards that can kill you or hurt you and others. All safety messages will follow the safety alert symbol and the word “DANGER”, “WARNING”, or “CAUTION”. These words are defined as: DANGER Indicates a hazardous situation which, if not avoided, will result in death or serious injury.
www.Hotpoint.com PROPER INSTALLATION This washer must be properly installed and located in accordance with the Installation Instructions before it is used. Ensure that the hot water hose is connected to the “H” valve and the cold water hose is connected to the “C” valve. Install or store where it will not be exposed to temperatures below freezing or exposed to the weather, which could cause permanent damage and invalidate the warranty.
Operating instructions. Throughout this manual, features and appearance may vary from your model. Step 1 Step 3 Step 2 • Select wash cycle. • Add the manufacturer’s recommended amount of detergent. GE Appliances recommends the use of High Efficiency detergents such as in your energy efficient washer. Place detergent pods in the bottom of the wash basket before adding clothes. • Loosely add items around agitator. Overloading may negatively impact wash performance.
www.Hotpoint.com C Load Size (on some models) Make the load selection: Add detergent to the bottom of the basket prior to loading clothes. Loosely load items in the washer basket. Overloading may negatively impact wash performance. Adjust the load size accordingly. D Wash Cycles-Cycle Selector Knob The wash cycle controls the type of washing process. The cycle selector knob can be turned in either direction.
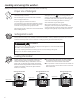
Loading and using the washer. Always follow fabric manufacturer’s care label when laundering. Proper Use of Detergent Using too little or too much detergent is a common cause of laundry problems. Use less detergent if you have soft water, a smaller load or a lightly soiled load. For spots, apply pre-treatment to items as recommended on the product label. Application should be made in the basket to prevent overspray which may cause the coloring on the lid or graphics to fade.
About washer features. www.Hotpoint.com Liquid Bleach Liquid chlorine bleach should be added through the bleach dispenser in the front left corner. Follow bleach manufacturer’s recommendations for the correct amount of liquid chlorine bleach based on load size, taking care to not apply or spill it directly on clothing. NOTE: Do not use liquid chlorine bleach and laundry pretreatments such as an Oxi product in the same wash load.
Installation Instructions Washer If you have any questions, call 800.GE.CARES (800.432.2737) or visit our Website at: www.Hotpoint.com This is the safety alert symbol. This symbol alerts you to potential hazards that can kill you or hurt you and others. All safety messages will follow the safety alert symbol and the word “DANGER”, “WARNING”, or “CAUTION”. These words are defined as: DANGER Indicates a hazardous situation which, if not avoided, will result in death or serious injury.
Installation Instructions LOCATION OF YOUR WASHER Do Not Install the Washer: IMPORTANT: Minimum Installation Clearances - Alcove or Closet 1. In an area exposed to dripping water or outside weather conditions. The ambient temperature should never be below 60°F (15.6°C) for proper washer operation. • If your washer is approved for installation in an alcove or closet, there will be a label on the back of the machine describing requirements.
Installation Instructions 3 CONNECT DRAIN HOSE TO WASHER 5 CONNECT WATER HOSES TO OUTLET VALVES Connect drain hose to drain port on back of washer. Open clamp with pliers and slide onto hose end. Holding clamp open, push hose end onto drain port until fully seated. Release clamp between locating ribs on hose end. Outlet of hose end should be oriented vertically. Drain hose Determine which is HOT water line before attaching water hoses to faucets. Traditionally, HOT faucet is on left.
Installation Instructions 6 CONNECT TO DRAIN Install drain hose clip on rear panel of washer. Route drain hose through clip and insert free end into drain opening of your home. 6 CONNECT TO DRAIN (Continued) If your drain is a standpipe, fasten drain hose to standpipe with cable tie provided. Drain hose clip NOTE: If longer drain hose is required, order drain hose extension kit, GE Appliances part number WH49X301.
Installation Instructions ELECTRICAL REQUIREMENTS WARNING GROUNDING INSTRUCTIONS This appliance must be grounded. In the event of malfunction or breakdown, grounding will reduce the risk of electric shock by providing a path of least resistance for electric current. This appliance is equipped with a cord having an equipment- grounding conductor and a grounding plug. The plug must be plugged into an appropriate outlet that is properly installed and grounded in accordance with all local codes and ordinances.
Before you call for service…Troubleshooting Tips Save time and money! Review the charts on the following pages, or visit GEAppliances.com. You may not need to call for service. WATER Possible Causes What To Do Short spray and delay after pushing the Start button Water level seems low Lid was opened and closed between cycle selection and start This is normal This is normal. See START-UP SEQUENCE in the Safety Instructions section.
Before you call for service…Troubleshooting Tips Save time and money! Review the charts on the following pages, or visit GEAppliances.com. You may not need to call for service. OPERATION Possible Causes What To Do Washer pauses during spin cycle Washer won’t operate This is normal Washer is unplugged The washer may pause during the spin cycle to remove soapy water more efficiently. Make sure cord is plugged securely into a working outlet.
www.Hotpoint.com PERFORMANCE (cont) Possible Causes What To Do Snags, holes, tears, Pins, snaps, hooks, sharp Fasten snaps, hooks, buttons and zippers. rips or excessive wear buttons, belt buckles, Remove loose items like pins, objects in pockets and sharp buttons. zippers and sharp objects Turn knits (which snag easily) inside out. left in pockets Undiluted chlorine bleach Check bleach package instructions for proper amount.
Notes.
www.Hotpoint.
Notes.
Hotpoint Appliances Washer Warranty. All warranty service provided by our Factory Service Centers, or an authorized Customer Care® technician. To schedule service, Visit us on-line at www.Hotpoint.com, or call 800.GE.CARES (800.432.2737). Please have serial number and model number available when calling for service. Staple your receipt here. Proof of the original purchase date is needed to obtain service under the warranty.
Consumer Support. Hotpoint Website www.Hotpoint.com Have a question or need assistance with your appliance? Try the Hotpoint Website 24 hours a day, any day of the year! For greater convenience and faster service, you can now download Owner’s Manuals, order parts or even schedule service on-line. Schedule Service www.Hotpoint.com Expert Hotpoint repair service is only one step away from your door. Get on-line and schedule your service at your convenience any day of the year! Or call 800.GE.CARES (800.
Lavadoras www.Hotpoint.com INSTRUCCIONES DE SEGURIDAD . . . . . . . . . . . . . . . . . . . . . . .2 INSTRUCCIONES DE OPERACIÓN Controls . . . . . . . . . . . . . . . . . . . . . . . . . . . . . .4 Carga . . . . . . . . . . . . . . . . . . . . . . . . . . . . . . . .6 Funciones . . . . . . . . . . . . . . . . . . . . . . . . . . . .7 MANUAL DEL PROPIETARIO E INSTALACIÓN HTW200 ENGLISH/ESPAÑOL CUIDADO Y LIMPIEZA . . . . . . . . . . .7 INSTRUCCIONES DE INSTALACIÓN . . . . . . . . . . . . . . . . . . . .
INFORMACIÓN DE SEGURIDAD IMPORTANTE. LEA TODAS LAS INSTRUCCIONES ANTES DE USAR. Éste es el símbolo de alerta de seguridad. El mismo alerta sobre potenciales riesgos que le pueden producir la muerte o lesiones tanto a usted como a otras personas. Todos los mensajes de seguridad estarán a continuación del símbolo de alerta de seguridad y con la palabra “PELIGRO”, “ADVERTENCIA” o “PRECAUCIÓN”.
www.Hotpoint.com INSTALACIÓN CORRECTA La lavadora se debe instalar y colocar correctamente de acuerdo con las instrucciones de instalación, antes de utilizarla. Asegúrese de que la manguera de agua caliente esté conectada a la válvula “H” y que la manguera de agua fría esté conectada a la válvula “C”. Se recomienda una extensión opcional de la manguera de drenaje para descargas en alturas de 60” a 96”.
Instrucciones de uso. Es posible que las funciones y apariencias varíen con relación a su modelo a lo largo del manual. Paso 1 • Agregue la cantidad de detergente recomendada por el fabricante. GE Appliances recomienda el uso de detergentes de Alta Eficiencia tales como en su lavadora de energía eficiente. Coloque los receptáculos de detergente en la parte inferior de la canasta de lavado antes de agregar la ropa. Controles Paso 3 Paso 2 • Agregue las prendas sin ajustar alrededor del agitador.
www.Hotpoint.com C Load Size (Tamaño de carga) (en algunos modelos) D Perilla de Ciclos de Lavado-Selector de Ciclo Realice la selección de carga: gregue detergente en el fondo del tambor antes de cargar la A ropa. Agregue las prendas sin apretar en el tambor de la lavadora. Sobrecargar el tambor puede producir un impacto negativo en el desempeño de lavado. Ajuste el tamaño de la carga según corresponda. El ciclo de lavado controla el tipo de proceso de lavado.
Cómo cargar y usar la lavadora. Siempre siga las instrucciones del fabricante de la ropa cuando lave. Uso correcto del detergente El uso de demasiado poco o cantidades excesivas de detergente es causa común de problemas con la colada. Use menos detergente si tiene agua blanda, una carga más liviana o ropa poco sucia. Para tratar manchas, aplique pretratamiento a las prendas según se recomienda en la etiqueta del producto.
Funciones de la lavadora. www.Hotpoint.com Blanqueador Líquido El blanqueador líquido de cloro debe ser agregado a través del dispensador del blanqueador en la esquina frontal izquierda. Siga las recomendaciones del fabricante del blanqueador para utilizar la cantidad correcta de blanqueador líquido de cloro en base al tamaño de la carga, evitando aplicar o salpicar el mismo directamente sobre la ropa.
Instrucciones de instalación Lavadora Si tiene alguna pregunta, llame a 800.GE.CARES (800.432.2737) o visite nuestro sitio Web en: www.Hotpoint.com Éste es el símbolo de alerta de seguridad. El mismo alerta sobre potenciales riesgos que le pueden producir la muerte o lesiones tanto a usted como a otras personas. Todos los mensajes de seguridad estarán a continuación del símbolo de alerta de seguridad y con la palabra “PELIGRO”, “ADVERTENCIA” o “PRECAUCIÓN”.
Instrucciones de instalación UBICACIÓN DE LA LAVADORA IMPORTANTE: Distancias mínimas de separación para la instalación - Nicho o Armario No instale la lavadora: • Si la lavadora ha sido aprobada para ser instalada en un nicho o armario, debe haber una etiqueta en la parte posterior de la máquina que describa los requisitos. 1. En un área expuesta a goteras o a las condiciones del exterior. La temperatura ambiente no debe ser nunca inferior a 60°F (15,6°C) para que la lavadora funcione correctamente.
Instrucciones de instalación 3 CONECTE LA MANGUERA DE DESAGÜE 5 CONECTE LAS MANGUERAS DE AGUA A Conecte la manguera de desagüe al puerto de drenaje en la parte trasera de la lavadora. Abra la abrazadera con las pinzas y deslice las mismas sobre el extremo de la manguera. Manteniendo la abrazadera abierta, presione el extremo de la manguera sobre el puerto de drenaje hasta que quede completamente insertada. Libere la abrazadera entre los resortes de ubicación en el extremo de la manguera.
Instrucciones de instalación 6 CONECTE AL DRENAJE 6 CONECTE AL DRENAJE (Continúa) Instale el sujetador de la manguera Sujetador de de drenaje en el panel trasero de la manguera de desagüe la lavadora. Oriente la manguera de drenaje a través del sujetador e inserte el extremo libre en la abertura del drenaje de su hogar. NOTA: Si se requiere una manguera de drenaje más larga, mande a pedir el equipo de extensión de la manguera de drenaje, número de pieza GE Appliances WH49X301.
Instrucciones de instalación REQUISITOS ELÉCTRICOS ADVERTENCIA INSTRUCCIONES DE CONEXIÓN A TIERRA Este electrodoméstico deberá estar conectado a tierra. En caso de avería o mal funcionamiento, la conexión a tierra reducirá el riesgo de descargas eléctricas al brindar un camino con una resistencia menor para la corriente eléctrica. Este electrodoméstico está equipado con un cable con un conductor para la conexión a tierra del equipo y un enchufe con conexión a tierra.
Antes de llamar para solicitar servicio…Consejos para la solución de problemas. ¡Ahorre tiempo y dinero! Consulte primero las tablas de las páginas siguientes o visite GEAppliances.com y quizás no necesite llamar al servicio.
Antes de llamar para solicitar servicio…Consejos para la solución de problemas. ¡Ahorre tiempo y dinero! Consulte primero las tablas de las páginas siguientes o visite GEAppliances.com y quizás no necesite llamar al servicio.
www.Hotpoint.com RENDIMIENTO (cont.) Enganches, agujeros, desgarros, rasgones o desgaste excesivo Arrugas SONIDOS Causas posibles Qué hacer Alfileres, broches, ganchos, botones cortantes, hebillas de cinturón, cierres y objetos cortantes dejados en los bolsillos Cierre broches, ganchos, botones y cierres. Retire los objetos sueltos como alfileres, objetos en los bolsillos y botones cortantes. De vuelta las prendas de punto (que se enganchan fácilmente).
Notas.
www.Hotpoint.
Notas.
Garantía de la lavadora Hotpoint. Todos los servicios de garantía se ofrecen a través de nuestros centros de asistencia técnica o un técnico autorizado de Customer Care®. Para programar servicio, visite la página www.Hotpoint.com o llame al 800.GE.CARES (1.800.432.2737). Cuando llame para solicitar servicio, por favor tenga a mano el número de serie y el número de modelo. Engrape el recibo aquí. Se necesita el comprobante con la fecha de compra original para que la garantía cubra los servicios.
Soporte al consumidor. Página Web de Hotpoint www.Hotpoint.com ¿Tiene alguna pregunta sobre su electrodoméstico? ¡Pruebe la página Web de Hotpoint 24 horas al día, cualquier día del año! Para mayor conveniencia y servicio más rápido, ya puede descargar los Manuales de los Propietarios, pedir piezas o incluso hacer una cita en línea para que vengan a realizar una reparación. Solicite una reparación www.Hotpoint.com El servicio de expertos Hotpoint está a tan sólo un paso de su puerta.